The discussion of the Alien series of films and the props used in them is the aim, but if it's got Big Bugs and Big Guns, then they are welcome too!


Post new topic Reply to topic  [ 33 posts ]  Go to page 1, 2  Next
Author Message
 Post subject: Pulse Madness: Build#2- 2/3rd scale MINI/son's pulse (DONE!)
PostPosted: Tue Mar 24, 2015 4:06 pm 
THAT guy
User avatar

Location: Virginia
Service Number: A03/TQ2.0.02146E1
Country: United States
I am finally getting around to committing time to build my son a Pulse rifle. I can say already it has not gone as well as I had hoped! But I will document it anyways just in case it gives anyone ideas which shouldn't be too hard to improve upon :wink:

"The Recipe" I am using for a roughly 2/3rd scale Pulse rifle is as follows:

-A model "766" Air Soft Gun. They don't claim any mention of the "thompson" on the packaging or on most headlines, but if you search 766, 766A, or 766A1 you can probably track one down. They are spring powered airsoft guns and are roughly 2/3 scale thompsons. Quite a bit of modifying is necessary, but as an 'out of the box' mini thompson it was a good foundation and far more accurate than any toy I have found.
Attachment:
766A 1 airsoft gun.jpg
766A 1 airsoft gun.jpg [ 78.72 KiB | Viewed 11432 times ]


-A Crossman Stinger S30 airsoft shotgun. These are no longer made as crossman shotgun line is up the Stinger S34 now. I picked this up back in 1999 thinking I would use it on my own pulse rifle. I instantly recognized the fact it was an SPAS-12, but had no clue back then that it was way too small. I eventually realized it and it has been in a drawer ever since.
Attachment:
crosman-s30.jpg
crosman-s30.jpg [ 6.83 KiB | Viewed 11432 times ]


*The Franchi licensed SPAS-12s spring powered airsoft are actually nearly identical. Despite claims that it is a 1:1 prop, they are undersized. They have better build quality in the airosft internal parts over the Crossman, but the cages are possibly even from the same mold. I held both next to each other and they are identical in size/dimensions. They are not cheap, but they are easier to find and the black plastic is also probably preferable.


Just lining the parts up I figured I was on the right track
Attachment:
20141017_065719.jpg
20141017_065719.jpg [ 251.19 KiB | Viewed 11432 times ]


Then I got to cutting and trimming. This is the rough out under the 'guts' of 1:1 resin parts.
Attachment:
20141208_134257.jpg
20141208_134257.jpg [ 125.24 KiB | Viewed 11432 times ]


Last edited by bigbisont on Mon Apr 06, 2015 3:31 pm, edited 3 times in total.

Top
 Profile  
Reply with quote  
 Post subject: Re: Pulse Rifle Madness: 2nd build - the 2/3rd scale MINI
PostPosted: Tue Mar 24, 2015 4:39 pm 
THAT guy
User avatar

Location: Virginia
Service Number: A03/TQ2.0.02146E1
Country: United States
And on to the build!

-I disabled the functionality of the airsoft (no good could come of this in the hands of the youngin'). I removed all components except the spring tension on the trigger.

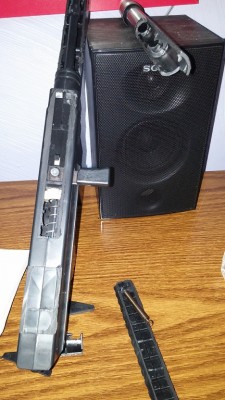
-The tactical rails and rear site need to be cut off. They are molded on. This leave the spring dangling on the cocking handle (it was attached to the rail area) so I removed that spring as well. I will have to glue a cover on that
Attachment:
20141117_125201.jpg
20141117_125201.jpg [ 210.14 KiB | Viewed 11429 times ]


-You will want to toss the parts you don't need into a trash can far far away! To give the gun weight it appears they filled the stock with plaster (at least I hope its plaster, because the dust from it was everywhere not just the stock) and the magazine with a rusty chunk of steel! (silly cheap chinese products)
Attachment:
20141231_212348_HDR.jpg
20141231_212348_HDR.jpg [ 286.25 KiB | Viewed 11429 times ]


-The handle does come off seperately, so I removed mine in order to trim it up more accurately. Not enough material is there so a hole did get cut into the front when I removed the 'nub' on the grip area. I'll have to fill that in. I did get nice slits on it from a regular hacksaw.

-I wanted to make the grenade launcher a live fire item of "suction cup darts". To do this I bought a cheap suction cup dart shotgun that would fit in the cage. This plan failed horribly!!! The cheap suction cup shotgun was not able to be shortened and keep its firing mechanism. Neither its 'guts' nor its frame could stand up to much modding. I guess it looks better in there than foam though, so I will be using it if for no other reason than lightweight filler with a spring tension trigger.

Attachment:
20150323_192555.jpg
20150323_192555.jpg [ 191.93 KiB | Viewed 11429 times ]


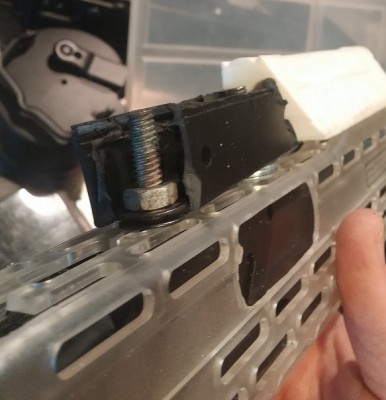
Once I abandoned hope of any functionality to the piece, I went ahead and ran two long bolts through the body of the shotgun, sandwiched the SPAS halves around it and bolted it to the for forend of the thompson. Then I promptly dropped it and it broke at the bolt points! Such cheap plastic...sigh...

This shot gives new meaning to "exploded view" of what I did, eh?... :roll:
Attachment:
20150323_201740.jpg
20150323_201740.jpg [ 102.39 KiB | Viewed 11429 times ]


So I glued it back together. I will reinforce it later.


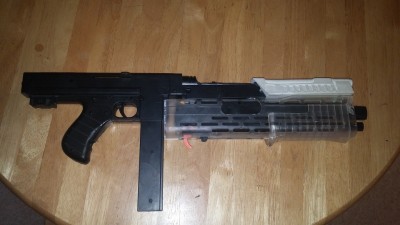
I had been hanging on to the resin barrel/vent from my very first pulse rifle for years. It was a poorly cast, undersized 10-hole varient that was surely recast from someone elses kit (but I was dumb and didn't know better back then). I went and removed 2 x holes from the middle and reglued it back together. It is now a very mini and very durable front end. The parts that it is screwed to...not so solid. But it is a start.

So this is where I am at. It is not at all like I planned, but at least the project is finally moving.
Attachment:
20150323_202113.jpg
20150323_202113.jpg [ 191.1 KiB | Viewed 11429 times ]


Last edited by bigbisont on Tue Mar 24, 2015 8:42 pm, edited 1 time in total.

Top
 Profile  
Reply with quote  
 Post subject: Re: Pulse Madness: Build#2 - the 2:3rd scale MINI/kid pulse
PostPosted: Tue Mar 24, 2015 7:26 pm 
reload
User avatar

Location: Hamburg
Service Number: A03/TQ3.0.12136E1
Country: Germany
Great progress.
I had the same issues when looking for an AirSoft SPAS-12 nearly all where despite claims undersized.
Does the drum indicate that your also working on something "larger”? ;)

_________________
Sgt. Frank Peters 'reload' Smartgun Operator
A03/TQ3.0.12136E1 "It will be no picknick!"
AL Colonial Admin. - Sergeant at Arms (SgtA) -- 2020-2022
GERCM - Executive Officer (XO)
UKCM Foreign Legion: The Deviant Dragoons


Top
 Profile  
Reply with quote  
 Post subject: Re: Pulse Madness: Build#2 - the 2:3rd scale MINI/kid pulse
PostPosted: Tue Mar 24, 2015 8:40 pm 
THAT guy
User avatar

Location: Virginia
Service Number: A03/TQ2.0.02146E1
Country: United States
577_ops wrote:
Great progress.
I had the same issues when looking for an AirSoft SPAS-12 nearly all where despite claims undersized.
Does the drum indicate that your also working on something "larger”? ;)


Thanks, and yeah...got a little something on the back burner :wink: I hope to dive into that here in the next month or so. I have a big list and not a lot of time to squeez it all in!


Top
 Profile  
Reply with quote  
 Post subject:
PostPosted: Tue Mar 24, 2015 9:04 pm 
Mobile Mayhem
User avatar

Location: Rapid View, Saskatchewan
Service Number: A10/TQ1.O.32157E1
Country: Canada
I've been waiting for this thread to pop up!

Watching intently!

_________________
Lt. Melissa L. Klassen, ALG
AL Colonial Admin. - Executive Officer (XO) -- 2021-2022
RCCM | Royal Canadian Colonial Marines - Commanding Officer (CO) -- 2021-2022

Read the AL Charter Rules & Regulations: https://docs.google.com/document/d/1i3gd9QUyIqI_6rfk8kpxspbKU-JT4MBAjLPxfCkvGJ8


Top
 Profile  
Reply with quote  
 Post subject:
PostPosted: Tue Mar 24, 2015 9:53 pm 
User avatar

Location: Kent, UK
This is looking amazing! can't wait to see more.


Top
 Profile  
Reply with quote  
 Post subject: Re: Pulse Madness: Build#2 - the 2:3rd scale MINI/kid pulse
PostPosted: Thu Mar 26, 2015 8:27 pm 
THAT guy
User avatar

Location: Virginia
Service Number: A03/TQ2.0.02146E1
Country: United States
I have no idea if this will work, but I'm going to try and do a cardboard shroud then fiberglass it. I guess technically you could call it a pepakura attempt.

Today I drew, cut and a taped up the frame work.
Attachment:
20150326_135333.jpg
20150326_135333.jpg [ 156.44 KiB | Viewed 11339 times ]


Fit is pretty good! I hope I can keep the translation over into a more solid form and not collapse it attempting to glass it!
(like oh so many of my previous fiberglass attempts)
Attachment:
20150326_132515.jpg
20150326_132515.jpg [ 152.49 KiB | Viewed 11339 times ]


Top
 Profile  
Reply with quote  
 Post subject:
PostPosted: Thu Mar 26, 2015 10:42 pm 
Prop Churner Outer
User avatar

Location: Bath, Maine
Service Number: A03/TQ1.0.12143G1
Country: United States
Damn! That looks good man! Before you glass it retrace the pattern on a second backup sheet. You could also use thin plastic sheeting and then fill it in with bondo...

_________________
:delta: My entry-level prop and costume tutorials: viewtopic.php?f=3&t=12751 :delta:


Top
 Profile  
Reply with quote  
 Post subject:
PostPosted: Fri Mar 27, 2015 12:53 am 
Harvester of Sorrow
User avatar

Location: Lancashire (Wirral born)
Service Number: A04/TQ1.0.32156E1
Country: United Kingdom
Looking awesome mate!
I'd go with Retro's suggestion, might be a be lighter for your mini-marine to carry around than fibreglass.

_________________
Image AKA: Simon


Top
 Profile  
Reply with quote  
 Post subject: Re: Pulse Madness: Build#2 - the 2:3rd scale MINI/kid pulse
PostPosted: Fri Mar 27, 2015 6:50 pm 
THAT guy
User avatar

Location: Virginia
Service Number: A03/TQ2.0.02146E1
Country: United States
The initial fiberglass coat went well! I bulked up the magazine portion a bit with more cardboard then gave everything a once-over in resin.

It worked out so well, I think I may not bother with the mat/cloth. Its pretty rigid as is and now I think I may fill the 'pillars' and mag area with a bit of expanding foam. I think it will stay fairly light and be plenty durable.

Attachment:
20150327_133152.jpg
20150327_133152.jpg [ 231.25 KiB | Viewed 11284 times ]


Plus...I plan to add some aluminum channel to the shroud. I will put one strip upside down along the top rail (strength to carry handle plus a ready made site groove), then I will epoxy these rails I cut into the shroud bottom rail so it hugs the thompson ridges firmly:

Cut
Attachment:
20150131_155917.jpg
20150131_155917.jpg [ 259.61 KiB | Viewed 11284 times ]


Then will hug the ridges like so:
Attachment:
20150131_155938.jpg
20150131_155938.jpg [ 89.7 KiB | Viewed 11284 times ]


Everything as you saw it above was just a hair over 1lb, so still pretty light. Still need to see how much weight the foam and the stock add (undecided material for the stock) but I am confident it will be well under 1.5lbs.


Top
 Profile  
Reply with quote  
 Post subject:
PostPosted: Fri Mar 27, 2015 9:56 pm 
Mobile Mayhem
User avatar

Location: Rapid View, Saskatchewan
Service Number: A10/TQ1.O.32157E1
Country: Canada
Haha dude, I might be commissioning you again if you'll accept! Those shrouds are pretty awesome!

_________________
Lt. Melissa L. Klassen, ALG
AL Colonial Admin. - Executive Officer (XO) -- 2021-2022
RCCM | Royal Canadian Colonial Marines - Commanding Officer (CO) -- 2021-2022

Read the AL Charter Rules & Regulations: https://docs.google.com/document/d/1i3gd9QUyIqI_6rfk8kpxspbKU-JT4MBAjLPxfCkvGJ8


Top
 Profile  
Reply with quote  
 Post subject: Re:
PostPosted: Fri Mar 27, 2015 10:04 pm 
THAT guy
User avatar

Location: Virginia
Service Number: A03/TQ2.0.02146E1
Country: United States
Moosh89 wrote:
Haha dude, I might be commissioning you again if you'll accept! Those shrouds are pretty awesome!


I'll keep you posted, and its a bit early to get your hopes up, but I am thinking about trying to cast it when it really gets "done".

Already from when I posted that last update to now, I am starting to have second thoughts about its strength 'as-is' with just foam. Plus it would be good practice. I will be scratch building a 1:1 shroud later with plans to mold and do fiberglass casts. I might as well find out of my planned method works with this thing. If the casting works out, you will be the first to know!


Top
 Profile  
Reply with quote  
 Post subject: Re: Pulse Madness: Build#2 - the 2:3rd scale MINI/kid pulse
PostPosted: Tue Mar 31, 2015 5:38 pm 
THAT guy
User avatar

Location: Virginia
Service Number: A03/TQ2.0.02146E1
Country: United States
Well, hit a snag on all fronts.

I didnt want to make the shrouds two halves (like a real Pulse) for durability reasons and in its cardboard form I could just slide the Thompson in and out the back after removing the grip. Unfortunately after adding the aluminum strips and foam, the fit became too snug to be able to continue doing that.

I decided to cut it in top and bottom halves instead, again, for durability reasons. The top carry handle wont be going anywhere when I put the bands on the back and the mag base will still be very tight so long as the magazine is in. I am doing a clip/overhand thing to keep them connected when the mag is not in place though. I still have full faith this will work, but its getting ugly! Its going to need a lot of cleanup.

Attachment:
20150330_201330.jpg
20150330_201330.jpg [ 213.44 KiB | Viewed 11185 times ]

Attachment:
20150330_201351.jpg
20150330_201351.jpg [ 144.84 KiB | Viewed 11185 times ]


Doing another layer of resin to fill in damage caused from metal and foam applications before sanding and paint tonight.


Top
 Profile  
Reply with quote  
 Post subject: Re: Pulse Madness: Build#2 - the 2:3rd scale MINI/kid pulse
PostPosted: Wed Apr 01, 2015 4:55 pm 
THAT guy
User avatar

Location: Virginia
Service Number: A03/TQ2.0.02146E1
Country: United States
I made the lower and upper half detachable via a tab that is attached to the inside of mag portion and hangs on the bottom rail. It is all very snug when both sides are locked in and I do not fear them coming apart. To disassemble it, I just remove the magazine and 'unhook' them. It all comes apart well.

Attachment:
20150401_112722.jpg
20150401_112722.jpg [ 148.14 KiB | Viewed 11147 times ]


However, despite the progres..this project is losing steam! After a proper paint job and weathering the imperfections are sure to blend away, but man this is ugly. Sorry Moosh, it would appear this is NOT going to be the item I practice casting on.
Attachment:
20150401_112658.jpg
20150401_112658.jpg [ 173.71 KiB | Viewed 11147 times ]

Attachment:
20150401_112707.jpg
20150401_112707.jpg [ 147.59 KiB | Viewed 11147 times ]


To top is all off....KIDS!!! Ugh, they fill your soul one minute, then break your heart the next!

After some painting other parts I was starting to get a bit fired up because it was actually looking like a Pulse. So I did a dry fit and slapped the parts together to show my son the progress. He took one look at it and said, "Does it shoot anything?" "Um...no", I said. "It just looks cool and works just like mine. Thats pretty awesome right!?". He didn't even respond, he just went back to watching ninja turtles!!! GAAAAHHH!!!


So...I will eventually re-tackle the shrouds some day, but after that last dagger of indifference I can't get motivated to start all over. I will definitely finish it, though. Tonight I will work on the little bits/extras that the shrouds and GL are missing. That kid is getting a dang pulse whether he likes it or not!


Top
 Profile  
Reply with quote  
 Post subject:
PostPosted: Wed Apr 01, 2015 5:17 pm 
Prop Churner Outer
User avatar

Location: Bath, Maine
Service Number: A03/TQ1.0.12143G1
Country: United States
Oh man, I feel your pain. My sever year old was soooo pumped when I was building my flame thrower, because he thought it would actually work. Once he learned it was a static prop it became far less interesting. Aren't they supposed to be the ones with huge imaginations? Hell, I remember my brother and I turning any stick we found with a forked branch on it into guns.

You're a good dad for seeing this through and someday he'll appreciate it far more than a store bought dart gun with a Ninja Turtle sticker on the side.

_________________
:delta: My entry-level prop and costume tutorials: viewtopic.php?f=3&t=12751 :delta:


Top
 Profile  
Reply with quote  
 Post subject: Re:
PostPosted: Wed Apr 01, 2015 5:48 pm 
THAT guy
User avatar

Location: Virginia
Service Number: A03/TQ2.0.02146E1
Country: United States
retrogarde wrote:
Oh man, I feel your pain. My sever year old was soooo pumped when I was building my flame thrower, because he thought it would actually work. Once he learned it was a static prop it became far less interesting. Aren't they supposed to be the ones with huge imaginations? Hell, I remember my brother and I turning any stick we found with a forked branch on it into guns.

You're a good dad for seeing this through and someday he'll appreciate it far more than a store bought dart gun with a Ninja Turtle sticker on the side.


Ha, yeah someday he will appreciate it. Guess I dodged a bullet when I built him that armor! That could have been truly soul crushing!


Top
 Profile  
Reply with quote  
 Post subject:
PostPosted: Wed Apr 01, 2015 10:56 pm 
Mobile Mayhem
User avatar

Location: Rapid View, Saskatchewan
Service Number: A10/TQ1.O.32157E1
Country: Canada
No worries, maybe I will return the favour sometime and come up with a solution before you get to finish (I doubt it though!! haha)

If I do, you will be the first to know!

_________________
Lt. Melissa L. Klassen, ALG
AL Colonial Admin. - Executive Officer (XO) -- 2021-2022
RCCM | Royal Canadian Colonial Marines - Commanding Officer (CO) -- 2021-2022

Read the AL Charter Rules & Regulations: https://docs.google.com/document/d/1i3gd9QUyIqI_6rfk8kpxspbKU-JT4MBAjLPxfCkvGJ8


Top
 Profile  
Reply with quote  
 Post subject:
PostPosted: Thu Apr 02, 2015 10:11 am 
User avatar

Location: Kent, UK
It might be worth getting some 3mm/4mm thick styrene and giving it another shot. That way you won't have to deal at all with fibreglass and will get a very clean smooth result.

Heres a set I made using styrene...

Image
Image
Image
Image


Top
 Profile  
Reply with quote  
 Post subject: Re:
PostPosted: Thu Apr 02, 2015 12:54 pm 
THAT guy
User avatar

Location: Virginia
Service Number: A03/TQ2.0.02146E1
Country: United States
nick-a-tron wrote:
It might be worth getting some 3mm/4mm thick styrene and giving it another shot. That way you won't have to deal at all with fibreglass and will get a very clean smooth result.

Heres a set I made using styrene...


That def looks great. I have a little bit of this stuff I have used for detail bits on other projects, but have never gone anywhere near that scale. How would you rate its durability? Specifically, how would it hold up if a 4 year old tossed it to ground while in a dead sprint to jump on something (or someone)?


Top
 Profile  
Reply with quote  
 Post subject:
PostPosted: Fri Apr 03, 2015 9:32 am 
User avatar

Location: Kent, UK
It's strong enough for general handling but don't think it would hold up well to being tossed on the ground etc. It could always be re-enforced on the inside if need be though.


Top
 Profile  
Reply with quote  
 Post subject:
PostPosted: Fri Apr 03, 2015 12:40 pm 
Harvester of Sorrow
User avatar

Location: Lancashire (Wirral born)
Service Number: A04/TQ1.0.32156E1
Country: United Kingdom
Expanding foam would help

_________________
Image AKA: Simon


Top
 Profile  
Reply with quote  
 Post subject: Re: Pulse Madness: Build#2 - the 2:3rd scale MINI/son's puls
PostPosted: Mon Apr 06, 2015 3:29 pm 
THAT guy
User avatar

Location: Virginia
Service Number: A03/TQ2.0.02146E1
Country: United States
Well, v1.0 is complete.

-I decided NOT to add a stock at all. They can be fairly cumbersome and unwieldy to those not used to them on their own, plus it became appearent even at 2:3 scale it might be a bit too big for him to hand comfortably (as seen soon in the pictures!). It is easier for him to play with without the stock.

-I just ran with what I already made regarding the shrouds. The way I see it, when he breaks it (and he almost certainly will) I will do a better shroud on v2.0. If he doesn't break it, then I will upgrade the shrouds when he is actually old enough to appreciate the upgrade.


But for now I am done. I added some eyelet screws as sling point mounts. Sling is a perfect use of my old 'canteen straps'. Front 'blaze orange' barrel tips are from the massive drawer past airsoft and toy guy parts.

Attachment:
20150405_121615.jpg
20150405_121615.jpg [ 256.13 KiB | Viewed 11003 times ]

Attachment:
20150405_121624.jpg
20150405_121624.jpg [ 260.22 KiB | Viewed 11003 times ]


And to get him on board really required nothing more than getting mine and running around the house pretending to shoot aliens (he still has never seen the movie, but he has seen enough TV to know "Aliens" are usually bad guys.

Attachment:
20150405_121933.jpg
20150405_121933.jpg [ 148.58 KiB | Viewed 11003 times ]

Attachment:
20150405_122000.jpg
20150405_122000.jpg [ 214.92 KiB | Viewed 11003 times ]


Top
 Profile  
Reply with quote  
 Post subject: Re: Pulse Madness: Build#2- 2/3rd scale MINI/son's pulse (DO
PostPosted: Mon Apr 06, 2015 5:13 pm 
reload
User avatar

Location: Hamburg
Service Number: A03/TQ3.0.12136E1
Country: Germany
Great Work!
Glad your son also likes it.

_________________
Sgt. Frank Peters 'reload' Smartgun Operator
A03/TQ3.0.12136E1 "It will be no picknick!"
AL Colonial Admin. - Sergeant at Arms (SgtA) -- 2020-2022
GERCM - Executive Officer (XO)
UKCM Foreign Legion: The Deviant Dragoons


Top
 Profile  
Reply with quote  
 Post subject:
PostPosted: Mon Apr 06, 2015 8:05 pm 
Mobile Mayhem
User avatar

Location: Rapid View, Saskatchewan
Service Number: A10/TQ1.O.32157E1
Country: Canada
Cool Dad!

My Dad calls me a winkie hahaha

_________________
Lt. Melissa L. Klassen, ALG
AL Colonial Admin. - Executive Officer (XO) -- 2021-2022
RCCM | Royal Canadian Colonial Marines - Commanding Officer (CO) -- 2021-2022

Read the AL Charter Rules & Regulations: https://docs.google.com/document/d/1i3gd9QUyIqI_6rfk8kpxspbKU-JT4MBAjLPxfCkvGJ8


Top
 Profile  
Reply with quote  
 Post subject: Re: Pulse Madness: Build#2- 2/3rd scale MINI/son's pulse (DO
PostPosted: Mon Apr 06, 2015 8:22 pm 
You tell me man, I only work here.
User avatar

Location: Los Angeles
Country: United States
Very Cool!


Top
 Profile  
Reply with quote  
Display posts from previous:  Sort by  
Post new topic Reply to topic  [ 33 posts ]  Go to page 1, 2  Next


You cannot post new topics in this forum
You cannot reply to topics in this forum
You cannot edit your posts in this forum
You cannot delete your posts in this forum
You cannot post attachments in this forum

Search for:
Jump to:  
cron