The discussion of the Alien series of films and the props used in them is the aim, but if it's got Big Bugs and Big Guns, then they are welcome too!


Post new topic Reply to topic  [ 20 posts ] 
Author Message
 Post subject: HCG Pulse rilfe shroud removal
PostPosted: Sun Oct 31, 2010 12:18 pm 

Location: leicester, uk
Country: United Kingdom
Just spent the last hour removing my shrouds from my HCG pulse rifle so thought i would post a quick mention as may be useful for other people. I had read Matsuo's guide to removal and it was very helpful.
Attachment:
IMAG0459.jpg
IMAG0459.jpg [ 66.71 KiB | Viewed 6243 times ]


I heated my oven to 250, My oven is too small to fit the whole pulse rifle in so i just put it in as far as i could with about 1/2 the GL sticking out, I shut the oven door as much as i could and left it for about 5 Minutes.

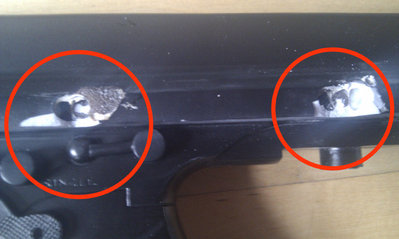
It was pretty hot when taken out and like Matsuo guide i started with the mad base and gently pryed it apart with screwdrivers, then i started at the back and pried apart more, the shroud popped off quite easy on one side, but ripped off part of the thompson where the Glue lugs where, maybe this was because it wasnt hot enough, but these are not noticible if i was to reuse the thompson. Seen here in red circles. Maybe more heat would of helped this.
Attachment:
IMAG0461.jpg
IMAG0461.jpg [ 78.96 KiB | Viewed 6243 times ]

Attachment:
IMAG0466.jpg
IMAG0466.jpg [ 69 KiB | Viewed 6243 times ]


The next stage i was pretty cautious about as In Matsuos review he said that the thompson always split at the ejector port, So I pried apart the other side a bit more and managed to slip some masking tape inside and wrap it around the ejector port for strength. as the resin is semi flexible when removing the shroud. I held the ejector as much as I could too and pried the other half of the shroud off but it still cracked a little, but this was once again not visible and would be hidden by a new shroud if i was to reuse. (see red circle below)
Attachment:
IMAG0462.jpg
IMAG0462.jpg [ 65.71 KiB | Viewed 6243 times ]


All in all I was surprised at how easy the removal was. and you can use a bit of force in removing them, The whole process might of been easier if i was able to heat up the unit more, but im happy with how it turned out.


Top
 Profile  
Reply with quote  
 Post subject: Re: HCG Pulse rilfe shroud removal
PostPosted: Sun Oct 31, 2010 4:43 pm 
Lifer
User avatar

Location: **Hamilton** Active Duty: USS Socorro
Country: Canada
From what I've seen your Thompson survived the removal process much better than others!

Thanks for posting! :delta:


Kevin

_________________
I told you I'd shoot, but you didn't believe me! WHY DIDN'T YOU BELIEVE ME!?!


Last edited by SSgt Burton on Mon Nov 01, 2010 3:56 pm, edited 1 time in total.

Top
 Profile  
Reply with quote  
 Post subject: Re: HCG Pulse rilfe shroud removal
PostPosted: Mon Nov 01, 2010 1:28 pm 

Location: leicester, uk
Country: United Kingdom
I need to remove a few millimetres of aluminium from the insides to make my Thompson upper fit, Can anyone suggest the best way to remove some excess aluminium? I don't have access to a milling machine, but have a Dremel and a Drill!

cheers people


Top
 Profile  
Reply with quote  
 Post subject: Re: HCG Pulse rilfe shroud removal
PostPosted: Mon Nov 01, 2010 3:39 pm 
You tell me man, I only work here.
User avatar

Location: Los Angeles
Country: United States
What kind of thompson?

I'd use a dremel and files. Maybe you can highlight the removal areas.


Top
 Profile  
Reply with quote  
 Post subject: Re: HCG Pulse rilfe shroud removal
PostPosted: Mon Nov 01, 2010 4:21 pm 
Ready to Rock & Roll!
User avatar

Location: Rochester, Kent, U.K.
Service Number: A08/TQ2.0.72136E1
Country: United Kingdom
IIRC, Matsuo had to remove some metal on each side, under the bolt and near the safety/rof selectors.

_________________
Steve
Corporal in 69th Regt. 1st Batt. Homer’s Heroes.

"I'd like to die at the age of 80 in my own bed, with a belly full of wine and a girl's mouth around my c**k."


Top
 Profile  
Reply with quote  
 Post subject: Re: HCG Pulse rilfe shroud removal
PostPosted: Mon Nov 01, 2010 4:26 pm 
User avatar

Location: Southern Sweden
xstoka wrote:
Just spent the last hour removing my shrouds from my HCG pulse rifle so thought i would post a quick mention as may be useful for other people. I had read Matsuo's guide to removal and it was very helpful.
Attachment:
IMAG0459.jpg


I heated my oven to 250, My oven is too small to fit the whole pulse rifle in so i just put it in as far as i could with about 1/2 the GL sticking out, I shut the oven door as much as i could and left it for about 5 Minutes.


Would it be possible for you to post this pic in even larger size? I mean really big so one can take a good look to the GL details. Matsuo had one but it was too blurry (slightly off focus), I like yours.

Also is the 250 degrees on your oven Celsius ?

Regards
JOnsey


Top
 Profile  
Reply with quote  
 Post subject: Re: HCG Pulse rilfe shroud removal
PostPosted: Mon Nov 01, 2010 5:04 pm 
User avatar

Location: Chicago
Is this to use the parts in another build?

_________________
No, they are not going to see this coming...


Top
 Profile  
Reply with quote  
 Post subject: Re: HCG Pulse rilfe shroud removal
PostPosted: Mon Nov 01, 2010 8:24 pm 

Location: leicester, uk
Country: United Kingdom
Quote:

Would it be possible for you to post this pic in even larger size? I mean really big so one can take a good look to the GL details. Matsuo had one but it was too blurry (slightly off focus), I like yours.

Also is the 250 degrees on your oven Celsius ?

Regards
JOnsey


Are these pictures any better?

My oven must be Celsius i think, i turned it up to maximum and 250 was the highest it goes.

Attachment:
IMG00558-20101101-1911.jpg
IMG00558-20101101-1911.jpg [ 153.46 KiB | Viewed 6123 times ]

Attachment:
IMG00557-20101101-1911.jpg
IMG00557-20101101-1911.jpg [ 193.04 KiB | Viewed 6123 times ]

Attachment:
IMG00556-20101101-1911.jpg
IMG00556-20101101-1911.jpg [ 207.33 KiB | Viewed 6123 times ]

Attachment:
IMG00555-20101101-1910.jpg
IMG00555-20101101-1910.jpg [ 205.08 KiB | Viewed 6123 times ]


Top
 Profile  
Reply with quote  
 Post subject: Re: HCG Pulse rilfe shroud removal
PostPosted: Mon Nov 01, 2010 8:26 pm 

Location: leicester, uk
Country: United Kingdom
Noble wrote:
What kind of thompson?

I'd use a dremel and files. Maybe you can highlight the removal areas.


I have a Hudson PFC Thompson that i want to use in my build, ill give the dremel a go


Top
 Profile  
Reply with quote  
 Post subject: Re: HCG Pulse rilfe shroud removal
PostPosted: Mon Nov 01, 2010 11:03 pm 
Ready to Rock & Roll!
User avatar

Location: Rochester, Kent, U.K.
Service Number: A08/TQ2.0.72136E1
Country: United Kingdom
Looking again at the stripped down parts, could you confirm that the receiver and barrel assembly (shown by the green dotted line in the pic below) are all one part or are securely fixed together, maybe at the dotted purple line?

Yours seems to have no droop, so I'm wondering how others (including mine in the second pic below) have drooped;

If it's all one piece, then my thought is that the droop was a fault in the initial moulding/assembling of the receiver/barrel, so there'd be no way to fix the droop.

If there's a fixing point at the area where I show a dotted purple line, then drooped PRs may have broken/cracked at that point, so re-gluing the GL at a lifted position would correct the droop.

I also outline what appears to be all the glue fixing lugs.

As you can see in my pic, the main receiver is perfectly level, compared to the severe droop of the whole barrel assembly, so it'd be handy to know if it's easy to fix it. :)

bare.jpg
bare.jpg [ 117.21 KiB | Viewed 6102 times ]

bare2.jpg
bare2.jpg [ 123.99 KiB | Viewed 6102 times ]


_________________
Steve
Corporal in 69th Regt. 1st Batt. Homer’s Heroes.

"I'd like to die at the age of 80 in my own bed, with a belly full of wine and a girl's mouth around my c**k."
Top
 Profile  
Reply with quote  
 Post subject: Re: HCG Pulse rilfe shroud removal
PostPosted: Tue Nov 02, 2010 1:26 pm 

Location: leicester, uk
Country: United Kingdom
HI PVB

My pulse did have a slight droop, it was noticeable but not as bad as others I have seen.

I have re put one half of my shroud on but cant really see a droop any more.
Attachment:
IMAG0469.jpg
IMAG0469.jpg [ 580.75 KiB | Viewed 6057 times ]


To help out how, in the below picture you can see two red circles, these are lugs that are attached to the shroud (on the other side there is only 1 lug). The blue circle is how the GL is attached to the Thompson. This blue section is movable, so I can aim the GL down or up slightly (make it droopy).
Attachment:
IMAG0470.jpg
IMAG0470.jpg [ 277.46 KiB | Viewed 6057 times ]


My thoughts are in regard to the droop are that the lugs should hold the GL straight to the Thompson if positioned right. However (I'm kind of guessing), the lugs have about 1mm of space around them for the glue, which would mean that there is up to possibly 1 - 2mm of movement if not held correctly while the glue is drying. Which could easily cause the droop that people are seeing. here is some more pictures of the lugs and where they go. I hope this helps
Attachment:
IMAG0480.jpg
IMAG0480.jpg [ 212.71 KiB | Viewed 6057 times ]

Attachment:
IMAG0481.jpg
IMAG0481.jpg [ 209.44 KiB | Viewed 6057 times ]

Attachment:
IMAG0482.jpg
IMAG0482.jpg [ 194.61 KiB | Viewed 6057 times ]


Top
 Profile  
Reply with quote  
 Post subject: Re: HCG Pulse rilfe shroud removal
PostPosted: Tue Nov 02, 2010 1:48 pm 
Ready to Rock & Roll!
User avatar

Location: Rochester, Kent, U.K.
Service Number: A08/TQ2.0.72136E1
Country: United Kingdom
That explains the GL drooping, but not the barrel as well, so it looks like the barrel also has some movement up/down somehow?

Edit: See the pic below for more info:

Is the section outlined in green still part of the solid receiver, or is it a separate mounting part for the barrel assembly (purple line), as it is angled/drooped down at the front and up at the back in the pic?

bare3.jpg
bare3.jpg [ 436.33 KiB | Viewed 6047 times ]


_________________
Steve
Corporal in 69th Regt. 1st Batt. Homer’s Heroes.

"I'd like to die at the age of 80 in my own bed, with a belly full of wine and a girl's mouth around my c**k."
Top
 Profile  
Reply with quote  
 Post subject: Re: HCG Pulse rilfe shroud removal
PostPosted: Tue Nov 02, 2010 2:25 pm 
User avatar

Location: Southern Sweden
Absolutely great thread & Pictures!!!
Many thanks to all :D

Im suffering from a "u" shaped GL (besides being angled to starboard but thats a later issue). But I'm not as macho as you guys splitting the shroud apart and so I'm pondering on ways to fix it with external means.
My theory is to heat it and maybe try to jam down a screwdriver along the GL between the barrel and spas cage just under the shroud and see if one can push down the rear GL a bit. And after a new heating insert the screw driver (or similar) in to the Thompson barrel and see if one can pull it up and correct the angle until satisfaction.

Any comments?

Also my second question is how the GL plastic and ammo counter reacts to the heat. I have been doing some LED work previously and recall it to be very susceptible to heat.

Regards
Jonsey


Top
 Profile  
Reply with quote  
 Post subject: Re: HCG Pulse rilfe shroud removal
PostPosted: Tue Nov 02, 2010 2:49 pm 

Location: leicester, uk
Country: United Kingdom
PVB wrote:
That explains the GL drooping, but not the barrel as well, so it looks like the barrel also has some movement up/down somehow?

Edit: See the pic below for more info:

Is the section outlined in green still part of the solid receiver, or is it a separate mounting part for the barrel assembly (purple line), as it is angled/drooped down at the front and up at the back in the pic?


Hello again, The barrel is not part of the Thompson reciever, it looks like it is attached somehow but is very loose so bends downwards when the GL moves.

The section you outlined in Green is part of the solid receiver, the receiver ends at the barrel, There is a hole (unsure of how deep) into the receiver that the barrel slots into. I cant pull the barrel out so I assume it is fixed somehow. But as mentioned it flexes so the hole is not a "tight fit"


Top
 Profile  
Reply with quote  
 Post subject: Re: HCG Pulse rilfe shroud removal
PostPosted: Tue Nov 02, 2010 3:17 pm 

Location: UK
Country: United Kingdom
I bought some shrouds off matt, and it came with the counter.

I think he cooks his shrouds.

The counter worked fine..though i removed it and sold it, as i have replicant im puting in it.


Top
 Profile  
Reply with quote  
 Post subject: Re: HCG Pulse rilfe shroud removal
PostPosted: Tue Nov 02, 2010 4:08 pm 
Ready to Rock & Roll!
User avatar

Location: Rochester, Kent, U.K.
Service Number: A08/TQ2.0.72136E1
Country: United Kingdom
@xstoka: Thanks for the info. :)

_________________
Steve
Corporal in 69th Regt. 1st Batt. Homer’s Heroes.

"I'd like to die at the age of 80 in my own bed, with a belly full of wine and a girl's mouth around my c**k."


Top
 Profile  
Reply with quote  
 Post subject: Re: HCG Pulse rilfe shroud removal
PostPosted: Wed Nov 03, 2010 5:17 pm 
Site Admin
User avatar

Location: Wasteland Minnesota, USA
Service Number: A06/TQ2.0.65181E6
Country: United States
Matt told me he believes the rifles were stored right side up after being assembled and before the industrial hot glue had cooled, thus allowing time for sag to set in before the glue had hardened. Inverting the rifle and heating the sides of the shroud to the L/R of the grenade launcher section rear (near the mag well) would "fix" the problem. The key is to heat both sides equally. Not sure how you'd pull that off without some effort or careful kludging. I'd be careful about attempting to put it in the oven. You could do more damage than help.

_________________
"A writer needs a pen, a painter a brush, and a filmmaker an army." - Orson Wells.

http://www.rookscastle.com
http://www.alchemyarms.com


Top
 Profile  
Reply with quote  
 Post subject: Re: HCG Pulse rilfe shroud removal
PostPosted: Wed Nov 03, 2010 6:18 pm 
Ready to Rock & Roll!
User avatar

Location: Rochester, Kent, U.K.
Service Number: A08/TQ2.0.72136E1
Country: United Kingdom
Maybe a hairdrier or two. :)

_________________
Steve
Corporal in 69th Regt. 1st Batt. Homer’s Heroes.

"I'd like to die at the age of 80 in my own bed, with a belly full of wine and a girl's mouth around my c**k."


Top
 Profile  
Reply with quote  
 Post subject: Re: HCG Pulse rilfe shroud removal
PostPosted: Wed Nov 10, 2010 1:34 pm 

Location: leicester, uk
Country: United Kingdom
If it is a help, a couple more pics as I have taken apart the HCG Pulse rifle more.

Here is how the GL is attached to the Thompson receiver.
Attachment:
IMAG0488 [1024x768].jpg
IMAG0488 [1024x768].jpg [ 83.2 KiB | Viewed 5878 times ]


Here is how the barrel is attached to the Thompson Receiver.
Attachment:
IMAG0491 [1024x768].jpg
IMAG0491 [1024x768].jpg [ 74.17 KiB | Viewed 5878 times ]


Word of warning!! too much heat is not good! be very careful if you intend to cook you pulse rifle! I cooked the GL to remove the Barrel Vent (it was glued and screwed), and left it for a bit too long, The paint has blistered and the GL has warped slightly at the bottom. This was after only being in the oven for 4 minutes. So be careful, watch it all the time and smell for burning!
Attachment:
IMAG0518 [1024x768].jpg
IMAG0518 [1024x768].jpg [ 41.52 KiB | Viewed 5878 times ]


Top
 Profile  
Reply with quote  
 Post subject: Re: HCG Pulse rilfe shroud removal
PostPosted: Wed Nov 10, 2010 11:07 pm 
Resin God.
User avatar

Location: St Louis-USA
Country: United States
One thing I always tell people is to preheat the oven (no more than 250-300) and let it stabilize first, dont stick anything in there while the coils are red, the radiation off those things will blister paint in a second. When baking pulse rifles or anything you want to heat and reshape for that matter, even heat over a long period, as opposed to focused heat over a short period is always preferable.

Never put stuff in while it's heating up and the coils are red!

M

_________________
"Stand up for something...Or get knocked down for nothing..."

Image


Top
 Profile  
Reply with quote  
Display posts from previous:  Sort by  
Post new topic Reply to topic  [ 20 posts ] 


You cannot post new topics in this forum
You cannot reply to topics in this forum
You cannot edit your posts in this forum
You cannot delete your posts in this forum
You cannot post attachments in this forum

Search for:
Jump to: