The discussion of the Alien series of films and the props used in them is the aim, but if it's got Big Bugs and Big Guns, then they are welcome too!


Post new topic Reply to topic  [ 339 posts ]  Go to page Previous  1 ... 6, 7, 8, 9, 10, 11, 12 ... 14  Next
Author Message
 Post subject: Re:
PostPosted: Tue Mar 02, 2021 8:56 am 
AKKURAZI
User avatar

Location: Bochum, Ruhr area
Country: Germany
Skiffy wrote:
It's time to start working on the rear ladder. This is going to be soldered up from 1.5mm brass rod.

I've never worked with brass like this before - so I was prepared for it to be a learning curve. Just as well!

Image

I filed fish-mouths in either end of each rung and tried working it with the soldering iron first. No joy there so I went with my mini butane torch and plumber's flux. That did the job and will produce decent results I'm sure - but I need a little more practice first - this first joint looks like a right dog's dinner. lol

Image

Image

Onward and upward, exelsior!


The amount of detail is staggering. Very impressive!


Top
 Profile  
Reply with quote  
 Post subject: Re: 1:18 scale M557 APC scratch-build
PostPosted: Thu Mar 04, 2021 12:22 am 
Thank you so much ObiHahn - it's a real labour of love.

Here's a quick catch up of some of the little jobs I've been fitting in between work.

Image

Despite my cack-handed attempt at soldering/brazing I pushed on ahead with the ladder. First up, breaking out the Dremel pillar drill.

Image

I needed that to drill 4 holes into some scrap timber to build an alignment jig for the ladder rungs.

Image

All set up and ready to go! That's my fireproof soldering mat.

Image

..and there we are, filed, sanded and given a first coat of primer. I'll refine the joints a little more later.

Image

I printed out two missile racks (one didn't print properly, so I'll re-do that one) and stuck the Chupa Chup sticks in there. They just need rounded warheads made now. I printed them in clear resin simply because that's what I had loaded up.

Image

I shaved down 2 red LEDs (they had domed tops) to fit into the rear lights.

Image

These 3d files will be printed up in clear resin, like the missile racks and will have the LED fixed inside.


Top
 Profile  
Reply with quote  
 Post subject: Re: 1:18 scale M557 APC scratch-build
PostPosted: Thu Mar 04, 2021 2:56 pm 
AKKURAZI
User avatar

Location: Bochum, Ruhr area
Country: Germany
Skiffy wrote:
Thank you so much ObiHahn - it's a real labour of love.


And it shows in each and every progress post.


Top
 Profile  
Reply with quote  
 Post subject: Re: 1:18 scale M557 APC scratch-build
PostPosted: Thu Mar 04, 2021 6:45 pm 
reload
User avatar

Location: Hamburg
Service Number: A03/TQ3.0.12136E1
Country: Germany
ObiHahn wrote:
Skiffy wrote:
Thank you so much ObiHahn - it's a real labour of love.


And it shows in each and every progress post.


Second that!

Pleasure to watch. Please keep posting.

_________________
Sgt. Frank Peters 'reload' Smartgun Operator
A03/TQ3.0.12136E1 "It will be no picknick!"
AL Colonial Admin. - Sergeant at Arms (SgtA) -- 2020-2022
GERCM - Executive Officer (XO)
UKCM Foreign Legion: The Deviant Dragoons


Top
 Profile  
Reply with quote  
 Post subject: Re: 1:18 scale M557 APC scratch-build
PostPosted: Fri Mar 05, 2021 11:32 pm 
Thank you both. :)

Another small update today. I made the vented grille section next to the ladder.

Image

You can see it here inbetween the ladder and the base of the (missing) turret.

Image

The louvres were marked out and cut from styrene.

Image

I couldn't resist chucking some olive drab on there to see how the whole assembly is looking. Not too shabby. :)


Top
 Profile  
Reply with quote  
 Post subject:
PostPosted: Sat Mar 06, 2021 3:35 am 
Marine Raider
User avatar

Location: Bosnia
Service Number: A05/TQ2.0.92155E1
Country: United States
Looks so good man!!


Top
 Profile  
Reply with quote  
 Post subject: Re: 1:18 scale M557 APC scratch-build
PostPosted: Sat Mar 06, 2021 10:45 pm 
Thanks Bacta Baby!

I did some more work on the rear exterior and threw some rattle can olive drab over it all to see how it was shaping up.

Image

Image

It's starting to look a lot better. I'm looking forward to getting the rear light assemblies done - I'm just waiting for a delivery (a new FEP film tray for the resin printer).


Top
 Profile  
Reply with quote  
 Post subject: Re: 1:18 scale M557 APC scratch-build
PostPosted: Sun Mar 07, 2021 1:47 pm 
User avatar

Location: Portsmouth
Country: United Kingdom
Phenomenal! :o


Top
 Profile  
Reply with quote  
 Post subject: Re: 1:18 scale M557 APC scratch-build
PostPosted: Thu Mar 11, 2021 11:13 pm 
Thanks badkarma. :)

Hopefully I'll have another update soon.


Top
 Profile  
Reply with quote  
 Post subject:
PostPosted: Fri Mar 12, 2021 12:35 am 
Harvester of Sorrow
User avatar

Location: Lancashire (Wirral born)
Service Number: A04/TQ1.0.32156E1
Country: United Kingdom
I can’t get over how clean your work is, it all looks like a kit or something! Keep it up

_________________
Image AKA: Simon


Top
 Profile  
Reply with quote  
 Post subject: Re:
PostPosted: Fri Mar 12, 2021 3:05 am 
Prop Churner Outer
User avatar

Location: Bath, Maine
Service Number: A03/TQ1.0.12143G1
Country: United States
88reaper88 wrote:
I can’t get over how clean your work is, it all looks like a kit or something! Keep it up


Yes, exactly! You're just doing such amazing work on this thing.

_________________
:delta: My entry-level prop and costume tutorials: viewtopic.php?f=3&t=12751 :delta:


Top
 Profile  
Reply with quote  
 Post subject:
PostPosted: Sun Mar 14, 2021 5:16 pm 
Thank you so much folks. This build's like therapy for me during these strange times. :)

I've been wondering how to tackle the rear lights and I was planning to 3d print them and had made up a print file ready to go. My resin printer is busy at the moment and I had time to work today so I though - what the heck - I'll make them up from some clear stock.

Image

I've shaped the lens, left it cloudy and popped a red LED behind it. I'm making the wire protectors (brush guard type things) from 1mm solder.

Image

Here's one complete.

Image

On the back-side I'll be light blocking the rest of the LED.

Image

I'm getting better at soldering but still not great. :)

Image

It doesn't look that great when floodlit for the camera. It looks better in real life.

Image

..and with the light off.


Top
 Profile  
Reply with quote  
 Post subject:
PostPosted: Mon Mar 15, 2021 4:40 am 
GarageGeek
User avatar

Country: United States
This is actually the best APC model ever created. that's a cool thought.


Top
 Profile  
Reply with quote  
 Post subject:
PostPosted: Tue Mar 16, 2021 3:12 am 
Marine Raider
User avatar

Location: Bosnia
Service Number: A05/TQ2.0.92155E1
Country: United States
I love these pic updates!


Top
 Profile  
Reply with quote  
 Post subject:
PostPosted: Tue Mar 16, 2021 11:30 am 
AKKURAZI
User avatar

Location: Bochum, Ruhr area
Country: Germany
Every progress post makes me want to have my own APC kit...


Top
 Profile  
Reply with quote  
 Post subject:
PostPosted: Tue Mar 16, 2021 11:21 pm 
Seven - wow, that's quite a claim - thanks! It's definitely my final goal.

Bacta Baby - thanks, happy to oblige. :)

ObiHahn - thank you, that's exactly why I started this, I wanted a kit too. :)

I did a little bit on the DSGR missiles today.

Image

I printed out some missile tips in resin (you can see unused ones still on the base block). They just got a little dab of glue since they fit quite snug.

Image

I cut Q-tips in half as holders while I paint the missiles. I'll be working on the bays and covers too but have to build the hinges first. More on that later.


Top
 Profile  
Reply with quote  
 Post subject:
PostPosted: Sat Mar 20, 2021 1:10 pm 
I've painted and fitted the DSGR launchers. They pivot up and down really well.

Image

Here they are in deployed mode. I won't be attaching the covers until the roof is painted and finished.

I've also started to assemble and permanently fix the rear exterior section. I'm stealing the genius opening method used in the Hiya Toys 1:18 scale APC.

Image

Image

Here it is glued up and mocked up closed and opened. I'll be working out how the hinges will function next.

Image

This last shot illustrates something I've been keen to preserve from the start. My APC can comfortably fit 4 marines on each side of the rear compartment. I don't think the Hiya Toys one can do that - based on images I've seen.

Still LOTS to do so I'd better get back at it. :)


Top
 Profile  
Reply with quote  
 Post subject:
PostPosted: Tue Mar 23, 2021 10:57 pm 
Work is busy but I got a little time over a couple of days. The hull has had a coat of primer and I've adapted the rear seating to allow for the hinge.

Image

I'm cutting brass tube to bend up and create the main spar of the swing-down seat restraints. I have a test one to measure from and I'm cutting the rest adding slots to help stop kinks in the two bends.

Image

It's tedious work but I'm getting there.

Meanwhile, I've saved images of the TOC screens (from screenshots of the movie) and tried printing them out on specially made water-slide decal paper. Unfortunately the results were very poor.

Image

Once we're back in University I can laser-print on thin acetate instead - which will work a lot better.


Top
 Profile  
Reply with quote  
 Post subject:
PostPosted: Thu Mar 25, 2021 11:24 pm 
I've done a little more on the seat restraints.

Image

I've bent up all 6 main bars and the short supports that link them to the padded bits.

Image

The smaller bits are the short central spar ringed in red.

I've had to file 18 tiny fish-mouths to make sure these all join up correctly and my eyes aren't what they once were!


Top
 Profile  
Reply with quote  
 Post subject:
PostPosted: Fri Mar 26, 2021 10:52 pm 

Location: Las Vegas, Nevada
Country: United States
Incredible job! Your attention to detail is on point!

_________________
Adam Ezekiel.
I mostly try to make nice ALIEN uniforms. ...Mostly.

http://www.nostromocrew.com/


Top
 Profile  
Reply with quote  
 Post subject: Re:
PostPosted: Sat Mar 27, 2021 11:34 pm 
NostromoCrew wrote:
Incredible job! Your attention to detail is on point!


Thank you so much NostromoCrew. I'm hoping I can do it justice. :)

It's the Easter break for me at University so I get a small respite from teaching remotely, which started as a novelty but is actually horrible. I'd far rather be in a class offering practical help and advice.

Anyway - on with the build!

Image

Here are the seat restraints having just had their micro LED lights fitted.

Image

I couldn't really get a close enough shot but you can just see the LED poking out of the end of this one.

I finally figured out a way to mount the bars and let them rise and fall without protruding out of the back of the chair.

Image

Image

Image

After I took these shots I added a tiny (2mm x 1mm) magnet at the top of the bar near the hinge and one embedded in the wall above it (you can see where I've marked a cross in pencil) so that the bars will stay in the 'up' position without falling.


Top
 Profile  
Reply with quote  
 Post subject:
PostPosted: Mon Mar 29, 2021 10:52 pm 
I promised myself that I'd show the bad as well as the good. Not everything goes to plan or works perfectly first time, so here's an update with a couple of things that haven't quite worked.

I've been working on this gap in the roofline which is a complex form with a twist - not a flat plate. It's on both sides and I don't want to build it up with formers as I did with the one further forward.

Image

I measured up the profile and made a copy for either side in resin.

Image

Unfortunately the resin is far too brittle to use for this and one snapped (and was glued) as you can see.

Image

So, I printed some out in PLA filament instead. The one on this side is almost there - but the profile is a little off.

Image

Plus - the one for the other side had some printing errors and isn't fit to use.

Image

I'm printing up a second set with an adjusted profile - hopefully these will fit better.

Image

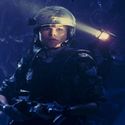
As well as that, I tested the lighting in the seat restraint bars and found that despite my earlier testing (where I got lucky) these micro LEDs have a definite front and back - meaning that one side of the bar will be lit far better than the other. The only real solution is to put two in there, back to back.

That's a problem, because I've glued all of the single ones in place. I'm working to produce one finished one to make sure it'll work, then do the rest. I have to straighten out every restraint, drill out the LED and wiring (destroying the glued-in LED in the process) and threading two in there.

Image

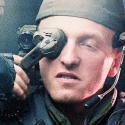
In this shot you can see that there are two LED lamps in there. I'm also strengthening the T bars with a rod inside, and a hole drilled in the main bar. I can't braze these joints - they're too close together so I have to glue them.

Image

Here I'm making swivelling clamps that I'll attach the curved pad to. Hopefully this part will go to plan. :)


Top
 Profile  
Reply with quote  
 Post subject: Re: 1:18 scale M557 APC scratch-build
PostPosted: Tue Mar 30, 2021 5:58 pm 
3d printing is not currently my friend. I'm having tech issues to do with a system board so in the meantime I fall back on good ol' hand-built components. There's a lesson there. :)

Image

These parts will form the padded pieces that sit in the seat restraints. the hinges are hand made and are about as small as I can work (old eyes, old hands) at 3mm x 4mm.

Image

I managed to file these two into the same shape - pretty much. Feeling like I needed a bit of a boost I chucked some NATO green on them.

Image

Wow - they're looking very nice if I do say so myself. 2 down, 10 to go. :)


Top
 Profile  
Reply with quote  
 Post subject:
PostPosted: Tue Mar 30, 2021 7:02 pm 
Marine Raider
User avatar

Location: Bosnia
Service Number: A05/TQ2.0.92155E1
Country: United States
Looking good! :D


Top
 Profile  
Reply with quote  
 Post subject:
PostPosted: Tue Mar 30, 2021 7:52 pm 
User avatar

Location: Portsmouth
Country: United Kingdom
Still stunning work. Hope you get your printer sorted, although it doesn't look like you need it :-)


Top
 Profile  
Reply with quote  
Display posts from previous:  Sort by  
Post new topic Reply to topic  [ 339 posts ]  Go to page Previous  1 ... 6, 7, 8, 9, 10, 11, 12 ... 14  Next


You cannot post new topics in this forum
You cannot reply to topics in this forum
You cannot edit your posts in this forum
You cannot delete your posts in this forum
You cannot post attachments in this forum

Search for:
Jump to: