The discussion of the Alien series of films and the props used in them is the aim, but if it's got Big Bugs and Big Guns, then they are welcome too!


Post new topic Reply to topic  [ 46 posts ]  Go to page Previous  1, 2
Author Message
 Post subject:
PostPosted: Mon Mar 23, 2020 4:53 pm 
Enjoy the silence
User avatar

Location: Germany
Country: Germany
Hey BigbisonT,
I've been watching your vids over the last days, and this is excellent work! Thanks for sharing. It inspires me to build an alu armor by myself! Thanks for that!
Thanks to all great women an men that built cool stuff and posted pics! Excellent community!
Ice

_________________
17 days? 17 days?


Top
 Profile  
Reply with quote  
 Post subject: Re: Taking another crack at metal armor - Videos are UP!
PostPosted: Wed Mar 25, 2020 12:35 am 
THAT guy
User avatar

Location: Virginia
Service Number: A03/TQ2.0.02146E1
Country: United States
Thanks man!

Speaking of which, I finished the most recent video. Was waiting on some paint and some webbing, but I am good to go and this sucker is wearable!
In this video I do final prep on the finished (but still raw and bare) pieces then get it fully strapped up.

I took a few liberties with button snaps in order to be able to take it apart for repair/repaint/cleaning, but none of it is visible when worn. Overall I am really happy with how things turned out. This one clocks in at just over 46 mins, but has a nice 'rapid fire' tempo that I think makes it more fun than the others.

Video #14 - Final material prep and strapping!
https://youtu.be/QCVLwlbojX4

Coming up next is paint and finishing touches.


Top
 Profile  
Reply with quote  
 Post subject: Re: Taking another crack at metal armor - Videos are UP!
PostPosted: Wed Mar 25, 2020 9:40 am 

Location: Derby
Country: United Kingdom
Really enjoyed watching this project evolve. Great inspiration for anyone wanting to tackle building armour thanks for posting.


Top
 Profile  
Reply with quote  
 Post subject: Re: Taking another crack at metal armor - Videos are UP!
PostPosted: Wed Mar 25, 2020 1:21 pm 
THAT guy
User avatar

Location: Virginia
Service Number: A03/TQ2.0.02146E1
Country: United States
Thanks and really hoping it inspires others (even if not in metal exactly).

Here are some quick pics for people not necessarily watching all the videos.
Attachment:
20200325_065610.jpg
20200325_065610.jpg [ 359.93 KiB | Viewed 3002 times ]


Here is a pic that might be useful in general to anyone trying to strap up the shoulder pads.
Attachment:
20200324_094307.jpg
20200324_094307.jpg [ 344.52 KiB | Viewed 3002 times ]


Top
 Profile  
Reply with quote  
 Post subject:
PostPosted: Wed Mar 25, 2020 7:27 pm 
GarageGeek
User avatar

Country: United States
This is insane. I love the idea of making a star pattern with a dremel wheel before drilling through the helmet. Making those holes was the hardest part of my helmet build, broke probably five bits.


Top
 Profile  
Reply with quote  
 Post subject: Re: Taking another crack at metal armor - Videos are UP!
PostPosted: Wed Mar 25, 2020 10:25 pm 
Enjoy the silence
User avatar

Location: Germany
Country: Germany
Oh man, that just looks so beautifull! And what i really like is the sound of it! That alu armor sounds like a symphony to me!
Have to go to workshop and begin...by the way: where did you get the templates for the parts? Is there a link or something?

_________________
17 days? 17 days?


Top
 Profile  
Reply with quote  
 Post subject:
PostPosted: Thu Mar 26, 2020 2:07 pm 
THAT guy
User avatar

Location: Virginia
Service Number: A03/TQ2.0.02146E1
Country: United States
I am afraid there are no templates online (that I am aware of). I essentially came up with mine via evolution. Counting my plastic and mixed media sets, this is the 5th overall armor set that I have built for myself, so I have evolved my patterns to be a better fit and more accurate each time. After my 4th set (my first metal set) I was able to compare my finished bits to actual Terry English bits and discovered I was actually REALLY close on most items. This latest one I tweaked things just a bit more based on that info. One thing I will stress is that the number one change to every single one of my 5 builds is that each time I realized new bits needed to be SMALLER! I see it over and over again with props, costumes and armor where people (self included) want to make everything too big right off the bat.

I don't really have the ability to do scans of my own templates, but I will try to post up some general measurements/reference on some of the more prominent features so people have a starting point. (Then of course adjust to yourself from there).


***EDIT/UPDATE: I did post pictures of my patterns straight on, which Martinr1000 was able to convert into CAD.
Downloadable 'starting point' patterns are now available in this thread viewtopic.php?f=3&t=18692 ***


Top
 Profile  
Reply with quote  
 Post subject: Re: Taking another crack at metal armor - Videos are UP!
PostPosted: Mon Apr 13, 2020 2:55 pm 
THAT guy
User avatar

Location: Virginia
Service Number: A03/TQ2.0.02146E1
Country: United States
Had a long stretch of non-productivity, but I'm moving again!

I finally knocked out the paint after a very productive weekend. Forgot how long this process takes...but overall I am pretty happy with it.
I used the "original Humbrol" colors, and like most, I just despise the "Matt Sand". There is nothing "Sand" about it!!! It is bright yellow!!!
All that said, there are plenty of pics showing a yellow color from surviving screen used sets, so I guess it simply 'is what it is'.

In the video, I document the effect of a clear matt coat over the paint vs leaving it bare, talk about different weathering techniques and decided to go with the liquid form of 'grate/stove (black iron) polish'. I also am documenting the 'scratch build' of the webbing/grenade straps and neck bindings. I am still editing up the video but should have it either later today or tomorrow morning.

In the mean time, a little "before and after"...

"BEFORE" (does have a little charcoal on the 'matt sand' and a "matt" clear coat on everything)
Attachment:
20200412_133321.jpg
20200412_133321.jpg [ 982.47 KiB | Viewed 2925 times ]


"AFTER" (liquid "Imperial" brand stove polish treatment)
Attachment:
20200412_151618.jpg
20200412_151618.jpg [ 939.21 KiB | Viewed 2925 times ]


Top
 Profile  
Reply with quote  
 Post subject:
PostPosted: Mon Apr 13, 2020 3:10 pm 
Prop Churner Outer
User avatar

Location: Bath, Maine
Service Number: A03/TQ1.0.12143G1
Country: United States
Glorious! It has been so much fun watching this come together.

_________________
:delta: My entry-level prop and costume tutorials: viewtopic.php?f=3&t=12751 :delta:


Top
 Profile  
Reply with quote  
 Post subject:
PostPosted: Mon Apr 13, 2020 7:11 pm 
GarageGeek
User avatar

Country: United States
daaamn dude, thats amazing


Top
 Profile  
Reply with quote  
 Post subject:
PostPosted: Tue Apr 14, 2020 7:38 pm 
THAT guy
User avatar

Location: Virginia
Service Number: A03/TQ2.0.02146E1
Country: United States
Thanks everyone.

Video #15 "Paint, weathering and Trim" is finally UP! I also scratch build some neck bindings and grenade straps here too.

https://youtu.be/vvEfoOjj9x4

This guy is damn near ready to go. I will do one more video in this series based on "optional" accessories. In that I will touch on the various 'other stuff' that completes the marine such as pouches, knives, weapons (briefly), watches, belt tools, shoulder lamps and all that jazz. Nothing new for you guys, but just some of the fun stuff that will flesh out the costume and make it more 'complete' just to finish off the series.

So "creation" is over and done, though. 10 weeks of effort have led to this:
Attachment:
20200413_193502.jpg
20200413_193502.jpg [ 273.19 KiB | Viewed 2903 times ]

Attachment:
20200413_193543.jpg
20200413_193543.jpg [ 253.18 KiB | Viewed 2903 times ]


Top
 Profile  
Reply with quote  
 Post subject:
PostPosted: Tue Apr 14, 2020 9:50 pm 
Prop Churner Outer
User avatar

Location: Bath, Maine
Service Number: A03/TQ1.0.12143G1
Country: United States
That looks top notch. I still need to watch the video but I appreciate the still shots!

_________________
:delta: My entry-level prop and costume tutorials: viewtopic.php?f=3&t=12751 :delta:


Top
 Profile  
Reply with quote  
 Post subject:
PostPosted: Wed Apr 15, 2020 1:13 pm 
User avatar

Location: East Tennessee
Country: United States
Wow this is superb. Great work!


Top
 Profile  
Reply with quote  
 Post subject: Re: Taking another crack at metal armor - Videos are UP!
PostPosted: Wed Apr 15, 2020 4:57 pm 
reload
User avatar

Location: Hamburg
Service Number: A03/TQ3.0.12136E1
Country: Germany
Great work. Love the camo painting.

_________________
Sgt. Frank Peters 'reload' Smartgun Operator
A03/TQ3.0.12136E1 "It will be no picknick!"
AL Colonial Admin. - Sergeant at Arms (SgtA) -- 2020-2022
GERCM - Executive Officer (XO)
UKCM Foreign Legion: The Deviant Dragoons


Top
 Profile  
Reply with quote  
 Post subject:
PostPosted: Tue Apr 21, 2020 6:57 am 
Enjoy the silence
User avatar

Location: Germany
Country: Germany
Excellent work! Thanks for taking us with you on this journey!

_________________
17 days? 17 days?


Top
 Profile  
Reply with quote  
 Post subject: Re: Taking another crack at metal armor - Videos are UP!
PostPosted: Wed Jul 08, 2020 1:19 pm 
THAT guy
User avatar

Location: Virginia
Service Number: A03/TQ2.0.02146E1
Country: United States
Few quick updates.

No new videos, but improvement overall I think. My dissatisfaction with the mustard color of the "matt sand" has only grown. I finally snapped and had to do something about it. I grabbed a bottle of the Tamiya XF-59 "flat desert yellow" (which is often referenced in old posts here as an humbrol matt sand crossover).

First I had to clean off the 'grate polish' weathering, which I eventually got done with Acetone. Regular mineral spirits were not enough to to remove it. I think if I had used mineral spirits with some steel wool it might have worked better but, but I was not being very patient. The acetone worked much faster but you had to be careful as it could remove paint as well (which in some spots it did! But in a way it helped the overall weathered look I think).

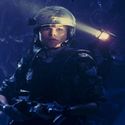
Back to the color, I think "Desert Yellow" is a decent enough improvement. Seen in this picture working from far-to-near, we have my metal "matt sand" helmet, a tweaked stephen210 fiberglass helmet with the Tamiya, and a Terry english helmet with presumably a custom color.
Attachment:
20200704_145444.jpg
20200704_145444.jpg [ 371.83 KiB | Viewed 2390 times ]


The results were decent enough that I did the rest of the armor. Here you see the Desert Yellow on the greaves (unweathered) and the pauldrons (weathered).
Further, I discovered during weathering that you can get better control over everything if you dip the rag/paper towel in mineral spirits first, THEN using the same wet rag dip it in the stove polish. The diluted effect is really much easier to control the darkness.
Attachment:
20200707_210015.jpg
20200707_210015.jpg [ 256 KiB | Viewed 2390 times ]


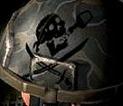
Finally, since I went to the trouble to strip it down, I figured I better add some graffiti. My wife has a pretty accurate Vaz setup and my son rolls with a Hicks look/armor, so I decided to do a movie character rather than my 'own thing' as I've typically done. Might as well make it a crowd-pleaser. I really wanted to do Ski or Crowe! But alas, in the end I suppose I'll just give the crowd what they want and it makes more sense given my family's gear.

unweathered Tamiya
Attachment:
20200707_114445.jpg
20200707_114445.jpg [ 276.63 KiB | Viewed 2390 times ]


Weathered and complete
Attachment:
20200707_223448.jpg
20200707_223448.jpg [ 375.05 KiB | Viewed 2390 times ]


Top
 Profile  
Reply with quote  
 Post subject:
PostPosted: Wed Jul 08, 2020 3:24 pm 
Prop Churner Outer
User avatar

Location: Bath, Maine
Service Number: A03/TQ1.0.12143G1
Country: United States
That looks great! The weathered version of the tan is a big improvement, and you are getting really good at painting the Hudson graffiti (third time counting the wooden wall plaque?).

_________________
:delta: My entry-level prop and costume tutorials: viewtopic.php?f=3&t=12751 :delta:


Top
 Profile  
Reply with quote  
 Post subject: Re:
PostPosted: Thu Jul 09, 2020 1:01 pm 
THAT guy
User avatar

Location: Virginia
Service Number: A03/TQ2.0.02146E1
Country: United States
retrogarde wrote:
That looks great! The weathered version of the tan is a big improvement, and you are getting really good at painting the Hudson graffiti (third time counting the wooden wall plaque?).


Thanks, and yeah def feeling comfy with the skulls as of late.


Top
 Profile  
Reply with quote  
 Post subject: Re: Taking another crack at metal armor - Videos are UP!
PostPosted: Wed Jul 22, 2020 6:01 pm 
THAT guy
User avatar

Location: Virginia
Service Number: A03/TQ2.0.02146E1
Country: United States
And the re-work is now complete. I have added the various acoutromon and am ready to rock.

Attachment:
20200721_200615_HDR.jpg
20200721_200615_HDR.jpg [ 339.64 KiB | Viewed 2309 times ]

Attachment:
20200709_210219.jpg
20200709_210219.jpg [ 178.29 KiB | Viewed 2309 times ]

Attachment:
20200709_210229.jpg
20200709_210229.jpg [ 154.29 KiB | Viewed 2309 times ]

Attachment:
20200721_200605_HDR.jpg
20200721_200605_HDR.jpg [ 332.2 KiB | Viewed 2309 times ]


Top
 Profile  
Reply with quote  
 Post subject:
PostPosted: Wed Jul 22, 2020 7:12 pm 
Prop Churner Outer
User avatar

Location: Bath, Maine
Service Number: A03/TQ1.0.12143G1
Country: United States
That looks fantastic!

_________________
:delta: My entry-level prop and costume tutorials: viewtopic.php?f=3&t=12751 :delta:


Top
 Profile  
Reply with quote  
 Post subject:
PostPosted: Mon Jul 27, 2020 1:05 am 
Marine Raider
User avatar

Location: Bosnia
Service Number: A05/TQ2.0.92155E1
Country: United States
Amazing work!


Top
 Profile  
Reply with quote  
Display posts from previous:  Sort by  
Post new topic Reply to topic  [ 46 posts ]  Go to page Previous  1, 2


You cannot post new topics in this forum
You cannot reply to topics in this forum
You cannot edit your posts in this forum
You cannot delete your posts in this forum
You cannot post attachments in this forum

Search for:
Jump to: