The discussion of the Alien series of films and the props used in them is the aim, but if it's got Big Bugs and Big Guns, then they are welcome too!


Post new topic Reply to topic  [ 11 posts ] 
Author Message
 Post subject: Sulaco Airlock: a found-item build
PostPosted: Tue Sep 25, 2012 10:48 pm 
Prop Churner Outer
User avatar

Location: Bath, Maine
Service Number: A03/TQ1.0.12143G1
Country: United States
So if you want to see how to accurately recreate the Sulaco Airlock, please enjoy this thread right here:
viewtopic.php?f=3&t=4573

I was recently "gifted" this hunk of metal from my work:

Attachment:
dooropener1.jpg
dooropener1.jpg [ 70.26 KiB | Viewed 5897 times ]


After looking at it for a bit I had the idea to turn it upside down, add a handle and try to make it look like the Sulaco Airlock!

Attachment:
dooropener2.jpg
dooropener2.jpg [ 146 KiB | Viewed 5897 times ]


It won't be even 75% Screen Accurate, but it makes a very satisfying KA-CHUNK sound and is sturdy as hell.

Here's a quick shot of it with a few of the text bits laid out:

Attachment:
doormockup.jpg
doormockup.jpg [ 190.57 KiB | Viewed 5897 times ]


The next step is to paint it black, add the text bits, paint the area behind the handle red, and THEN worry about the stuff that goes on the right! :mrgreen:

Not a bad project for the weekend, right?

_________________
:delta: My entry-level prop and costume tutorials: viewtopic.php?f=3&t=12751 :delta:


Top
 Profile  
Reply with quote  
 Post subject:
PostPosted: Wed Sep 26, 2012 3:43 pm 
Mad Cat
User avatar

Location: Active duty: USS Catalpa
Service Number: AO3/TQ6.0.79749E8
Country: United States
I like! I was just thinking the other day about how cool it would be to remodel my garage to look like the Sulaco hanger deck.

_________________
"Awww, someone tell me that's a boot!

It's a boot!"

III drops


Top
 Profile  
Reply with quote  
 Post subject:
PostPosted: Wed Sep 26, 2012 4:11 pm 
Prop Churner Outer
User avatar

Location: Bath, Maine
Service Number: A03/TQ1.0.12143G1
Country: United States
Attachment:
painted.jpg
painted.jpg [ 164.09 KiB | Viewed 5840 times ]


I gave it a coat of paint and started looking for stuff to replicate the old TV panel that makes up the detailing on the right side. This will do for the middle (once I paint it red), now I just need to find buttons etc.

I have the two bolts for beneath the handle. I'll paint them yellow but first I need to figure out if I'm punching a hole through the metal, cutting them down to just their heads to glue them on, or recasting the heads. It sounds like a stupid amount of effort no matter which way I go about it, so I may just go with the brute force method. How thick can the metal be afterall! :twisted:

_________________
:delta: My entry-level prop and costume tutorials: viewtopic.php?f=3&t=12751 :delta:


Top
 Profile  
Reply with quote  
 Post subject:
PostPosted: Fri Sep 28, 2012 3:41 pm 
Mad Cat
User avatar

Location: Active duty: USS Catalpa
Service Number: AO3/TQ6.0.79749E8
Country: United States
I think it's looking great! How did you do the text and graphics?

_________________
"Awww, someone tell me that's a boot!

It's a boot!"

III drops


Top
 Profile  
Reply with quote  
 Post subject:
PostPosted: Fri Sep 28, 2012 8:44 pm 
Prop Churner Outer
User avatar

Location: Bath, Maine
Service Number: A03/TQ1.0.12143G1
Country: United States
They're just printed in color on regular paper and glued on. I used PhotoShop to recreate the text and graphics as well as I could. Again, not 100% but pretty close. I worked on it last night so I'll post more photos soon!

_________________
:delta: My entry-level prop and costume tutorials: viewtopic.php?f=3&t=12751 :delta:


Top
 Profile  
Reply with quote  
 Post subject:
PostPosted: Mon Oct 01, 2012 4:23 pm 
Prop Churner Outer
User avatar

Location: Bath, Maine
Service Number: A03/TQ1.0.12143G1
Country: United States
I've done some more work on the righthand side of the airlock. To recreate the top "third" I found a metal binder name plate to use as the border. The opaque area at the top will be represented by a pice of a plastic milk jug. The part below it I can't quite match so I'm using part of a model tank and I will paint the vertical lines on. I'm still looking for the top two buttons, but for the three round buttons at the bottom I'm using rubber dots:

Attachment:
materials.jpg
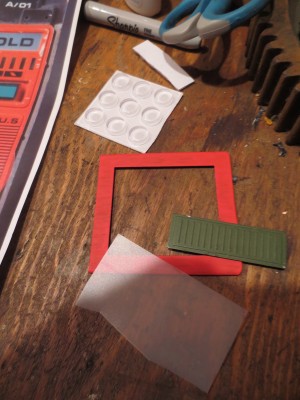
materials.jpg [ 360.28 KiB | Viewed 5760 times ]


Painting the bottom of the dots orange and the other bits red. Making the three stylized letters (V O X?), but I'm having to shift their position due to space constraints.

Attachment:
painting.jpg
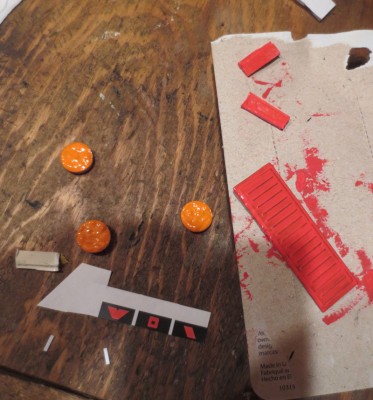
painting.jpg [ 295.25 KiB | Viewed 5760 times ]


A test fitting. The orange buttons look pretty good! The word HOLD will go over the milk jug piece; I printed it out on clear plastic and will sandwich them together.

I recreated the rectangular logo in the upper righthand corner too.

I still need to trim and clean up a few areas, but the build is nearly done. I'll be weathering this a fair bit too.

Attachment:
progress.jpg
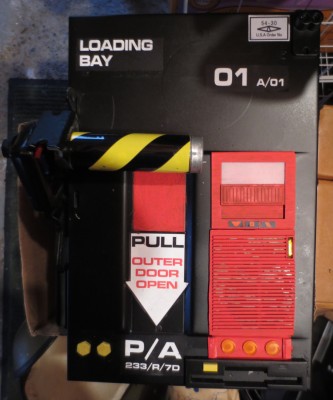
progress.jpg [ 277.49 KiB | Viewed 5760 times ]


And yes, that is a floppy drive port at the very bottom on the right. I had it kicking around and thought it might be funny to add, especially with there being one on the locker widget.

_________________
:delta: My entry-level prop and costume tutorials: viewtopic.php?f=3&t=12751 :delta:


Top
 Profile  
Reply with quote  
 Post subject:
PostPosted: Mon Oct 01, 2012 5:27 pm 
Mad Cat
User avatar

Location: Active duty: USS Catalpa
Service Number: AO3/TQ6.0.79749E8
Country: United States
LOVE. IT.

_________________
"Awww, someone tell me that's a boot!

It's a boot!"

III drops


Top
 Profile  
Reply with quote  
 Post subject:
PostPosted: Tue Oct 02, 2012 5:03 pm 
Prop Churner Outer
User avatar

Location: Bath, Maine
Service Number: A03/TQ1.0.12143G1
Country: United States
Attachment:
progress2.jpg
progress2.jpg [ 234.06 KiB | Viewed 5736 times ]


A little further along. I know those are supposed to be slots under the word HOLD, but painting them in black gives a similar look. More painting to be done and still need to make the two large buttons, but this is pretty much it!

_________________
:delta: My entry-level prop and costume tutorials: viewtopic.php?f=3&t=12751 :delta:


Top
 Profile  
Reply with quote  
 Post subject:
PostPosted: Tue Oct 02, 2012 6:56 pm 
The Hugger of Destruction TechnoSasquatch
User avatar

Location: Middlesbrough- Anglo Saxon land
Service Number: A06/TQ1.0.22140E1
Country: United Kingdom
Oh YES that is excellent and works well :D

Who`s to say all ships of the fleet have the same set up after all ;)

Great Job :D

_________________
What ya gonna do when I TECKNO HUG Youuuuu!!

Image

Pvt.
STEAD,J "TECKNO VIKING"
A06/TQ1.0.22140E1

Skype: ulthur1


Top
 Profile  
Reply with quote  
 Post subject:
PostPosted: Fri Oct 05, 2012 2:31 pm 
Prop Churner Outer
User avatar

Location: Bath, Maine
Service Number: A03/TQ1.0.12143G1
Country: United States
With the red and blue buttons finished and a bit of light weathering, I think this prop is almost done! I still need to finish painting around the handle a little bit though. I used SteelStik to reinforce the handle and the metal gray of it is bugging me!


Attachment:
final.jpg
final.jpg [ 277.6 KiB | Viewed 5710 times ]


Once I get it mounted on the wall I'll snap one last photo of the thing. Thanks for looking!

_________________
:delta: My entry-level prop and costume tutorials: viewtopic.php?f=3&t=12751 :delta:


Top
 Profile  
Reply with quote  
 Post subject:
PostPosted: Sat Oct 06, 2012 2:54 pm 
User avatar

Location: USS Sulaco
Country: Canada
Wow, I love it! Great work!

_________________
Pfc. Wells, Brandon. W
"I am the ultimate bad-ass. State of the bad-ass art."
Image


Top
 Profile  
Reply with quote  
Display posts from previous:  Sort by  
Post new topic Reply to topic  [ 11 posts ] 


You cannot post new topics in this forum
You cannot reply to topics in this forum
You cannot edit your posts in this forum
You cannot delete your posts in this forum
You cannot post attachments in this forum

Search for:
Jump to: