SIR YES SIR!!So let me first state that if Spat's armour is only 80% accurate (he wrote that somewhere) then mine is only 60%. It is missing some of the indentations and curves and currently only has two "steps" along the bottom of the front instead of three (I'm working on that though as it bugs me).
There was a lot of trial and error involved in making this, especially when it came to choosing the right kind of plastic.
Attachment:
 plasticbins.jpg [ 226.49 KiB | Viewed 17597 times ]
In this picture we have some of the bins I used. The big one in the back is the actual body (you'll need two of these), the one on the left I used just for its top, and the one on the right was my first choice for the shoulder plates but this ended up being a bad one as the plastic was too brittle. I wish I had a size reference for the big bin, but if the little one on the right is 6 gallons then the big one must be 10-12 gallons.
Attachment:
 bells.jpg [ 393.26 KiB | Viewed 17597 times ]
So the tops of the lefthand bins gave me my shoulder bells. In this picture you can see an uncut version on top and a partially cut version below. The inside of the plastic is nicely reinforced so there's no wobbling.
Attachment:
 bottomlayer.jpg [ 426.22 KiB | Viewed 17597 times ]
Here we have a shot of the chest plate well underway, yet you can still see how this started out as a trash bin. The bottom of the bin is cut off completely and becomes the top of the armour. The bin is cut down the sides and the front is modified to be the first of the "steps". In the photo I've already added quick release clips and strapping on the sides and at the shoulders, with the lefthand shoulder being permanently attached. I made simple floater plates (or nuggets as some folks call them) out of spare rectangles of plastic.
The next step is to take another large bin and cut out a shape like this:
Attachment:
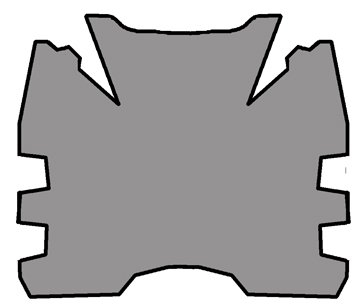 pattern.jpg [ 42.46 KiB | Viewed 17597 times ]
The tabs are vital as that is how you will rivet it together to create the three dimensional shape of the front of the breastplate. Making a sample out of cardboard is a really good idea as finding the exact angle to create the right look can be tricky. Too little and it isn't even noticable, too much and you have a duck bill.
Attachment:
 toplayer.jpg [ 394.97 KiB | Viewed 17597 times ]
Notice that this top layer also adds one of the "steps" to the front. The final one will be a third small plate riveted to the bottom layer just for that purpose.
There will be a gap where the plastic of the top layer joins and is riveted. This should be filled in with the gapfiller or putty of your choice.


 AKA: Simon