| The Aliens Legacy http://forum.alienslegacy.com/ |
|
| My Pepakura Armour Build http://forum.alienslegacy.com/viewtopic.php?f=3&t=9980 |
Page 1 of 5 |
| Author: | korran_kuat [ Tue May 17, 2011 9:35 am ] |
| Post subject: | My Pepakura Armour Build |
Hi Every body, I thought I would share some pics of my USCM build with you all. I have been meaning to post some pictures up for a while but I always forget to take them until I'm covered in fibre-glass. 
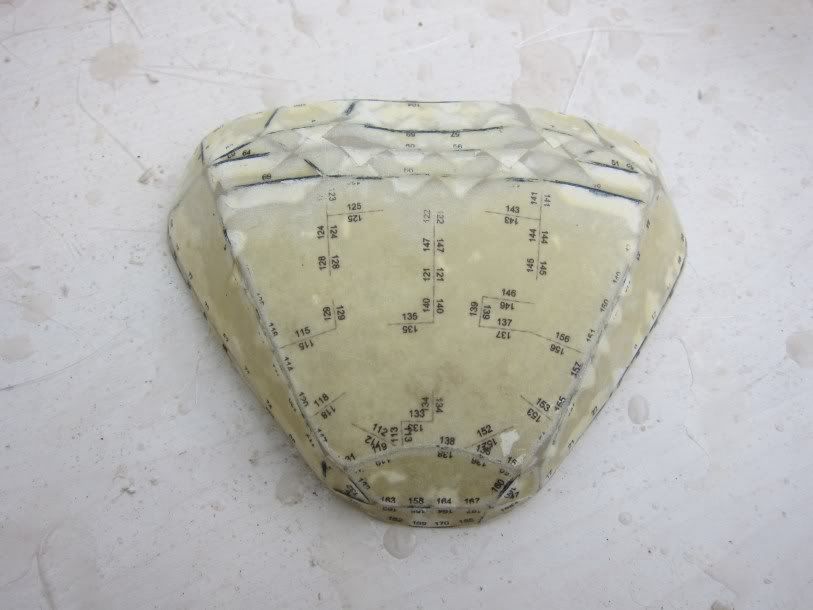
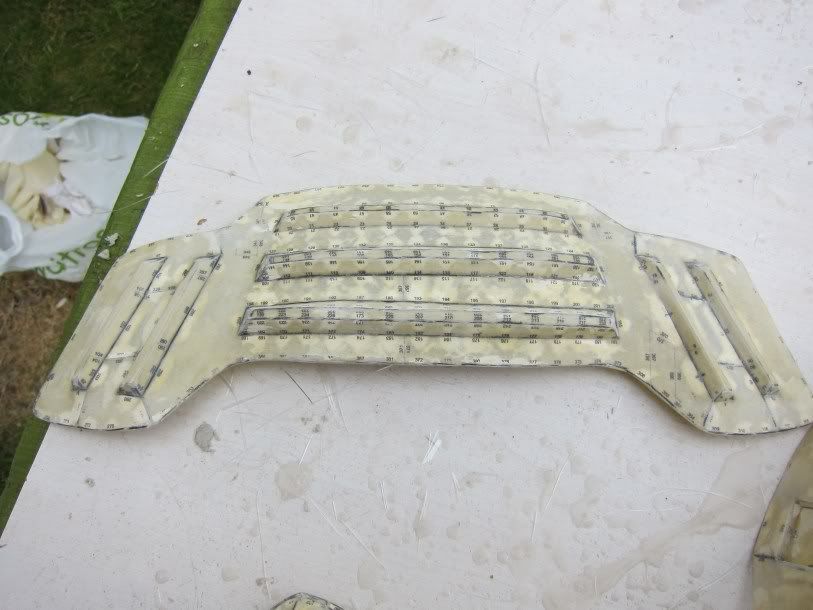
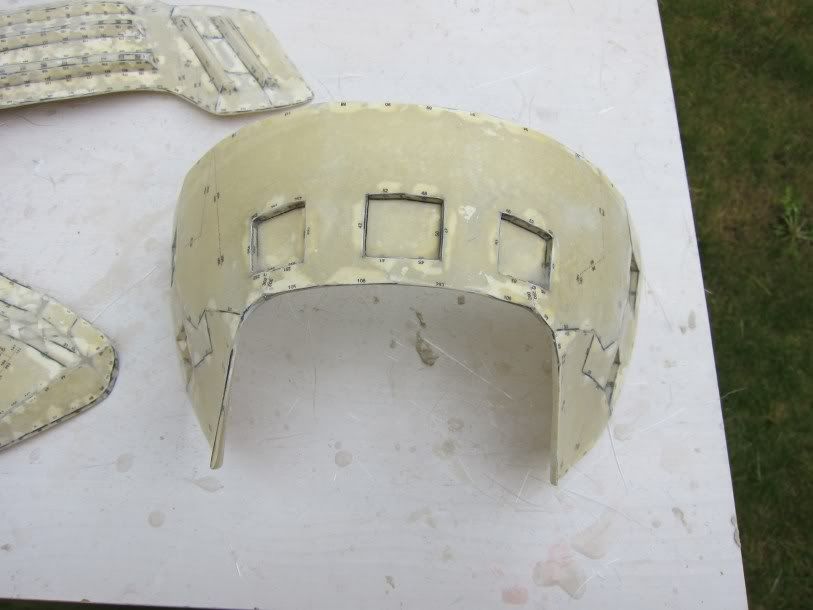
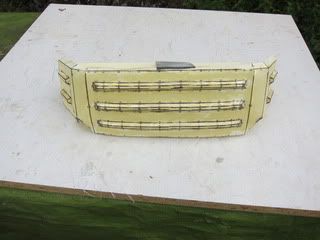
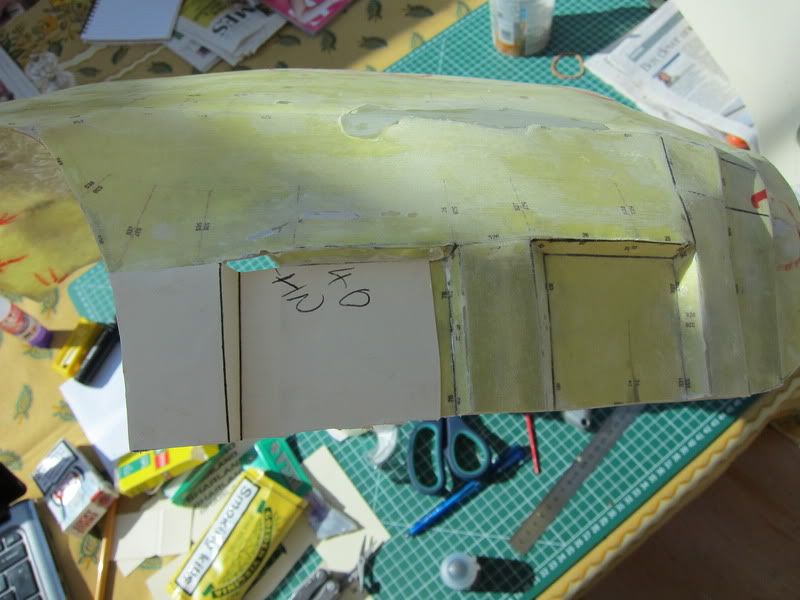
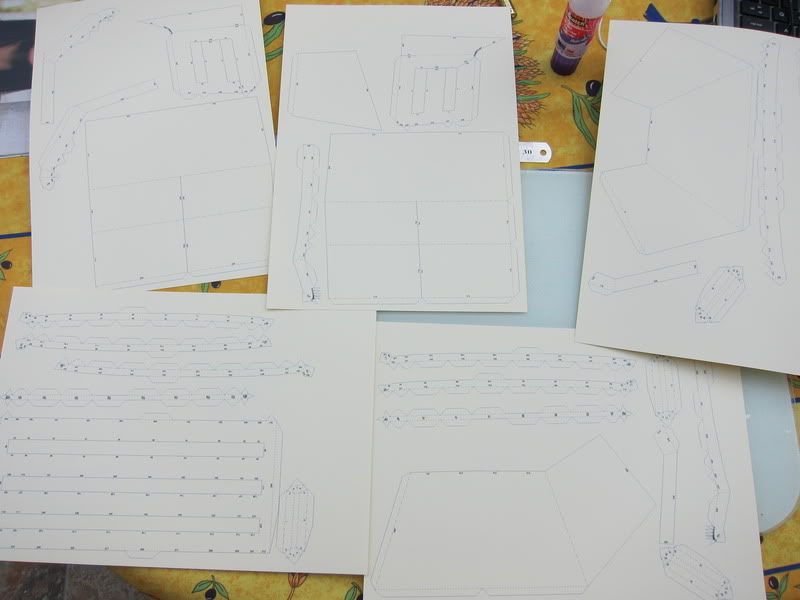
I'm building my armour through pepakura. Basically you start with a paper model looking something liek this: ![]() 
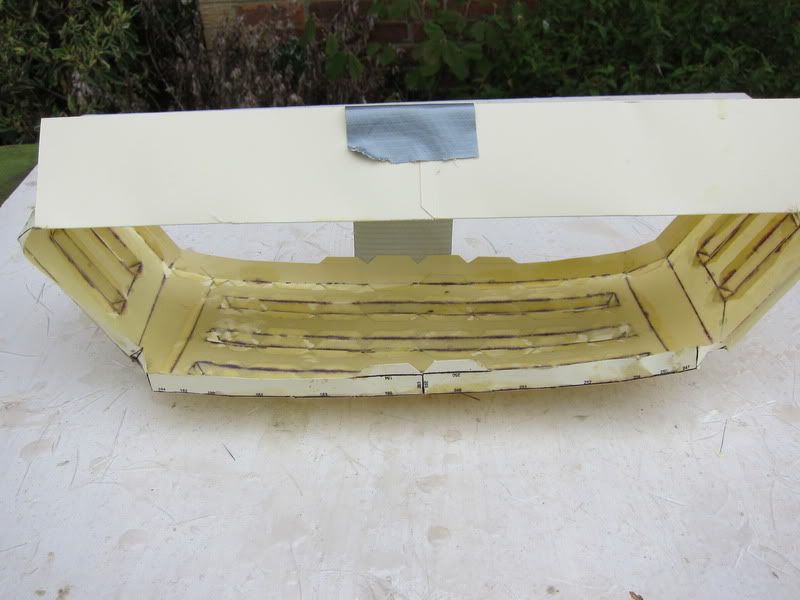
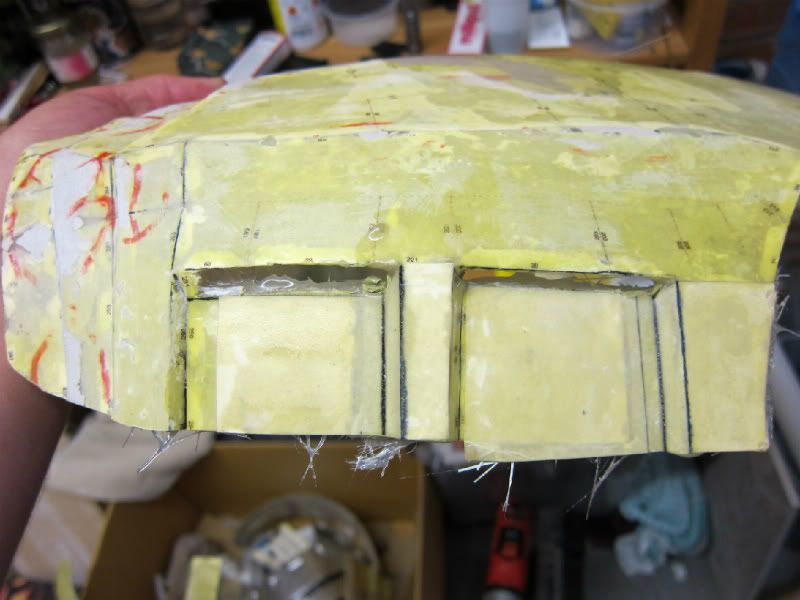
Which you then build into this: ![]() ![]() 
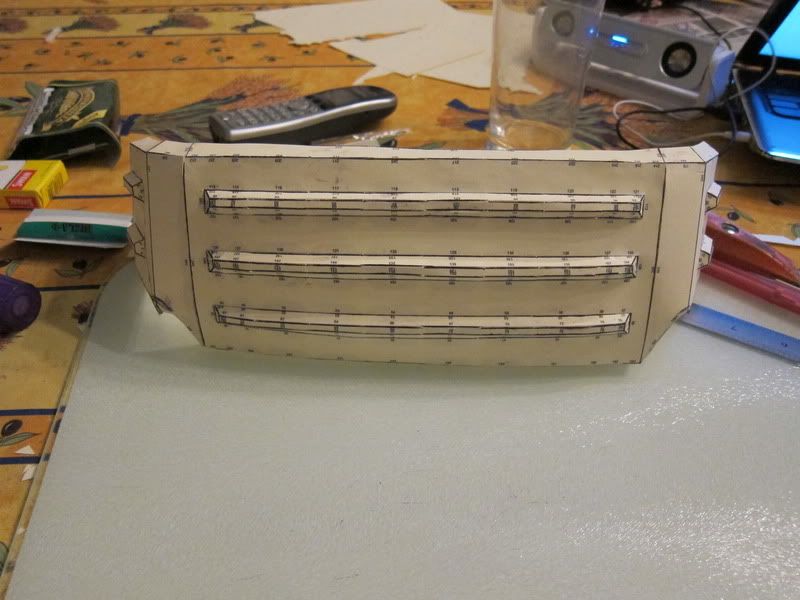
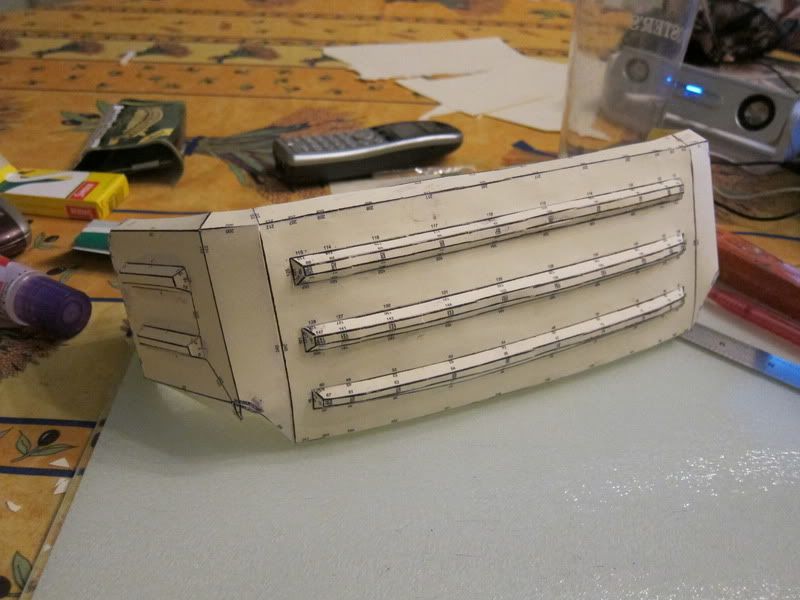
It's quite a long process. I think this piece took me nearly 5 hours last night. 
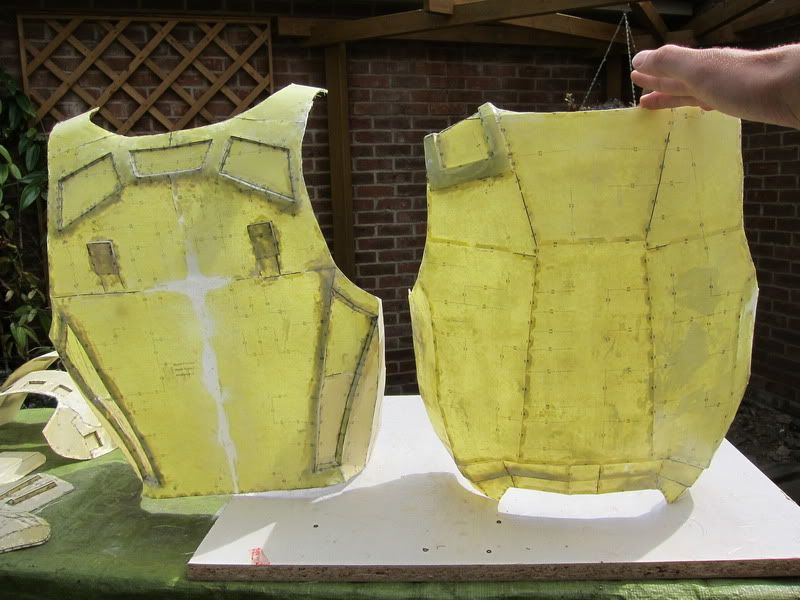
From there you paint the cardboard with resin to give it some strength. Then you fibre-glass it. I don't have any pics of this stage at the moment. But the next time I do a piece I'll try and get some. 
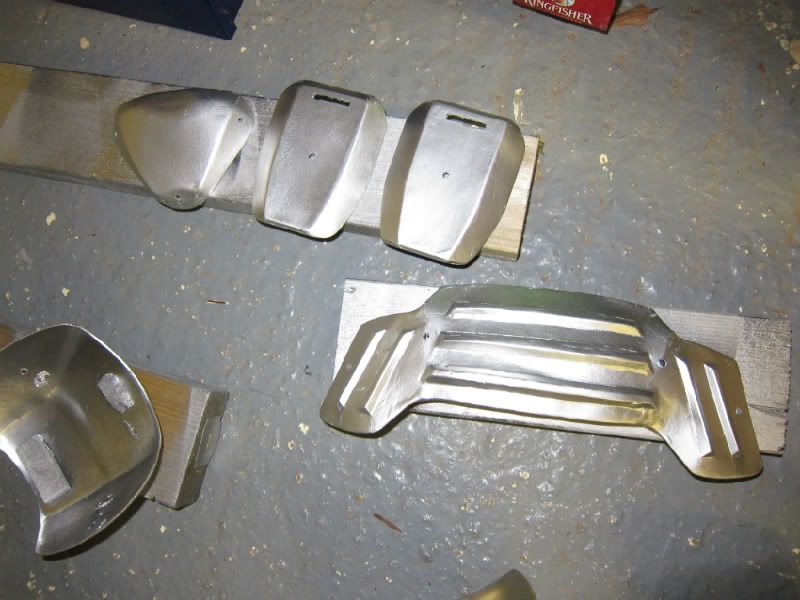
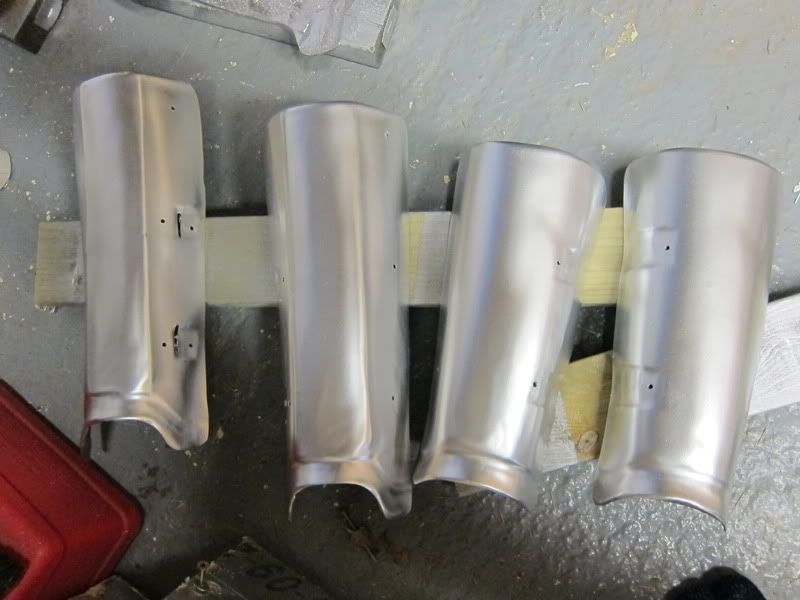
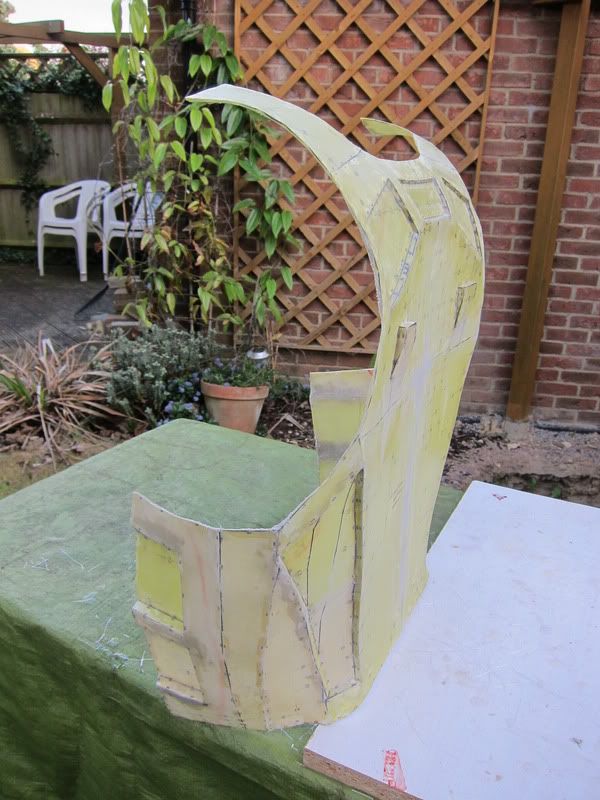
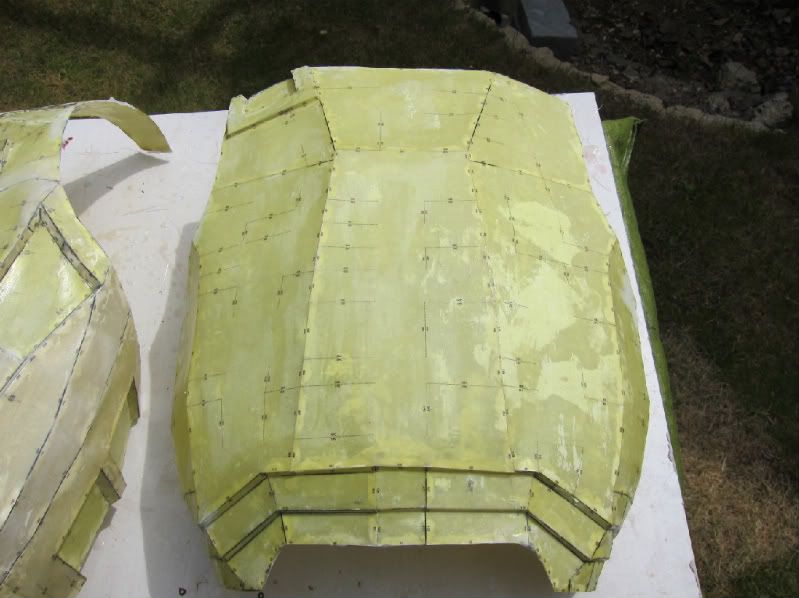
Here's how far I am: ![]() ![]() 
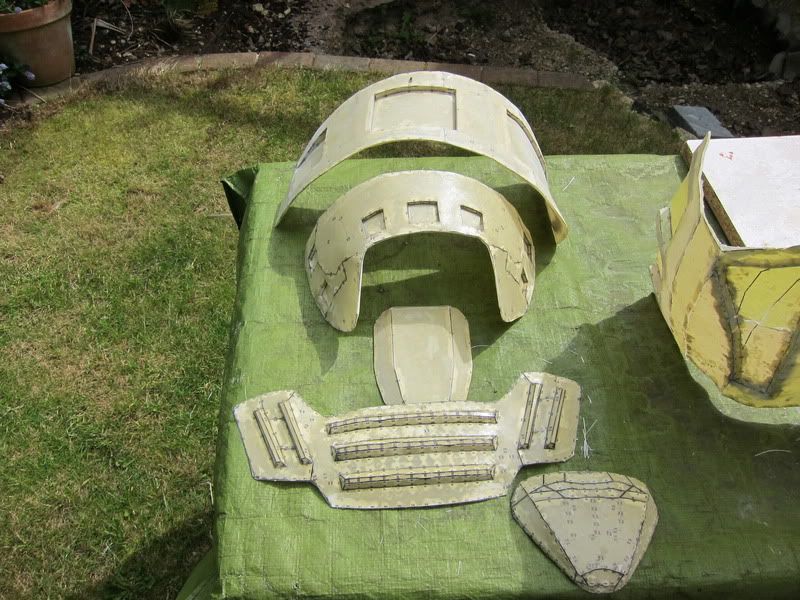
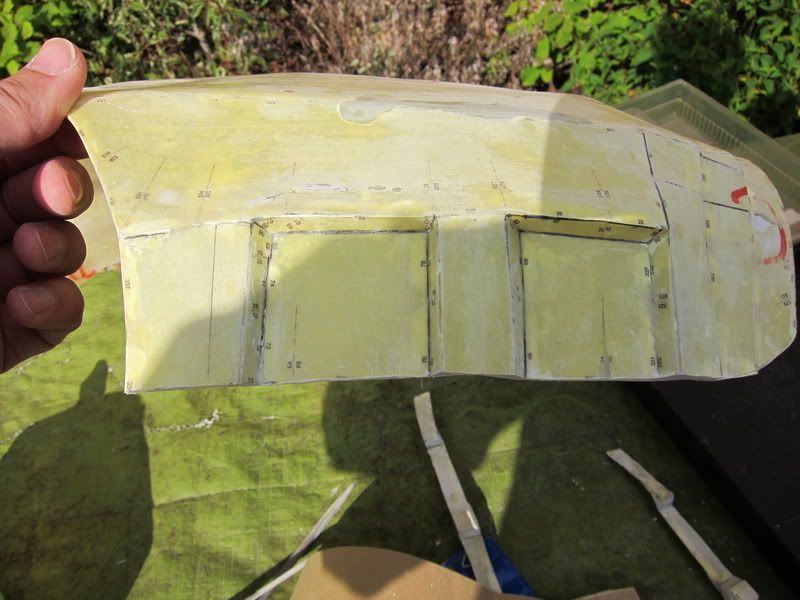
The top and lower shoulder piece are almost finished. I just need to cut out the holes for the strapping. 
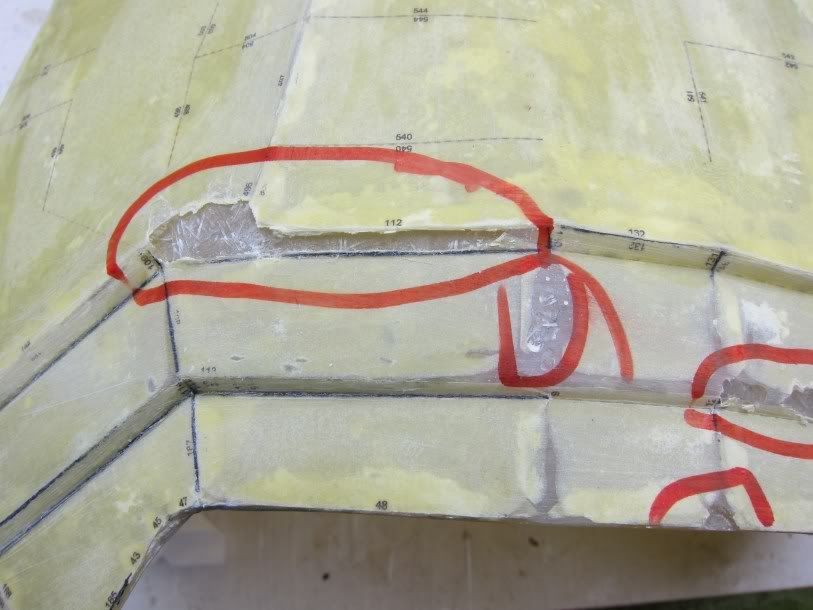
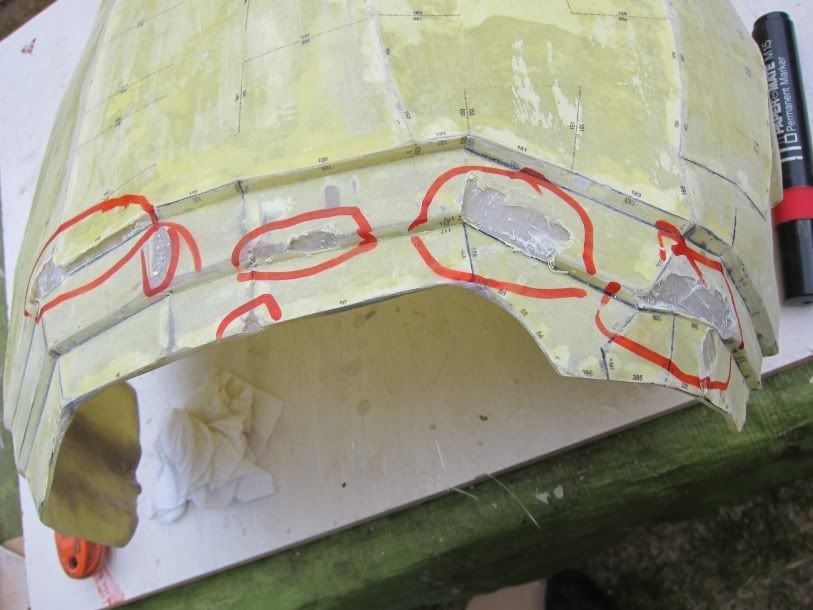
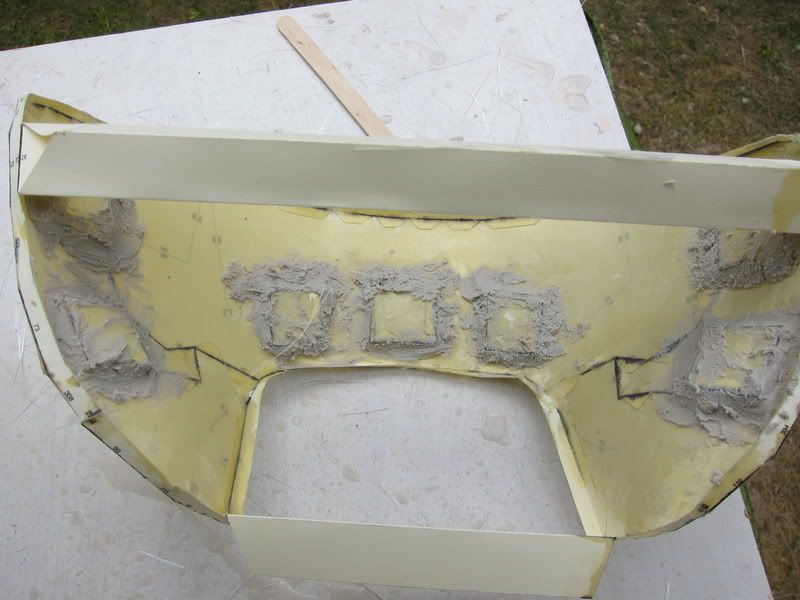
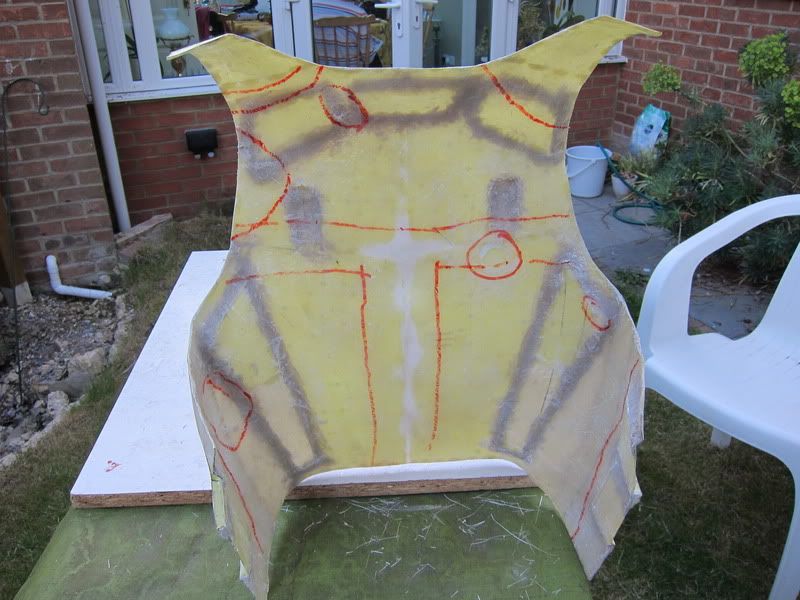
The back piece is almost finished. It has had a heavy sand to get it into the right shape. The was a big ridge down the middle that I had to sand out and most of the joinst were quite rough, so I've smoothed them out. ![]() ![]() ![]() 
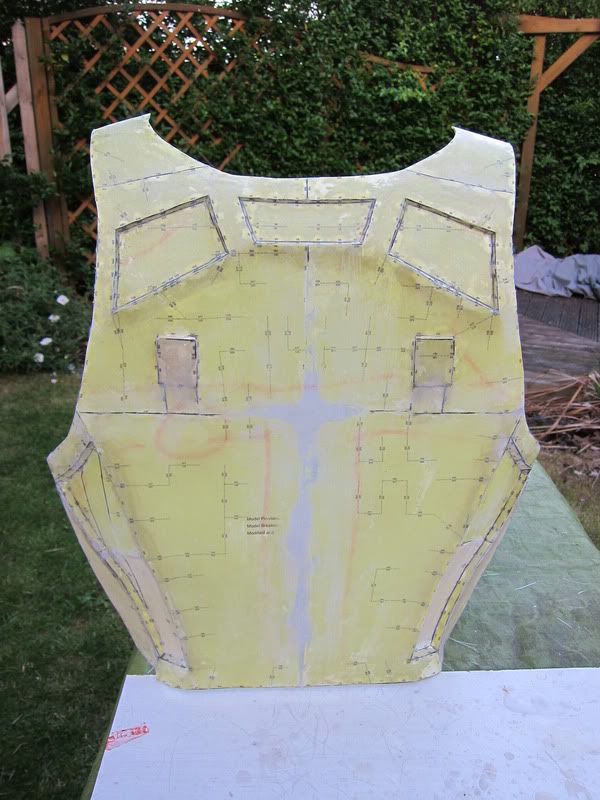
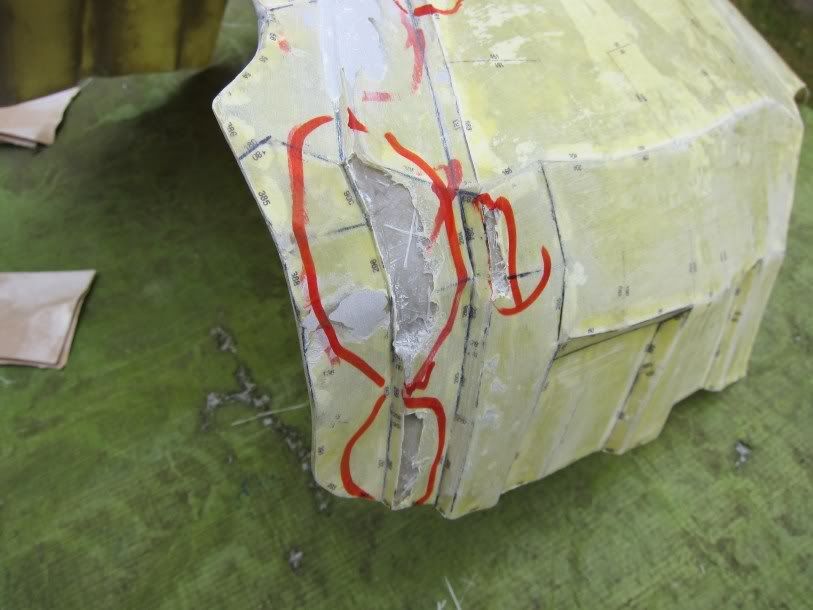
It needs a little more sanding and also some more glass where I have sanded it quite thin. The red areas show the bits the need either some more glass or in parts just a bit more resin. I also need to cut out the holes for the strapping. ![]() The chest piece needs a good sand, my job for today. ![]() 
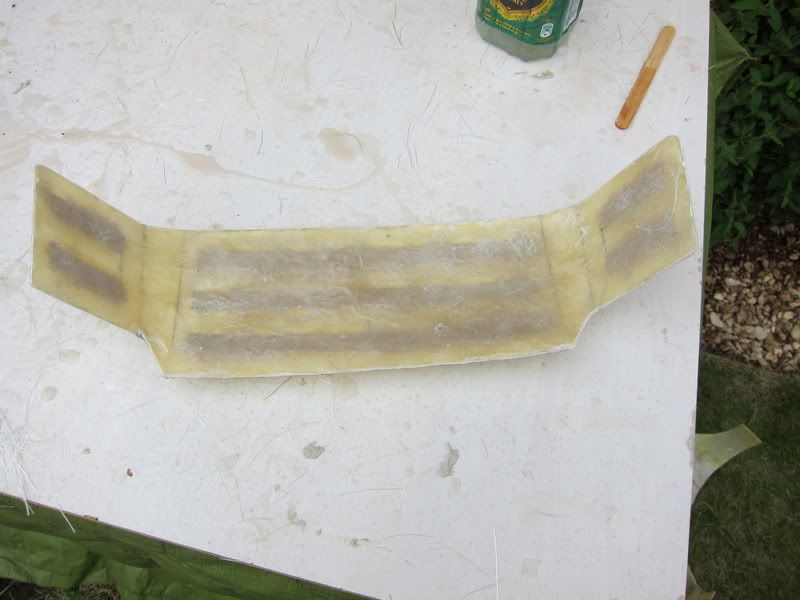
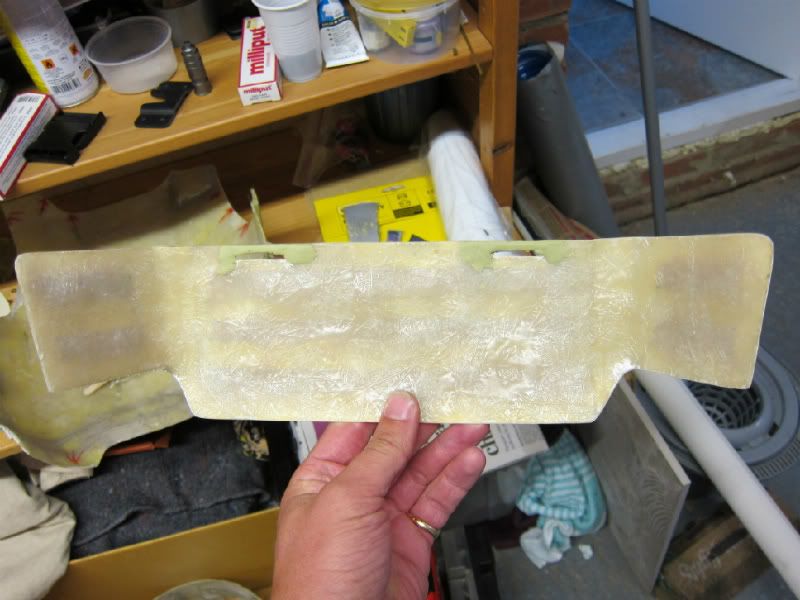
The ab plate, cod piece and middle shoulder section have all had 2 layers of glass now and are ready to be sanded. The left shoulder has been printed and is waiting to be made. I'll start that tonight. I decided that I couldn't face doing much more through this process and as a result I have ordered the leg armour from Spat. All in all I'm fairly happy with things so far. I'd hate to imagine how many hours I've put into this and how many more I have to go. Things I still need: M1 helmet - searching ebay, but need to get some money before I can buy one. Ear piece/mic for helmet - I'm not going to make this, so I need to find somewhere I can buy one. BDUs - On the look out for some, but I might go with Polish Desert camo and get them altered to be more accurate. Jungle boots Patches Weapon - don't have enought money atm for a pulse rifle, so I'm thinking of using a cheap airsoft shotgun for now. Webbing - What is the correct colour for the webbing and what sizes do I need? Any comments are much appreciated. Let me know what you think. Pete |
|
| Author: | Space Jockey [ Tue May 17, 2011 11:41 am ] |
| Post subject: | Re: My Pepakura Armour Build |
I think it's looking realy impressive. I've seen pepakura armour mentioned a couple of times here on the boards but this is the first time I have seen it done and certainly did not know about coating it in the fiberglass. Looks great - well done thus far. |
|
| Author: | korran_kuat [ Tue May 17, 2011 11:44 am ] |
| Post subject: | Re: My Pepakura Armour Build |
Thanks. I'll keep the photos and updates coming as I go along. |
|
| Author: | 88reaper88 [ Tue May 17, 2011 12:29 pm ] |
| Post subject: | Re: My Pepakura Armour Build |
This is how I'm hopefully making my armour. I will be glued to this thread for tips and tricks!! It's looking really nice so far |
|
| Author: | Drake07046139 [ Tue May 17, 2011 12:59 pm ] |
| Post subject: | Re: My Pepakura Armour Build |
Awesome job! If I had your skills Id be making these all the time |
|
| Author: | korran_kuat [ Tue May 17, 2011 1:39 pm ] |
| Post subject: | Re: My Pepakura Armour Build |
Thanks Guys, 88Reaper88, the best thing to remember is to use a light fibre-glass matt and build it up in layers. I think I'm using about 225gsm. You also want to use a lot of resin. It's a really labour intensive process. The only thing that's keeping me going is that I'm slowly starting to finish parts. Drake, it's really not too hard. This is the first time I have ever worked with any of this stuff. A good friend of mine builds hoovercrafts out of fibre-glass and when he saw my first attempt he told me it was the worst he had ever seen. |
|
| Author: | korran_kuat [ Wed May 18, 2011 11:45 am ] |
| Post subject: | Re: My Pepakura Armour Build |
OK, up date. Yesterday I finished the middle shoulder section, ab pad and cod plate. From this: ![]() To this: ![]() ![]() ![]() Then I moved onto the chest plate. All was going well untill a few holes appeared. This is from the the fibre-glass hasn't been layered down properly. ![]() ![]() After I had them filled and sanded a few more opened up: ![]() ![]() Slowly filling and sanding them all down. Hopefully it will be ok. |
|
| Author: | SSgt Burton [ Wed May 18, 2011 11:54 am ] |
| Post subject: | Re: My Pepakura Armour Build |
Ouch. Well best of success correcting those holes. I must say I'm pretty impressed with this build so far! I was never keen on pepakura- mostly because I'm a caveman and this is such a recent thing with our hobby. Greatly looking forward to how this turns out! Kevin |
|
| Author: | korran_kuat [ Wed May 18, 2011 12:31 pm ] |
| Post subject: | Re: My Pepakura Armour Build |
Thanks man. It was a little annoying, since I was almost finished sanding the chest. |
|
| Author: | Ttaskmaster [ Wed May 18, 2011 12:34 pm ] |
| Post subject: | Re: My Pepakura Armour Build |
This is very cool! Could you use Pepakura to make armour from sheet steel, I wonder? |
|
| Author: | korran_kuat [ Wed May 18, 2011 12:50 pm ] |
| Post subject: | Re: My Pepakura Armour Build |
The main problem would be the joins. The paper model you make is 3d, so I doesn't really give you a flat template. |
|
| Author: | 88reaper88 [ Wed May 18, 2011 3:00 pm ] |
| Post subject: | Re: My Pepakura Armour Build |
Could you not make the pep armour as normal and then use it as almost a die for the metal? Hammering it out on top of the pep? Obviously you'd need to fill up the voids on the reverse with sand or something but could that work????? |
|
| Author: | Russ Krook III [ Thu May 19, 2011 6:49 pm ] |
| Post subject: | Re: My Pepakura Armour Build |
88reaper88 wrote: Could you not make the pep armour as normal and then use it as almost a die for the metal? Hammering it out on top of the pep? Obviously you'd need to fill up the voids on the reverse with sand or something but could that work????? Uh... no? Because you'd be hammering metal plates on top of fiberglass. I can't see that working out well. It shouldn't take much effort to fill those holes with bondo and sand smooth. @ Korran: Good build, looks great so far! Was there a reason why you used chopped fiberglass instead of flat fiberglass mat? |
|
| Author: | 88reaper88 [ Thu May 19, 2011 7:00 pm ] |
| Post subject: | Re: My Pepakura Armour Build |
Well sorry for being a retard. |
|
| Author: | korran_kuat [ Tue May 24, 2011 10:53 pm ] |
| Post subject: | Re: My Pepakura Armour Build |
I am using fibre-glass mat. Holes are mostly filled and sanded. Still got a bit of work to do. |
|
| Author: | Drake07046139 [ Tue May 24, 2011 11:26 pm ] |
| Post subject: | Re: My Pepakura Armour Build |
Keep us updated, really interested to see how this will turn out |
|
| Author: | korran_kuat [ Tue May 31, 2011 10:32 pm ] |
| Post subject: | Re: My Pepakura Armour Build |
I haven't had much of a chance to work on this project at the moment due to real life commitments. However I'm starting to look at getting the webbing, what sizes do I need? Am I right in thinking it is only 1" and 2"? Also what colour is best? Black or Olive? I know that Olive is accurate for the grenade straps, but what about all the others? Thanks |
|
| Author: | dkwd [ Fri Jun 24, 2011 12:33 am ] |
| Post subject: | Re: My Pepakura Armour Build |
Looking good Pete. Have you managed to progress or has real life bogged you down? David |
|
| Author: | korran_kuat [ Fri Jun 24, 2011 8:31 am ] |
| Post subject: | Re: My Pepakura Armour Build |
I've made some progress, but not as much as I would have liked. I have a little fibre-glassing left to do on the back piece andc the lower back and then I think that is it. I have a lot of sanding still to do. I just need a couple of free days with good weather. |
|
| Author: | Big Stew [ Sat Jun 25, 2011 7:44 pm ] |
| Post subject: | Re: My Pepakura Armour Build |
korran_kuat can you tell me where you got the pepakura template from? need to build custom chest and back plate and pepakura seems the best way to go. cheers |
|
| Author: | Vito [ Sat Jun 25, 2011 8:37 pm ] |
| Post subject: | Re: My Pepakura Armour Build |
Very Impressive Man! |
|
| Author: | korran_kuat [ Sun Jun 26, 2011 12:18 pm ] |
| Post subject: | Re: My Pepakura Armour Build |
Wildeone, PM sent. Thanks Vito. Hopefully this week I'll have some time to do some work on this and I'll do a big update. |
|
| Author: | korran_kuat [ Fri Jul 08, 2011 10:05 pm ] |
| Post subject: | Re: My Pepakura Armour Build UPDATED 08/07 |
OK guys, time for a big up date. Things are going quite well and I should start painting next week. Unfortunately I'm too busy over the weekend to start, and it's not because I'm at LFCC. Quite a few people have asked me about the process I go through whole making this, so here is a quick tutorial: The first thing I do is paint both sides of the card model with resin, this gives you something a bit more sold to work with. Normally I make up 100ml mixes using 1% cat. ![]() ![]() Once that has dried I go over all the fine detail in car body filler. This stops you from getting big holes if you haven't managed to get the glass into all the corners. (which is what happened on my chest plate.) ![]() ![]() Again once that is dry it's time for the first layer of glass. I'm using a 300 gramms per square metre matt. Make sure you use lots of resin, it will help make the matt more workable. ![]() After the first layer of glass I remove all the triangular supports and trim down the edges. Then I do another layer. ![]() After that it's a case of cleaning up the edges again (when you're putting the second layer on it's always best to go over the edges a bit, just to make sure they are going to be well glassed.) Sanding it down, filling and making it ready to pain. ![]() One thing I did with the lower back was reinforce the bit above where I cut the holes. For this I used milliput. ![]() One problem I ran into this week was that the indents on the side of the chest plate were far too small for the 2" straps, so I have had to cut them out and remake them. It was fairly easy, I cut them out to the right size, then got them to the right size in card. After which I painted them with resin again, built up the inside with milliput and the re-glassed. I haven't had a chance sand or tidy them up yet. ![]() ![]() ![]() Here's a few pics of the bits I have painted silver and that are waiting for me to start painting the camo. ![]() My spat Leg armour.
|
|
| Author: | TECKNO VIKING [ Fri Jul 08, 2011 10:19 pm ] |
| Post subject: | Re: My Pepakura Armour Build |
WOW never could get my head around this pep stuff but amazing job. |
|
| Author: | korran_kuat [ Fri Jul 08, 2011 10:23 pm ] |
| Post subject: | Re: My Pepakura Armour Build |
Thanks dude. It's been a real labour of love. I forgot to mention that I have also trimmed half an inch of the sides of both the front an back plates to make them fit better. |
|
| Page 1 of 5 | All times are UTC [ DST ] |
| Powered by phpBB © 2000, 2002, 2005, 2007 phpBB Group http://www.phpbb.com/ |
|