| The Aliens Legacy http://forum.alienslegacy.com/ |
|
| Building a set of USCM armour. Start to finish. http://forum.alienslegacy.com/viewtopic.php?f=3&t=9621 |
Page 1 of 3 |
| Author: | nick-a-tron [ Sun Feb 27, 2011 6:25 pm ] |
| Post subject: | Building a set of USCM armour. Start to finish. |
Hi! I've been commissioned to build another set of MAA armour so I thought I'd document it here for others to refer to, whether they are building a full set too or just need some tips for refurbishing/repairing their current kit. Maybe something for the archives. OK so here we go! First things first, I had to heat the chest piece with a heat-gun and bend it a little to make the overall curve a little tighter. Some cracks appeared but they were only small and nothing a bit of Superglue, filler and sanding couldn't fix 
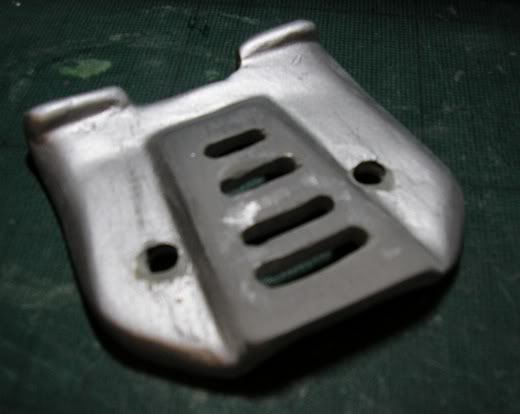
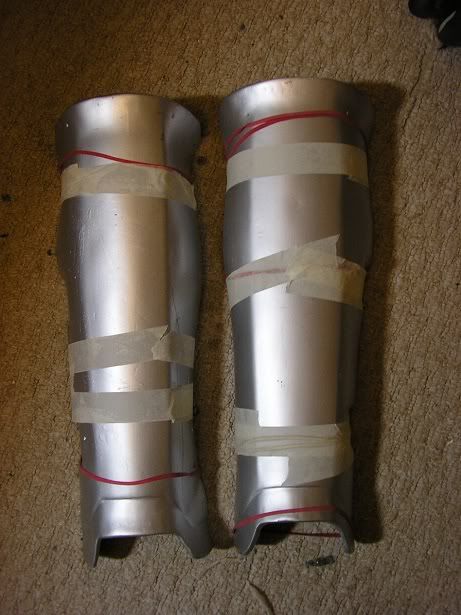
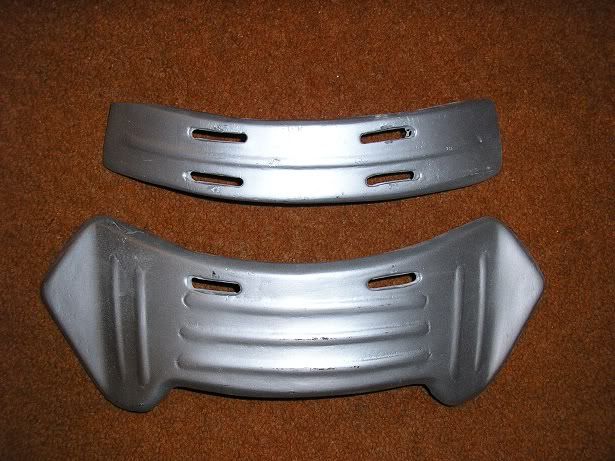
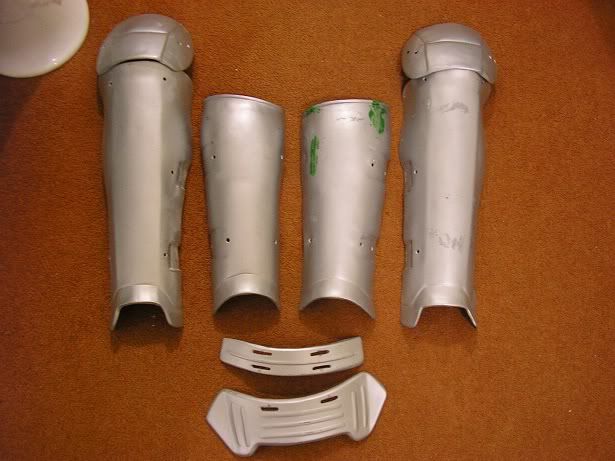
Next drill out all the rivet holes and slots in the torso section. I used a cordless drill with a 5mm bit to drill the rivet holes. For the slots I used the same drill and bit to drill a hole at each end then cut out the centre section with a Dremel with a cutting wheel attached. The back bracket holes were made by placing the brackets on the back piece, marking the holes with black marker and then drilling the holes with the 5mm drill bit. I will be pop riveting these to the armour. ![]() 
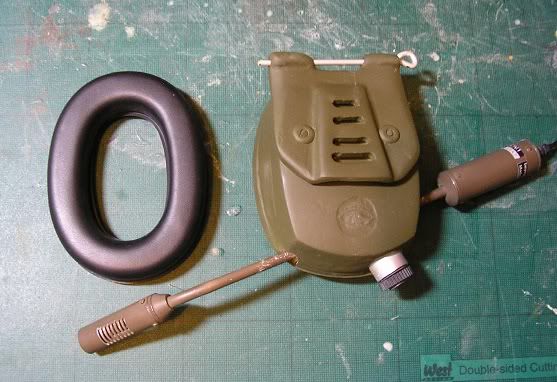
The next step would be to spray all the sections OD green but as the weather wasn't too great today I decided to paint the back brackets Brown Bess and start on the helmet ear cup. ![]() 
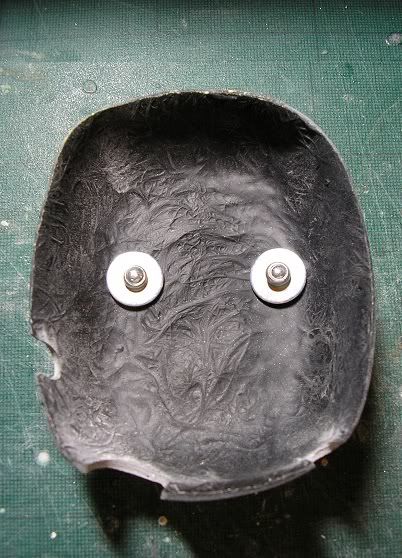
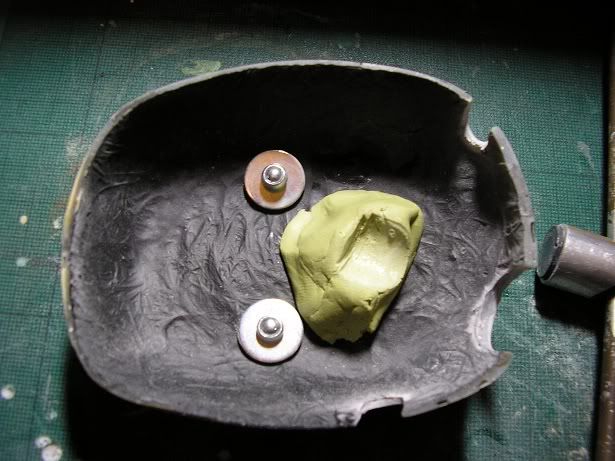
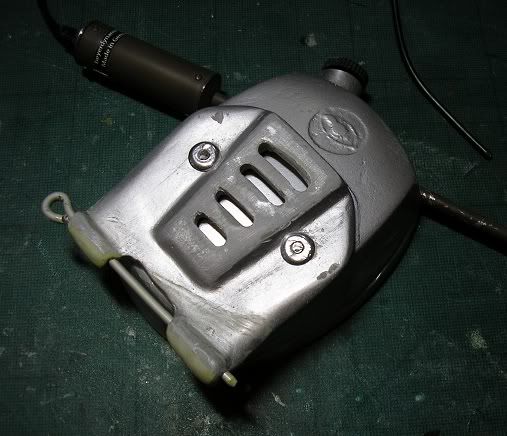
Here you can see the notches I made in the cup using a Dremel with a sanding cylinder. These notches are what the Mic sits in. ![]() Watch this space. |
|
| Author: | nick-a-tron [ Sun Feb 27, 2011 7:28 pm ] |
| Post subject: | Re: Building a set of USCM armour. Start to finish. |
Time to drill out the "vents" in the ear cup plate. I made these the same way I made the webbing slots on the armour; drill a hole at each end use a Dremel with a cutting wheel to cut out the middle section. ![]() ![]() Note that I cut away some material below the vent on the backside to allow for the chin strap. Now it's just a simple case of riveting it to the cup... ![]() and the inside... ![]() And with the mic dry-fitted..
|
|
| Author: | Russ Krook III [ Mon Feb 28, 2011 8:30 pm ] |
| Post subject: | Re: Building a set of USCM armour. Start to finish. |
Hurry up! I want to see how you web up the torso armor. I'm having fits with mine. |
|
| Author: | 88reaper88 [ Mon Feb 28, 2011 8:38 pm ] |
| Post subject: | Re: Building a set of USCM armour. Start to finish. |
#subscribes to awesome topic |
|
| Author: | nick-a-tron [ Mon Feb 28, 2011 9:12 pm ] |
| Post subject: | Re: Building a set of USCM armour. Start to finish. |
Not to worry Russ ill be going over how it all straps together very clearly soon. |
|
| Author: | nick-a-tron [ Mon Feb 28, 2011 9:53 pm ] |
| Post subject: | Re: Building a set of USCM armour. Start to finish. |
On with the build! Next step was to trim the shoulder-bell mid-tabs. These were made from a different material to the fibreglass plates (resin I think). I had to cut the frill, drill the rivet hole, cut off the cast in webbing and cut the slot. Here's a before and after shot. ![]() And a shot showing the frill. ![]() And both done.
|
|
| Author: | assimilate [ Mon Feb 28, 2011 11:13 pm ] |
| Post subject: | Re: Building a set of USCM armour. Start to finish. |
didnt have that problem on the set i built |
|
| Author: | spacemarine [ Mon Feb 28, 2011 11:16 pm ] |
| Post subject: | Re: Building a set of USCM armour. Start to finish. |
You've gotta love a good build thead, keep the updates coming. Awesome work. |
|
| Author: | Filandrius [ Tue Mar 01, 2011 4:35 am ] |
| Post subject: | Re: Building a set of USCM armour. Start to finish. |
Subscribed. |
|
| Author: | nick-a-tron [ Tue Mar 01, 2011 7:42 pm ] |
| Post subject: | Re: Building a set of USCM armour. Start to finish. |
Right moving onto the greaves. First thing to do was to heat them up with a heat-gun and bend to shape; they were a little flat out the box. I used rubber bands and masking tape to hold them in place then dunked them in a cold bath so they "set". Then I removed the bands and tape. Did the same for the rear plates. I then drilled all holes and slots. ![]() ![]() Also cut the slots in the lobster plates. ![]() And a group shot. The green smear is putty to fill in some small cracks that appeared when bending the plates. I'll give the plates a sanding before painting as some heat bumps appeared too.
|
|
| Author: | nick-a-tron [ Wed Mar 02, 2011 6:56 pm ] |
| Post subject: | Re: Building a set of USCM armour. Start to finish. |
Continuing work on the ear cup as the weather again was too cold and windy for spray painting. Next thing I had to make was a plate for cup - this is what the foam ear piece will attach to. I traced around the cup on some styrene and cut the rough shape with a Stanley knife. ![]() I then glued it to the cup with 4 TINY drops of Superglue. I need to be able to remove it. ![]() I then did the final trimming... ![]() And sanding.... ![]() And now we have a plate that fits perfectly ![]() Now I had to make something for the mic adjustment barrel to glue to. I used a blob of Milliput and pushed the mic into it. ![]() And removed it. Now I have a perfect slot to glue the mic to once dry.
|
|
| Author: | nick-a-tron [ Thu Mar 03, 2011 6:39 pm ] |
| Post subject: | Re: Building a set of USCM armour. Start to finish. |
Mic glued in place with epoxy glue and backplate superglued in place. I gave the edges a final sanding after the glue had dried just to tidy it up.
|
|
| Author: | PVB [ Thu Mar 03, 2011 6:59 pm ] |
| Post subject: | Re: Building a set of USCM armour. Start to finish. |
Great guide Nick. You might wanna change the images to have them hosted on the forum though, in case your image host stops/other reason in the future once this thread is finished and archived. |
|
| Author: | nick-a-tron [ Thu Mar 03, 2011 7:03 pm ] |
| Post subject: | Re: Building a set of USCM armour. Start to finish. |
Thanks Steve, and will do! |
|
| Author: | spacemarine [ Thu Mar 03, 2011 7:13 pm ] |
| Post subject: | Re: Building a set of USCM armour. Start to finish. |
Thanx Nick, this thread will help me no end when i get my helmet parts from Marsattack. |
|
| Author: | nick-a-tron [ Fri Mar 04, 2011 10:14 pm ] |
| Post subject: | Re: Building a set of USCM armour. Start to finish. |
OK I drilled the ear-cup hinge and strengthened it a bit with some Milliput. I used a cut knitting needle to make the hinge pin. ![]() The weather was better today so I managed to spray all the torso parts OD green. ![]() I use the olive drab paint by Fosco for all my armour builds.
|
|
| Author: | nick-a-tron [ Wed Mar 09, 2011 8:54 pm ] |
| Post subject: | Re: Building a set of USCM armour. Start to finish. |
Ear-cup primed and base coated. Got hold of a correct sized padded ear defender
|
|
| Author: | Filandrius [ Thu Mar 10, 2011 7:53 pm ] |
| Post subject: | Re: Building a set of USCM armour. Start to finish. |
You and your great paints that are only available in the UK... |
|
| Author: | nick-a-tron [ Thu Mar 10, 2011 9:09 pm ] |
| Post subject: | Re: Building a set of USCM armour. Start to finish. |
Ah sorry Mike, but yeah it does make things a little easier being able to get hold of them here Speaking of painting I started the camo today. Just the dark green to start with.
|
|
| Author: | spacemarine [ Thu Mar 10, 2011 9:58 pm ] |
| Post subject: | Re: Building a set of USCM armour. Start to finish. |
Loving the paint work, you'll be getting a PM when i finally get my armour |
|
| Author: | korran_kuat [ Sat Mar 12, 2011 4:53 am ] |
| Post subject: | Re: Building a set of USCM armour. Start to finish. |
This is looking very nice. Are you using a pattern for the camo or do you free hand? Also do you paint it on by hand or airbrush it? |
|
| Author: | Akir [ Sat Mar 12, 2011 8:16 am ] |
| Post subject: | Re: Building a set of USCM armour. Start to finish. |
I needs my money from work like now |
|
| Author: | nick-a-tron [ Sat Mar 12, 2011 9:15 am ] |
| Post subject: | Re: Building a set of USCM armour. Start to finish. |
Thanks guys! I paint the camo on free hand with a brush. |
|
| Author: | nick-a-tron [ Thu Mar 17, 2011 11:13 am ] | ||
| Post subject: | Re: Building a set of USCM armour. Start to finish. | ||
Ok all the camo on the torso has been painted. Next stage is the weathering.
|
|||
| Page 1 of 3 | All times are UTC [ DST ] |
| Powered by phpBB © 2000, 2002, 2005, 2007 phpBB Group http://www.phpbb.com/ |
|