The discussion of the Alien series of films and the props used in them is the aim, but if it's got Big Bugs and Big Guns, then they are welcome too!


Post new topic Reply to topic  [ 46 posts ]  Go to page Previous  1, 2
Author Message
 Post subject: Re: Steadycam arm scratch build
PostPosted: Fri Feb 04, 2011 11:17 am 
Galaxy-hopping garbage man

Country: United Kingdom
So.... umm..... hypothetically..... how much would something like this cost to make and ship to, say.... my house? :D


Top
 Profile  
Reply with quote  
 Post subject: Re: Steadycam arm scratch build
PostPosted: Sat Feb 12, 2011 9:05 pm 
If found, please return to the Bar.
User avatar

Country: United Kingdom
a little more progress -

Image
Image
Image

Simon - cheers mate. mines about an inch longer, but seems to still be a useable length.

Woody - Good question!! as i've built this completely from scrap, its only cost me £8 (for the springs) i actually have no idea how much it would have cost if i had to buy all the aluminium etc :D

_________________
M/SGT Rich Hyatt-Dowling (Retd)

UKCM Black ops


Top
 Profile  
Reply with quote  
 Post subject: Re: Steadycam arm scratch build
PostPosted: Sat Feb 12, 2011 10:13 pm 
Set to stun

Location: Honiton, Devon
Service Number: A01/TQ9.6.23466E8
Country: United Kingdom
Daaamn Rich, you're just too bad! Excellent job! :D

_________________
Image

Image


Top
 Profile  
Reply with quote  
 Post subject: Re: Steadycam arm scratch build
PostPosted: Wed Mar 09, 2011 6:50 pm 
"Smart"-Ass
User avatar

Location: Orlando, FL, USA
Service Number: A01/TQ2.0.72156E1
Country: United States
More Smartgunners! MOAR!!

_________________
Image
CPL Sean Maio A01/TQ2.0.72156E1
Public Relations Division (Temporary Cross-Assignment)
M-56 Smartgun Operator, A/3Btn, II CMEF, USS Sephora

Image


Top
 Profile  
Reply with quote  
 Post subject: Re: Steadycam arm scratch build
PostPosted: Wed Mar 09, 2011 8:23 pm 
GroundBeef
User avatar

Location: Edmonton, Alberta - Land of the Beaver!
Service Number: A08/TQ0.0.62139E1
Country: Canada
Awesome job fellow gunner. Keep rockin'! :delta:

_________________
Worker bees can leave. Even drones can fly away. The Queen is their slave.


Top
 Profile  
Reply with quote  
 Post subject: Re: Steadycam arm scratch build
PostPosted: Wed Mar 09, 2011 8:58 pm 
User avatar

Location: Kent, UK
Image


Top
 Profile  
Reply with quote  
 Post subject: Re: Steadycam arm scratch build
PostPosted: Wed Mar 09, 2011 11:16 pm 
User avatar

Location: Germany
Woah! :shock:
Great job!

Cheers,
Stefan


Top
 Profile  
Reply with quote  
 Post subject: Re: Steadycam arm scratch build
PostPosted: Wed Mar 09, 2011 11:57 pm 
Ready to Rock & Roll!
User avatar

Location: Rochester, Kent, U.K.
Service Number: A08/TQ2.0.72136E1
Country: United Kingdom
£8?! :shock:

Mother of God! 8)

_________________
Steve
Corporal in 69th Regt. 1st Batt. Homer’s Heroes.

"I'd like to die at the age of 80 in my own bed, with a belly full of wine and a girl's mouth around my c**k."


Top
 Profile  
Reply with quote  
 Post subject: Re: Steadycam arm scratch build
PostPosted: Thu Mar 10, 2011 3:53 am 
User avatar
Best kids room, ever! Awesome work!

_________________
still alive


Top
 Profile  
Reply with quote  
 Post subject: Re: Steadycam arm scratch build
PostPosted: Thu Mar 10, 2011 6:12 pm 
Site Admin
User avatar

Location: Wasteland Minnesota, USA
Service Number: A06/TQ2.0.65181E6
Country: United States
Looking good... now take another pic of you all geared up with the M56 atttached!

_________________
"A writer needs a pen, a painter a brush, and a filmmaker an army." - Orson Wells.

http://www.rookscastle.com
http://www.alchemyarms.com


Top
 Profile  
Reply with quote  
 Post subject: Re: Steadycam arm scratch build
PostPosted: Thu Mar 10, 2011 7:52 pm 
User avatar

Location: Quebec, QC
Country: Canada
Absolutely incredible. It looks screen-used. Couldn't be more realistic or authentic-looking.

_________________
Hey, wait! I'm having one of those things. You know, a headache with pictures.


Top
 Profile  
Reply with quote  
 Post subject: Re: Steadycam arm scratch build
PostPosted: Thu Mar 10, 2011 9:10 pm 
Galaxy-hopping garbage man

Country: United Kingdom
REQUIRE!!!!!!!


Top
 Profile  
Reply with quote  
 Post subject:
PostPosted: Sat Jun 09, 2012 7:20 pm 
Ultimate Badass.
User avatar

Location: wisconsin
Service Number: A09/TQ1.0.12141E1
Country: United States
so mr ninja sir , could you give some simple measurements of your first pic ? I plan to try to make one or two next saturday

_________________
"I am the ULTIMATE BADASS , state of the badass art"
Alpha squad. Burton's Bandits


Top
 Profile  
Reply with quote  
 Post subject:
PostPosted: Sat Jun 09, 2012 7:43 pm 
If found, please return to the Bar.
User avatar

Country: United Kingdom
of course! im making some upgrades on the SG tomorrow, so ill get some measurements for you while im at it :)

_________________
M/SGT Rich Hyatt-Dowling (Retd)

UKCM Black ops


Top
 Profile  
Reply with quote  
 Post subject:
PostPosted: Sat Jun 09, 2012 8:52 pm 
Ultimate Badass.
User avatar

Location: wisconsin
Service Number: A09/TQ1.0.12141E1
Country: United States
thank you kind sir

_________________
"I am the ULTIMATE BADASS , state of the badass art"
Alpha squad. Burton's Bandits


Top
 Profile  
Reply with quote  
 Post subject:
PostPosted: Tue Jun 12, 2012 12:23 pm 
Harvester of Sorrow
User avatar

Location: Lancashire (Wirral born)
Service Number: A04/TQ1.0.32156E1
Country: United Kingdom
More pics/vids/plans/etchings please!

Damn fine work Rich :)

_________________
Image AKA: Simon


Top
 Profile  
Reply with quote  
 Post subject:
PostPosted: Tue Jun 12, 2012 7:49 pm 
"Smart"-Ass
User avatar

Location: Orlando, FL, USA
Service Number: A01/TQ2.0.72156E1
Country: United States
I'm watching this thread closely, myself. I've been wanting to rebuild my arm for a long time now; mine is heavy, and the combined weight is murder on my back and shoulders during those long stretches on the floor at the SEGA events. Your scratchbuild follows the mechanics of the original MUCH more closely than mine does, so I'm curious to see how it "flies" with the gun on it!

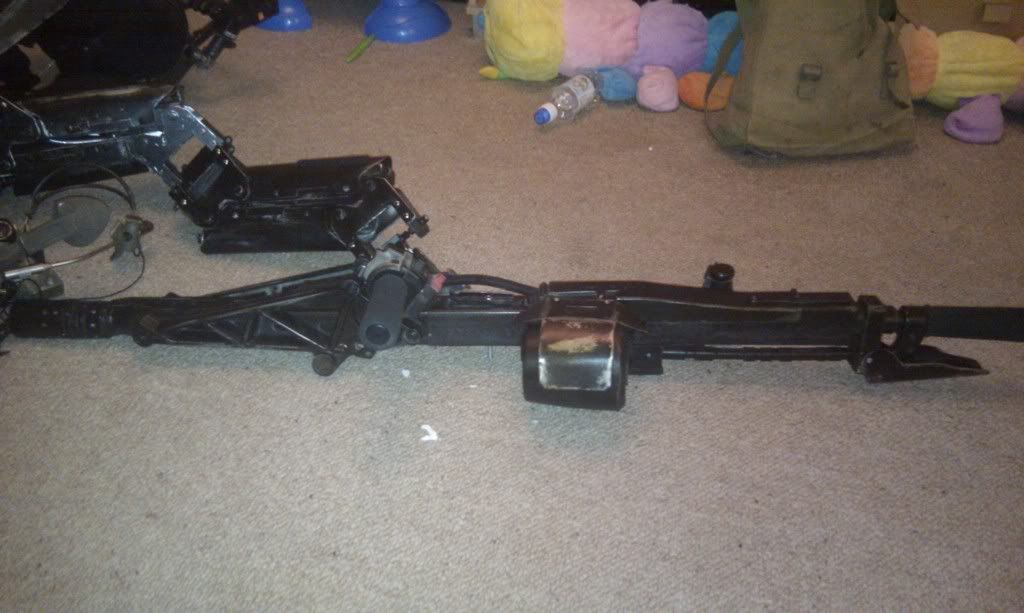
One thought, though: in one of the pictures above showing the arm at rest, it looks like the spring is bunching up. You may end up needing to find shorter springs. Finding a balance between spring length and tension has honestly been one of the toughest parts of getting my arm "just right"... shorter springs stay under tension through a wider range of motion, but the tension scales much more sharply through that range of motion. Longer springs have the opposite problem: the tension is more constant, but you run into the issue of not being able to raise the arm very high before the springs "bottom out" and stop carrying the weight. I've often wondered if the cable and pulley setup would help mitigate that.

Xeno_Stomper's arm build thread has some good images of the "Z"-shaped 3 spring layout, might be worth looking at. Watching that one pretty closely, too :wink: . Can't wait to see more progress!

_________________
Image
CPL Sean Maio A01/TQ2.0.72156E1
Public Relations Division (Temporary Cross-Assignment)
M-56 Smartgun Operator, A/3Btn, II CMEF, USS Sephora

Image


Top
 Profile  
Reply with quote  
 Post subject: Re: Steadycam arm scratch build
PostPosted: Tue Jun 12, 2012 9:14 pm 
If found, please return to the Bar.
User avatar

Country: United Kingdom
taken a few measurements -

Image

Ive just fit a real top cover, feed tray and charging handle to the SG, so ill post up some pics when the paints dry!

Your exactly right Sean, the springs are too long! they sit nicely under strain, but tend to bunch up and get too soft when you lift the gun up. I need to find a couple about an inch shorter, but not having much luck!

_________________
M/SGT Rich Hyatt-Dowling (Retd)

UKCM Black ops


Top
 Profile  
Reply with quote  
 Post subject: Re:
PostPosted: Tue Jun 12, 2012 10:30 pm 
GroundBeef
User avatar

Location: Edmonton, Alberta - Land of the Beaver!
Service Number: A08/TQ0.0.62139E1
Country: Canada
Outcry27 wrote:
Xeno_Stomper's arm build thread has some good images of the "Z"-shaped 3 spring layout, might be worth looking at...


Thanks for the mention Outcry. I dug up the link to my thread (it's been a while):
viewtopic.php?f=3&t=7718&hilit=my+m56+journey+begins

When I get more cash, I will start on the arm again... I went with 15/16" x 4" long compression springs for a little over $20 for all six, per bone.

Hope this helps!
:dropship:

P.S. Awesome job by the way... Looks like the real deal!

_________________
Worker bees can leave. Even drones can fly away. The Queen is their slave.


Top
 Profile  
Reply with quote  
 Post subject:
PostPosted: Wed Jun 13, 2012 12:44 am 
Ultimate Badass.
User avatar

Location: wisconsin
Service Number: A09/TQ1.0.12141E1
Country: United States
thanks for the info guys

_________________
"I am the ULTIMATE BADASS , state of the badass art"
Alpha squad. Burton's Bandits


Top
 Profile  
Reply with quote  
 Post subject: Re: Steadycam arm scratch build
PostPosted: Wed Jun 13, 2012 3:55 am 
Duke Bronson
User avatar

Country: Canada
Well done, Marine.


Top
 Profile  
Reply with quote  
Display posts from previous:  Sort by  
Post new topic Reply to topic  [ 46 posts ]  Go to page Previous  1, 2


You cannot post new topics in this forum
You cannot reply to topics in this forum
You cannot edit your posts in this forum
You cannot delete your posts in this forum
You cannot post attachments in this forum

Search for:
Jump to:  
cron