I got as much time in on this as I could before work starts tomorrow. I got some tiny magnets (2mm diameter, 1mm thick) to use as door closures and for fixing weapons to racks, hands etc.

You can see one of these in the door edge and a corresponding one in the cabin shell. I had to dig out and reverse the one in the door.


The tiny magnets hold the door closed just fine. Here you can see the side running light temporarily installed too.

The running light is a shaved LED glued onto a shaped section of clear sprue.

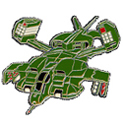
The headlights have been a little tricky since the filming vehicle had circular lamps behind a rectangular opening. Here's what I have.

The white will be light-blocked and painted dark. The donor lamps are from stick-on push-lights, for cupboards and such. I cropped down the boards they were on and soldered/made good the connections, keeping the resistors attached to help extend the life of the lamps.

I kept a switch from one of the push-lamps and this will be painted and installed in the cabin, disguised as a greeblie.
Here are the left and right side lamps temporarily placed. The batteries (3 x 1.5v) will go on the right side and be hidden from view.


Here are the headlights switched on. I didn't realise until I lit them both together that one of them is a warm white, and the other one a cool white. I'll place a gel in front of them to balance them out.


Well, that's it for now. I think next up will be wiring all of this stuff in properly but we'll see if anything else jumps to the front of the jobs list. I'm still waiting for supplies to get going properly on the seat-restraint modelling/lighting.