The discussion of the Alien series of films and the props used in them is the aim, but if it's got Big Bugs and Big Guns, then they are welcome too!


Forum locked This topic is locked, you cannot edit posts or make further replies.  [ 37 posts ]  Go to page 1, 2  Next
Author Message
 Post subject: Finally putting a marine together!
PostPosted: Sun Sep 11, 2016 1:20 am 
User avatar

Location: Southampton, UK
Country: United Kingdom
Righto, hi! :)

I've been umming and ahhing over a marine for years, mates with a few of the local UKCM and been promising i'd get it done forever, but cash has always been an issue - always put the money into other costumes or one of the 200 other geeky things i do, or frivolous stuff like food and rent.

However a mate of mine is ditching his now third-hand kit for a spectacularly low price, spat armour, BDU pants and sleeveless top, a metal chef helmet kit, and a handful of pouches and such, for £200.

Can't turn that down, so finally stepping up to it. :D Lots of work to fix it all up nice, probably need a couple parts replaced, but i've got time.

I've been grabbing the occasional part for years so i've ended up with a handful of decent stuff, got an ammo bag somewhere, a few accessory parts, and a snow wolf pulsie i picked up when they were cheap! plus a noble magwell holder for it.

Figured now's the time to dig stuff out and get started on it all, while i wait on armour getting delivered.

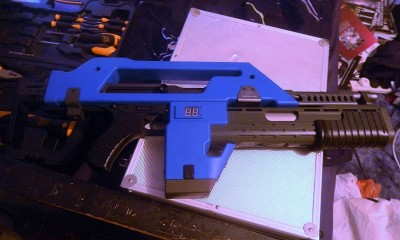
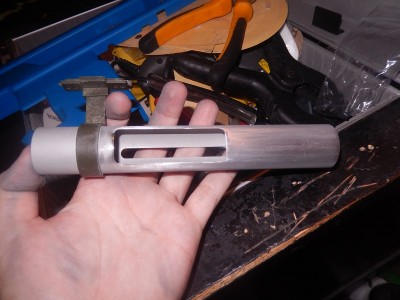
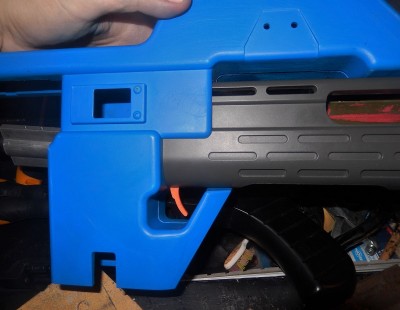
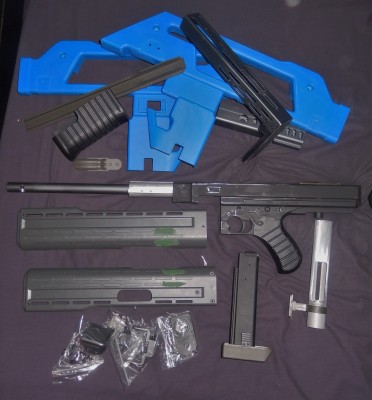
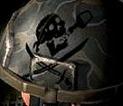
Popped my pulsie out and very timidly tore it apart, and got started on a few little mods and improvements.

Attachment:
DSCN1603.JPG
DSCN1603.JPG [ 181.62 KiB | Viewed 8769 times ]


Attachment:
DSCN1615.JPG
DSCN1615.JPG [ 155.06 KiB | Viewed 8769 times ]


Attachment:
DSCN1620.JPG
DSCN1620.JPG [ 147.6 KiB | Viewed 8769 times ]


Attachment:
DSCN1621.JPG
DSCN1621.JPG [ 224.98 KiB | Viewed 8769 times ]


Nothing special, just a handful of the regular mods i've seen folks do.

Added a trigger to the launcher, sanding and polishing the weird coating on the breech to get that nice and shiny, filling in the spas cage holes that shouldn't be there, darkening the ammo counter and such.

Gutted the magazine, would like to add rounds but no luck finding something convincingly sci-fi yet, no rush though. Got some Grenades on the way from Chef to swap out the shotgun shell too.

Passing on a few mods like rounding off the rear as i like moving parts, and leaving some other stuff i like aesthetically.


All the usual stuff everyone's seen but hopefully it'll get a bit more interesting when i get round to painting and get some armour in :D


Top
 Profile  
Reply with quote  
 Post subject:
PostPosted: Sun Sep 11, 2016 1:51 am 
THAT guy
User avatar

Location: Virginia
Service Number: A03/TQ2.0.02146E1
Country: United States
Gonna be pretty in no time. Great work.


Top
 Profile  
Reply with quote  
 Post subject: Re: Finally putting a marine together!
PostPosted: Sun Sep 11, 2016 1:15 pm 
User avatar

Location: Southampton, UK
Country: United Kingdom
More progress!

Attachment:
DSCN1628.JPG
DSCN1628.JPG [ 146.41 KiB | Viewed 8736 times ]


Filled in the vent holes with a pair of old games workshop mini bases sanded and filed down, convenient size.


Attachment:
DSCN1629.JPG
DSCN1629.JPG [ 175.18 KiB | Viewed 8736 times ]


Filled and smoothed the rear vents, like this mod a lot, more accurate and a lot less busy-looking.

Attachment:
DSCN1630.JPG
DSCN1630.JPG [ 248.95 KiB | Viewed 8736 times ]


Starting painting now! Won't be able to completely reassemble until i get chef's grenades through, but gonna get things started.


Top
 Profile  
Reply with quote  
 Post subject:
PostPosted: Sun Sep 11, 2016 5:18 pm 
Prop Churner Outer
User avatar

Location: Bath, Maine
Service Number: A03/TQ1.0.12143G1
Country: United States
Looks great man!

_________________
:delta: My entry-level prop and costume tutorials: viewtopic.php?f=3&t=12751 :delta:


Top
 Profile  
Reply with quote  
 Post subject: Re: Finally putting a marine together!
PostPosted: Sun Sep 11, 2016 7:56 pm 
User avatar

Location: Southampton, UK
Country: United Kingdom
More progress! Good day for it, the day moon shines and paint is drying quick so i got everything sprayed up.

Attachment:
DSCN1637.JPG
DSCN1637.JPG [ 242.46 KiB | Viewed 8707 times ]


Never been a huge fan of brown bess, so going with an OD. Nice brownish tone though so it's a halfway point, very happy with it.

Started weathering, scraping stuff up and such, minor paint apps, just have to give it all a dirt wash now!

Attachment:
DSCN1642.JPG
DSCN1642.JPG [ 272.18 KiB | Viewed 8707 times ]


Don't think i can fully reassemble it until i get my nades through, but it's shaping up. :D

Nice for it to finally look like a pulse rifle after 2 years...


Top
 Profile  
Reply with quote  
 Post subject: Re: Finally putting a marine together!
PostPosted: Mon Sep 12, 2016 7:55 pm 
MARINE RAIDER
User avatar

Location: LV-426
Service Number: A01/TQ0.0.12149E1
Country: Germany
What color did you use for the od green? I want to search for it on ebay!!

_________________
If you can read this, - you're too close!
ALIENS: Last Stand (Fan Film): https://felixberner.de/film/ALIENS-Last-Stand/


Top
 Profile  
Reply with quote  
 Post subject:
PostPosted: Mon Sep 12, 2016 11:17 pm 
User avatar

Location: Southampton, UK
Country: United Kingdom
It's a can of Krylon Camouflage Ultra-Flat Fusion in Olive (Blimey, that's a hell of a name.)

Really nice stuff :) Mostly airsoft shops get it in over here, easiest place to find it cheap.


Top
 Profile  
Reply with quote  
 Post subject: Re: Finally putting a marine together!
PostPosted: Mon Sep 12, 2016 11:35 pm 
MARINE RAIDER
User avatar

Location: LV-426
Service Number: A01/TQ0.0.12149E1
Country: Germany
"It's a Bingo :D" - found exatly one "Krylon Camouflage Ultra-Flat Fusion in Olive" spray in Ebay Germany - haha! 3..2..1..mine!

_________________
If you can read this, - you're too close!
ALIENS: Last Stand (Fan Film): https://felixberner.de/film/ALIENS-Last-Stand/


Top
 Profile  
Reply with quote  
 Post subject: Re: Finally putting a marine together!
PostPosted: Mon Sep 12, 2016 11:47 pm 
MARINE RAIDER
User avatar

Location: LV-426
Service Number: A01/TQ0.0.12149E1
Country: Germany
Google for "Aervoe Olive Drab" - this is also an amzing od green brown bess mix ;)!
http://i.imgur.com/Pw89iav.jpg

_________________
If you can read this, - you're too close!
ALIENS: Last Stand (Fan Film): https://felixberner.de/film/ALIENS-Last-Stand/


Last edited by Burner on Tue Sep 13, 2016 5:58 pm, edited 1 time in total.

Top
 Profile  
Reply with quote  
 Post subject: Re: Finally putting a marine together!
PostPosted: Tue Sep 13, 2016 4:56 pm 
User avatar

Location: Southampton, UK
Country: United Kingdom
That's very nice aye! :)

Dirt wash and some detail painting finished.

Attachment:
DSCN1652.JPG
DSCN1652.JPG [ 458.53 KiB | Viewed 8635 times ]


Pretty much done on the PR paintjob now, just attempting a convincing wood paintjob on the grip, then it's all done and nearly ready for reassembly! Really happy with how it's coming out :D


Top
 Profile  
Reply with quote  
 Post subject:
PostPosted: Tue Sep 13, 2016 4:59 pm 
Prop Churner Outer
User avatar

Location: Bath, Maine
Service Number: A03/TQ1.0.12143G1
Country: United States
Wood grain? Makes me think of the USCM Tech Manual!

_________________
:delta: My entry-level prop and costume tutorials: viewtopic.php?f=3&t=12751 :delta:


Top
 Profile  
Reply with quote  
 Post subject:
PostPosted: Tue Sep 13, 2016 5:14 pm 
User avatar

Location: Southampton, UK
Country: United Kingdom
Yep, pilfering it from there! ;) Really liked the look, and it's another texture/colour which is always good - as long as i can get it to look right :)


Top
 Profile  
Reply with quote  
 Post subject: Re: Finally putting a marine together!
PostPosted: Wed Sep 14, 2016 2:06 pm 
User avatar

Location: Southampton, UK
Country: United Kingdom
Righto, progress!

I know i'm spamming a bit now, but trying to keep an actual WIP for once as i always forget! ;)

Adding a cutout of welding visor to the ammo counter to darken it up and make it less "pink".

Attachment:
DSCN1657.JPG
DSCN1657.JPG [ 330.63 KiB | Viewed 8587 times ]


Attachment:
DSCN1680.JPG
DSCN1680.JPG [ 243.81 KiB | Viewed 8587 times ]


Plus, painted up the grip - first time i've ever painted "wood" but i think it's reasonably convincing. Really happy with it.

Attachment:
DSCN1707.JPG
DSCN1707.JPG [ 184.46 KiB | Viewed 8587 times ]


Attachment:
DSCN1710.JPG
DSCN1710.JPG [ 390.71 KiB | Viewed 8587 times ]


Nearly there now :) Just waiting on grenades and i can finish popping the bugger back together!


Top
 Profile  
Reply with quote  
 Post subject: Re: Finally putting a marine together!
PostPosted: Wed Sep 14, 2016 6:45 pm 
MARINE RAIDER
User avatar

Location: LV-426
Service Number: A01/TQ0.0.12149E1
Country: Germany
DAMN - the olive color you used is mind blowing good - did you weather it to make it more brownish??

BTW: I would also paint the metal plates on the sides of the snow wolf - i mean the "TD201203-0163" metal plate ;) - if you use a sand paper you can delete the serial numbers and the "made in china" label :D

_________________
If you can read this, - you're too close!
ALIENS: Last Stand (Fan Film): https://felixberner.de/film/ALIENS-Last-Stand/


Top
 Profile  
Reply with quote  
 Post subject:
PostPosted: Wed Sep 14, 2016 7:00 pm 
User avatar

Location: Southampton, UK
Country: United Kingdom
Yep - the dirt wash i do is generally a mix of black and brown + matte varnish and water, painted on then rubbed off a couple of times, so it's definitely a shade or two browner than when i started :)

Personal preference, i quite like the plates being different tones - Little more detail. Mine didn't come with a 'made in china' stamp, just the serial number, so no problem :D

Edit - Got some post through! A handful of grenades from Chef and a couple really cool old alien minis. 8)

Attachment:
DSCN1724.JPG
DSCN1724.JPG [ 448.65 KiB | Viewed 8516 times ]


Last edited by Shaman on Fri Sep 16, 2016 2:57 pm, edited 1 time in total.

Top
 Profile  
Reply with quote  
 Post subject: Re: Finally putting a marine together!
PostPosted: Fri Sep 16, 2016 2:56 pm 
User avatar

Location: Southampton, UK
Country: United Kingdom
Went nuts painting the grenades up (Wasn't a fan of how they were turning out from just polishing up the cold-cast.) and got one together for the pulse rifle, working on the others now.

Some time with a screwdriver, a hammer to bash the git back together and a little bit of swearing, and it's done!

Attachment:
DSCN1732.JPG
DSCN1732.JPG [ 451.99 KiB | Viewed 8516 times ]


Attachment:
DSCN1752.JPG
DSCN1752.JPG [ 411.59 KiB | Viewed 8516 times ]


Attachment:
DSCN1744.JPG
DSCN1744.JPG [ 431.53 KiB | Viewed 8516 times ]


Attachment:
DSCN1756.JPG
DSCN1756.JPG [ 327.23 KiB | Viewed 8516 times ]


Attachment:
DSCN1757.JPG
DSCN1757.JPG [ 350.54 KiB | Viewed 8516 times ]


Sorted! :D Pretty happy with how it's all turned out. Nice to finally have the bugger done after 3 years sat in a cupboard.


Top
 Profile  
Reply with quote  
 Post subject: Re: Finally putting a marine together!
PostPosted: Fri Sep 16, 2016 8:16 pm 
reload
User avatar

Location: Hamburg
Service Number: A03/TQ3.0.12136E1
Country: Germany
Great project. Thanks for sharing.
Amazing improvment! 8)

_________________
Sgt. Frank Peters 'reload' Smartgun Operator
A03/TQ3.0.12136E1 "It will be no picknick!"
AL Colonial Admin. - Sergeant at Arms (SgtA) -- 2020-2022
GERCM - Executive Officer (XO)
UKCM Foreign Legion: The Deviant Dragoons


Top
 Profile  
Reply with quote  
 Post subject:
PostPosted: Sat Sep 17, 2016 11:34 am 
Prop Churner Outer
User avatar

Location: Bath, Maine
Service Number: A03/TQ1.0.12143G1
Country: United States
The woodgrain handle looks amazing, and your brown wash weathering is seriously making me consider doing the same!
Could you list the brands of paint and varnish you used?

_________________
:delta: My entry-level prop and costume tutorials: viewtopic.php?f=3&t=12751 :delta:


Top
 Profile  
Reply with quote  
 Post subject:
PostPosted: Sat Sep 17, 2016 1:09 pm 
User avatar

Location: Southampton, UK
Country: United Kingdom
Cheers very much! :D I've done some really minor refinements, did a better job filling in the spas cage holes and fixed where i overdid a bit of the silver scratching e.t.c. but i'm really happy with it. :)

I can give you a rundown of how i did both - I mostly use acrylic paints, and when i do it's 90% citadel or tamiya as that's what i have lying around.

The woodgrain handle was, a good sand with low-grit paper, then a thick layer of Citadel Rhinox Hide (Basically trying to get the brushstrokes to look like woodgrain.), then a heavy drybrush with citadel Gorthor Brown to pick up the fake woodgrain.

Washed it with black (Citadel nuln oil, but that's literally just watered down black paint.), then washed it twice with watered down sepia/brown paint.

Sprayed it with gloss varnish, i think 2-3 times? to give it a good top layer, then hit it with some satin to dull it down a bit.

Honestly i was totally winging it, never done it before, but it turned out reasonably good :)


My dirt wash is a little more awkward, i use pigment powders for my washes - so once they dry they've got a really dusty, dirty look instead of looking like paint. ;)

Mixed humbrol dark earth and humbrol black weathering powders with a bit of matte medium and some water (the matte medium tbh is unnecessary) 'til it's basically the consistency of thin paint, coat every part in it bit by bit then rub it off with a cloth before it can dry, let some stay in the crevices.

Reaaaaally light coat of varnish over that if you need one at all, 'cos it'll screw up the dusty look.

Hope that's any help at all! :D I don't really work in measurements so much as "Eh, that looks right."


Last edited by Shaman on Sat Sep 17, 2016 10:58 pm, edited 1 time in total.

Top
 Profile  
Reply with quote  
 Post subject: Re: Finally putting a marine together!
PostPosted: Sat Sep 17, 2016 8:12 pm 
User avatar

Location: Southampton, UK
Country: United Kingdom
Did up the other grenades - repainted a couple caps and added the striping, wanted a few variants together, plus did a Baton round out of the plastic shotgun shell i ripped out of the snow wolf.

Attachment:
DSCN1778.JPG
DSCN1778.JPG [ 175.02 KiB | Viewed 8434 times ]


Really want to get some more grenades in, do some more variants with different tip shapes e.t.c, probably get some 3d-printed soon.

Also, i know these are hella weathered considering they're supposed to be fairly fresh ammo! But i'm going with rule of cool here, my kit's going to be very beat up all round so i'm not a fan of how bright, shiny aluminium metal would look alongside that. Rather go with something duller and worn.


Top
 Profile  
Reply with quote  
 Post subject:
PostPosted: Sun Sep 18, 2016 12:04 am 
Prop Churner Outer
User avatar

Location: Bath, Maine
Service Number: A03/TQ1.0.12143G1
Country: United States
Sounds like the start of a great backstory to me! Stationed on a remote outpost under harsh weather conditions... armed to the teeth in case trouble shows up...

:)

_________________
:delta: My entry-level prop and costume tutorials: viewtopic.php?f=3&t=12751 :delta:


Top
 Profile  
Reply with quote  
 Post subject: Re: Finally putting a marine together!
PostPosted: Sun Sep 18, 2016 4:53 pm 
User avatar

Location: Southampton, UK
Country: United Kingdom
I approve of that! ;) Gonna need some kind of justification for being a dirty boy i guess!


Righto, dug out one of those things i've had saved in the cupboard for when i eventually got around to doing the marine.

Attachment:
DSCN1781.JPG
DSCN1781.JPG [ 265.13 KiB | Viewed 8365 times ]


What's this!

Attachment:
DSCN1792.JPG
DSCN1792.JPG [ 293.91 KiB | Viewed 8365 times ]


Attachment:
DSCN1799.JPG
DSCN1799.JPG [ 212.11 KiB | Viewed 8365 times ]


Promotional watch from when Prometheus came out! Got hold of a dozen or so of these at the time, kept one for me... because it's a weyland corp watch. The only identifiers for it being a promo item are a prometheus logo on the back and across one side of the strap - a little acetone, problem solved!

But it's mine, so it needs to be a bit beat up, so....

Attachment:
DSCN1812.JPG
DSCN1812.JPG [ 233.96 KiB | Viewed 8365 times ]


Nice little touch, i figured - vintage watch instead of a seiko.


Top
 Profile  
Reply with quote  
 Post subject: Re: Finally putting a marine together!
PostPosted: Mon Sep 19, 2016 1:57 pm 
MARINE RAIDER
User avatar

Location: LV-426
Service Number: A01/TQ0.0.12149E1
Country: Germany
Damn, yeah! Today I used "Krylon Camouflage Ultra-Flat Fusion in Olive" and all I can say is, that this is an AMAZING COLOR - thx for sharing this info with me!!!!!!!

_________________
If you can read this, - you're too close!
ALIENS: Last Stand (Fan Film): https://felixberner.de/film/ALIENS-Last-Stand/


Top
 Profile  
Reply with quote  
 Post subject:
PostPosted: Mon Sep 19, 2016 10:32 pm 
User avatar

Location: Wellywood.
Service Number: A10/TQ0.0.82146E1
Country: New Zealand
Love the watch, that's a cool idea, done well.

_________________
Cpl Aron "septic" Williams
A10/TQ0.0.82146E1


Top
 Profile  
Reply with quote  
 Post subject:
PostPosted: Wed Nov 09, 2016 9:57 pm 
User avatar

Location: Southampton, UK
Country: United Kingdom
Righto, got my gear through.

Third-hand armour in very beat up condition, BDU's, a pile of extra parts including chef pouches and sling, plus a full steel helmet kit i don't need (Would prefer plastic) so will put a few bits and bobs up for sale soon!

Loads ( i mean, LOADS.) of work to do on it, fitting things properly as most of it's a little too big, replacing a few parts that are just too smashed up or small with Chef's parts, adding details and obviously painting it all, but for Reaaal cheap i'm super happy. :D

I'm happy to put the effort in and replace bits gradually to make it nice, in the long run it'll make the whole project very reasonable pricewise, which is always nice :)

Not got much time to work right now, plus need to get some replacement parts in (better detail/size Chestplate from chef and a replacement right epaulette as that's broken all over and really rough.) but i'll start piecing things together gradually. :D


Last edited by Shaman on Sat Nov 19, 2016 9:14 pm, edited 2 times in total.

Top
 Profile  
Reply with quote  
Display posts from previous:  Sort by  
Forum locked This topic is locked, you cannot edit posts or make further replies.  [ 37 posts ]  Go to page 1, 2  Next


You cannot post new topics in this forum
You cannot reply to topics in this forum
You cannot edit your posts in this forum
You cannot delete your posts in this forum
You cannot post attachments in this forum

Search for:
Jump to: