The Aliens Legacy
http://forum.alienslegacy.com/

Erik's Pulse Rifle Projects
http://forum.alienslegacy.com/viewtopic.php?f=3&t=15916
Page 1 of 2

Author:  Erik_MAA [ Mon Feb 08, 2016 1:23 am ]
Post subject:  Erik's Pulse Rifle Projects

While I wait for my M56 breastplate and headset, I'm focusing on another project.

I got my first Pulse Rifle, a “Spulse” from Spat in 2010. It arrived with less than two weeks to the next 'con and I did a rush job on assembly and painting.

Here it is on my workbench back in 2009, mostly assembled...mostly:
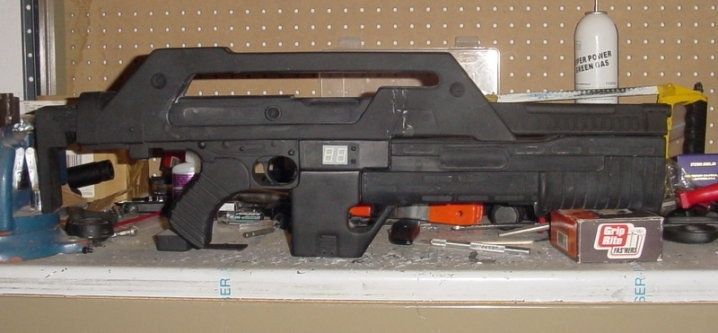
Image

After painting:

Image

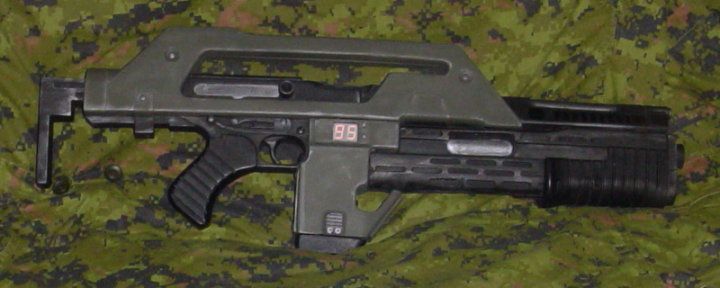
Having rushed the job, it had some horrible parting lines and I wasn't happy with the paint. I did a repaint on it and it looked better, but when I got my Snow Wolf and observed how some of the parts fit together, I found myself wanting to do another repaint.

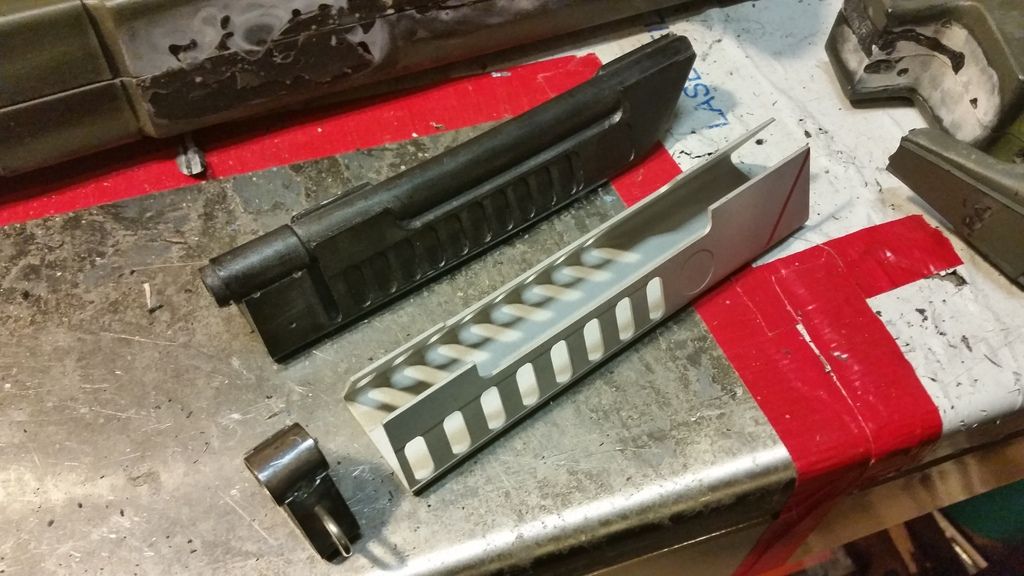
In addition to that, I recently acquired a Snow Wolf grenade launcher, and also had a proper vent and triangle sitting in the parts bin. I've got the time, and the parts, so it's time for the Spulse to get some rehab and restoration.

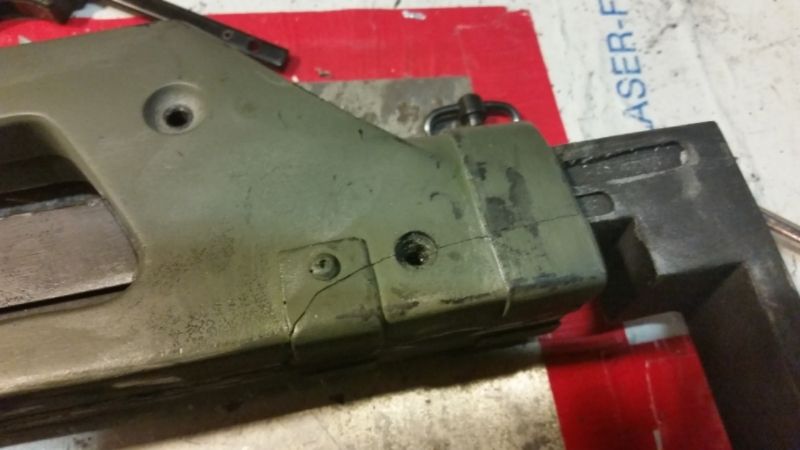
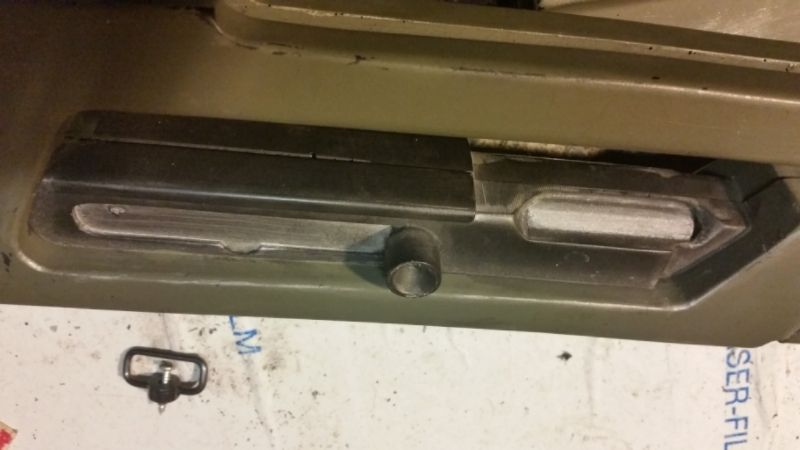
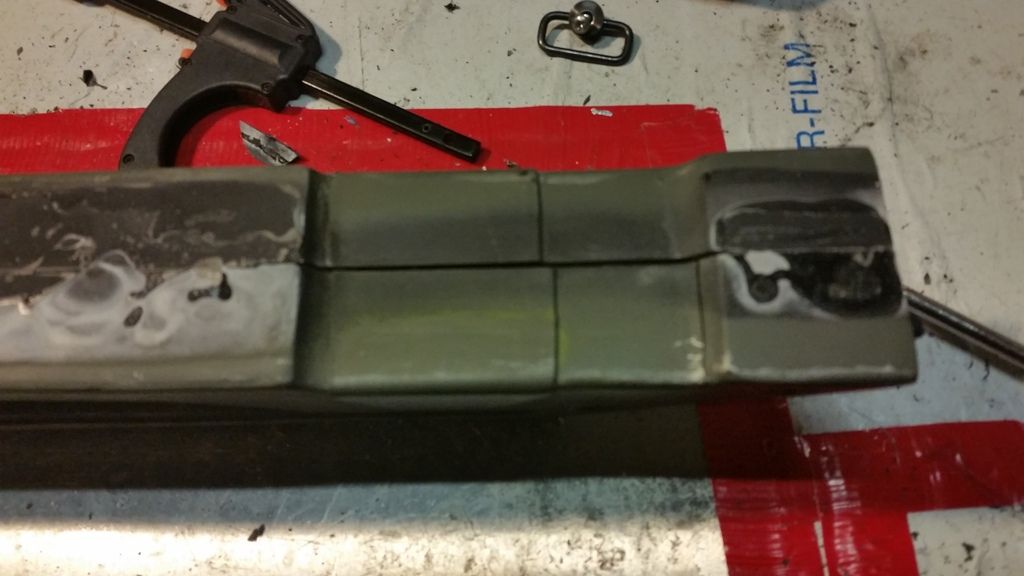
The first challenge is taking it apart. I didn't assemble it with the intention of ever disassembling it. I used a hammer and chisel to carefully separate the pieces, but it wasn't without cost. The gun is glued together with gap-filling cement and in some places I also added screws. You can see a couple of places where I cracked the model while separating the pieces.

Image

Image

My next step will be to remove as much of the old glue as I can and get a better fit between the pieces. I'm also going to tackle that parting line. Because these two halves are fused together with glue and screws, I may have to re-sculpt some of the joints with putty. We'll see how this goes.

You can see here some of the parting line and fitting issues:

Image

Image

Once I have the main body together, I'll be trimming the vent and Snow Wolf launcher to fit. The Snow Wolf and Spulse have slight differences in scale which will need to be considered.

Image

Image

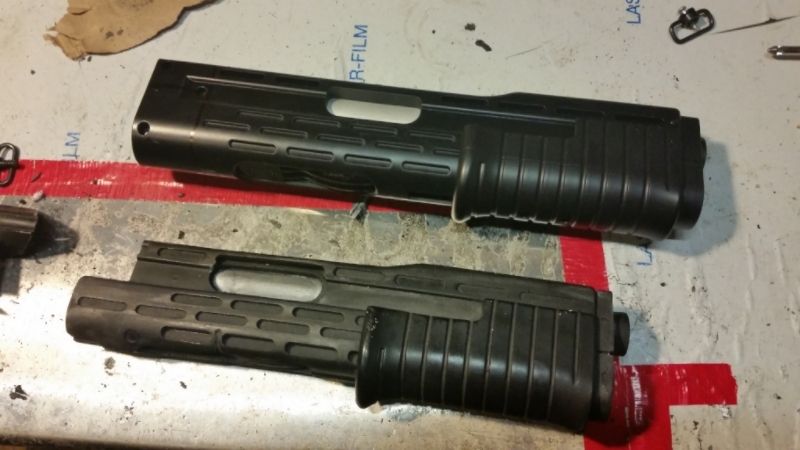
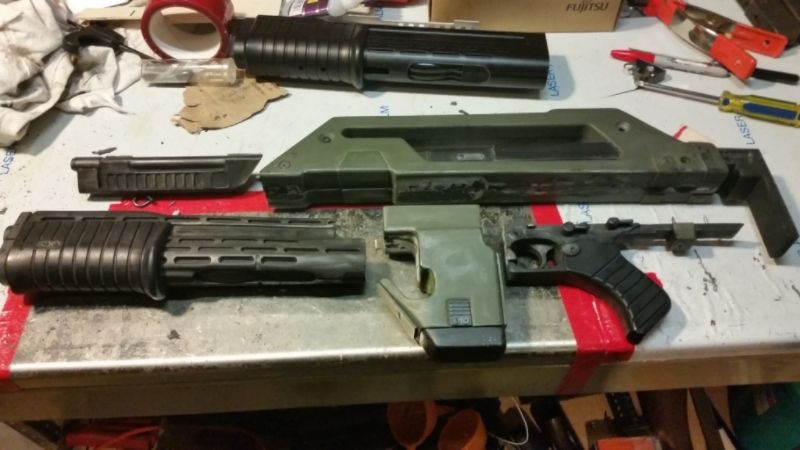
For comparison, here is my Spulse (top) and Snow Wolf (bottom) together.

Image

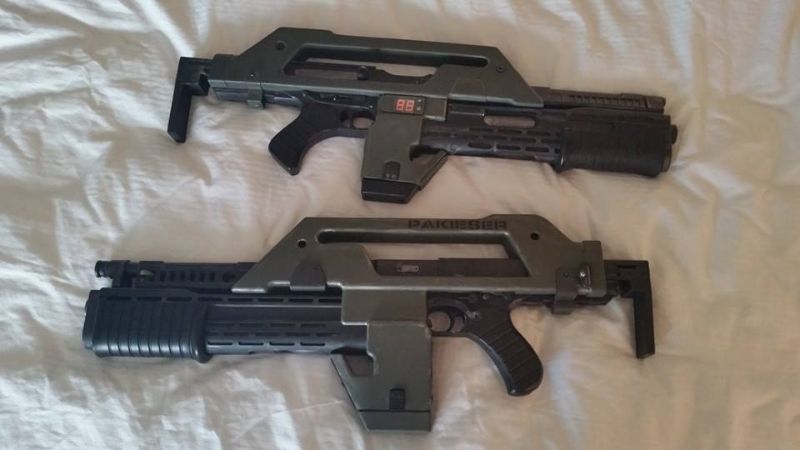
You can see the scale differences, which will be a small challenge when installing the Snow Wolf launcher on the Spulse. FWIW, I'm pretty sure the Spulse is closer to screen accuracy in size.

Once everything is fitted and re-assembled, I'm going to repaint and weather it. Hopefully I can have it ready for Marscon, which is just about a month away.

Author:  577_ops [ Mon Feb 08, 2016 2:50 pm ]
Post subject:  Re: Spulse Rehab Project

Thanks for sharing.
It shows how much fun you can have with building/upgrading the Spulse rifle.

Author:  Erik_MAA [ Sun Nov 25, 2018 8:57 pm ]
Post subject: 

So this project wound up morphing into the M41C build, but I've got another Spulse on the workbench I am messing with.

The new Spulse is on the top, the bottom gun was rebuilt into the M41C.
viewtopic.php?f=3&t=17477&p=258587&hilit=m41c#p258587

Attachment:
31945515_10214669846333002_5458693014178234368_o.jpg
31945515_10214669846333002_5458693014178234368_o.jpg [ 173.62 KiB | Viewed 8308 times ]


I'm moving my workspace indoors for the Winter (gotta love Minnesota) but I'm hoping to get this one done by Marscon.

Still gathering parts for my Hero build too!

Misc Notes and Lessons Learned:

- Wear a respirator while sanding and immediately clean as you go with a shop vac.

- Bondo spot putty is one of the best things ever. I don't know where it's been all my life.

- Kydex and styrene are awesome for patching and scratchbuilding. Easily cut, heat formed, sanded and takes paint well.

- Instead of obsessing over perfect straight line cuts, rough cut plastic with a scissors and use a belt sander to true it up. Works great!

- To fill gaps, glue small pieces of styrene in first, then putty. You use less putty and it sands/paints better.

- For large areas that need to be puttied, use plumber's epoxy. It dries rock hard and can be sanded and painted.

- For final sanding, always wet sand. Makes a huge difference!

- Prior to painting, blow dust off the surface with an air hose and then rub down with a tack rag.

Author:  knoxvilles_joker [ Mon Nov 26, 2018 11:54 am ]
Post subject:  Re: Erik's Pulse Rifle Projects

so you used styrofoam and then overlaid bond on top of that for the sealing coat before sanding and then painting?

Author:  Erik_MAA [ Mon Nov 26, 2018 3:12 pm ]
Post subject:  Re: Erik's Pulse Rifle Projects

knoxvilles_joker wrote:
so you used styrofoam and then overlaid bond on top of that for the sealing coat before sanding and then painting?


Not Styrofoam - styrene. As in polystyrene plastic.

Author:  Red_2 [ Tue Nov 27, 2018 6:16 pm ]
Post subject: 

Awesome!

Author:  Erik_MAA [ Thu Nov 29, 2018 11:53 pm ]
Post subject: 

Package from Evike arrived last night...

Attachment:
47294408_285604068965137_753994969240305664_n.jpg
47294408_285604068965137_753994969240305664_n.jpg [ 668.86 KiB | Viewed 8169 times ]


This thing is so cool, I almost feel bad about chopping it up....almost.

Author:  shelby [ Thu Dec 06, 2018 8:33 pm ]
Post subject:  Re: Erik's Pulse Rifle Projects

Had the same feelings, soon went away when it was dropped into the SPAS cage though! :)

Author:  Erik_MAA [ Thu Dec 06, 2018 8:55 pm ]
Post subject: 

Did inventory today. Here's my current status:

Built:
M41 Snow Wolf
M41S Snow Wolf
M41c Spulse

Under Construction:
M41 kit (maker unknown)
- Stock ordered from SDS
- Barrel vent and triangle ordered from SDS
- Airsoft shotgun acquired
- RS Thompson parts ordered from SARCO

M41 Spulse
- Added Snow Wolf grenade launcher
- Needs new LED (on order from Spat)
- Adding SDS barrel vent and triangle

I've also got an extra Thompson and a SPAS cage so I'll likely build a 6th gun at some point.

I've also got a TRamp and Majenko sound board I need to figure out what I am going to do with, and I'm waiting on two 10-hole vents from Matsuo for the Snow Wolfs.

This is getting pretty crazy.

Author:  Erik_MAA [ Wed Dec 19, 2018 5:58 pm ]
Post subject: 

Unseasonably nice weather has allowed me to get out into the garage and work on my Spulse and my Hero.

Attachment:
pr2.jpg
pr2.jpg [ 88.75 KiB | Viewed 7606 times ]

Spulse shroud is almost done. I have to modify the magazine well extensively to fit the width of the Snow Wolf grenade launcher.

Attachment:
pr3.jpg
pr3.jpg [ 127.11 KiB | Viewed 7606 times ]

I also added some more detailed selector switches to the Thompson part.

Attachment:
PR1.jpg
PR1.jpg [ 119.38 KiB | Viewed 7606 times ]


Turning my attention to the Hero, the shrouds need some work (I knew this when I bought it). The left side is warped and cracked in a couple of places. Some judicious work with a heat gun sorted that out, and I reinforced the inside with some styrene to make it stronger. Hairline cracks have been filled with gap filler cement and bondo.

Author:  Erik_MAA [ Fri Dec 28, 2018 4:53 am ]
Post subject: 

Added some additional styrene to the magazine well of the Spulse to recapture some of the details.

Attachment:
20181227_193959.jpg
20181227_193959.jpg [ 1.44 MiB | Viewed 7478 times ]


After that dries, I'll trim it to fit and putty the seams.

The Hero gun is coming together. I test-fitted the shroud on the resin Thompson and everything seems to fit nicely now that I've straightened the warp out.

Attachment:
20181227_194018.jpg
20181227_194018.jpg [ 1.74 MiB | Viewed 7478 times ]


There's enough parts in that box to build yet another PR, if I can find a set of shrouds and another counter.

I have a leftover resin grenade launcher from the Spulse (the Spulse is getting a Matrix launcher) and I want to do something with it, so I came up with this "stand-alone" concept. It will take a bit of work to finish, but I think it will come out pretty cool.

Attachment:
20181227_193950.jpg
20181227_193950.jpg [ 1.52 MiB | Viewed 7478 times ]

Author:  bigbisont [ Fri Dec 28, 2018 1:40 pm ]
Post subject: 

Cool stuff. The hero shrouds look fantastic now. Sorta makes me wish I hadn't sold off all my extra parts...and extra pulse.
I guess I should worry about fixing my main pulse before getting too nostalgic for building new ones though.

Author:  Erik_MAA [ Mon Dec 31, 2018 7:31 pm ]
Post subject: 

My Hero PR has a resin Thompson reciever with working bolt, recoil spring and recoil spring guide.

I drilled and tapped holes for two stock retaining bolts in the top of the resin reciever. Because the bolts don't intrude into the reciever the Thompson bolt and recoil spring move freely.

I can extend the stock, but I can't lock it into place. Any suggestions for a locking mechanism that won't interfere with the operation of the bolt?

Author:  Erik_MAA [ Thu Jan 03, 2019 6:56 pm ]
Post subject: 

Weather hitting the high 30s through Monday - hoping to make some progress and maybe even finish one!

Author:  bughunt10 [ Thu Jan 03, 2019 7:02 pm ]
Post subject: 

Best of luck Erik! Looking good!

Author:  Erik_MAA [ Sun Feb 03, 2019 12:21 am ]
Post subject: 

It was a scorching 38F today so I got back into the garage to work on a few things. I've got a drop coming up in March and I've got a few non-USCM props I was also working on.

I'm test fitting all the Hero parts tonight, and the Spulse looks like it's good to go. If the Hero test fit goes well, I am going to see about priming and painting this week.

For a while I've been working on a realistic racking bolt for my Matrix PRs. I did a proof of concept quite a while ago, but tonight, with better tools, I was able to build a decent dummy bolt.

Attachment:
Airsoft bolt mod 1.jpg
Airsoft bolt mod 1.jpg [ 185.35 KiB | Viewed 6991 times ]


Here you can see the Matrix ejection port. I used a drill and Dremel to remove the blocked portion and open it up like the real thing.

Attachment:
Bolt mod 2.jpg
Bolt mod 2.jpg [ 112.34 KiB | Viewed 6991 times ]


Comparison of a resin cast of a real-steel bolt to my wood and metal dummy bolt. While you will be able to rack it, my bolt won't be trigger actuated to it's a pretty simple design. There is a hole drilled in the front for the bolt extension (in this case a piece of pipe) and in the back for a recoil spring. For the actuator, I am going to bond the flat "bolt" assembly that the gun comes with to the side of the wood block.

Author:  Erik_MAA [ Thu Feb 14, 2019 9:18 pm ]
Post subject: 

More progress on the working bolt mod for the Snow Wolf/Matrix.

This is a permanent modification that renders the gun unable to function as Airsoft.

To start this mod, you have to tear down the mechbox to just the frame - you will only be using the trigger and frame, everything else can go. You then need to cut the top off the mechbox to create space in the upper receiver. You also need to remove the hopup.

Attachment:
Matrix ejection port unmod.jpg
Matrix ejection port unmod.jpg [ 1.41 MiB | Viewed 6815 times ]


Here we have the unmodified gun. The hopup unit takes up half the ejection port, and the other half is blocked by a facade of a bolt.

Attachment:
Airsoft bolt mod 1.jpg
Airsoft bolt mod 1.jpg [ 185.35 KiB | Viewed 6815 times ]


Removing the hopup and opening up the ejection port gives us this. I used a drill and Dremel for this, working very slowly, and finished it with a file. One my first attempt I took off a little too much and had to build it back up with plumber's epoxy.

Attachment:
bolt cover.jpg
bolt cover.jpg [ 813.9 KiB | Viewed 6815 times ]


I made a bolt out of scrap wood and aluminum tubing. To make the actuator functional, I bent the fake bolt 90 degrees in the front and back so the wooden block fits inside it.

Attachment:
notch.jpg
notch.jpg [ 499.42 KiB | Viewed 6815 times ]


Inside the upper receiver is a groove for the fake bolt. I cut a notch in the front and back to clear it.

Attachment:
Matrix Reciever modified.jpg
Matrix Reciever modified.jpg [ 1.19 MiB | Viewed 6815 times ]


Inside of the Thompson upper, showing a few things I removed so the bolt can travel back and forth.

Author:  Erik_MAA [ Thu Feb 14, 2019 9:23 pm ]
Post subject: 

Attachment:
bolt fit.jpg
bolt fit.jpg [ 458.76 KiB | Viewed 6815 times ]


Here you can see how the fake bolt fits onto the wooden block.

Attachment:
bolt open 2.jpg
bolt open 2.jpg [ 1.42 MiB | Viewed 6815 times ]


Looking down into the upper, showing how it all fits together. I haven't added a recoil spring yet, still engineering that part. You can also see a thin piece of styrene I used as a shim to align the bolt so it closes properly.

Attachment:
bolt closed 2.jpg
bolt closed 2.jpg [ 868.93 KiB | Viewed 6815 times ]


Bolt in the forward (closed) position.

Attachment:
bolt open.jpg
bolt open.jpg [ 846.22 KiB | Viewed 6815 times ]


Bolt open.

Attachment:
boltclosed.jpg
boltclosed.jpg [ 895.42 KiB | Viewed 6815 times ]


Bolt closed.

Author:  Erik_MAA [ Thu Feb 14, 2019 9:23 pm ]
Post subject: 

Double post, sorry

Author:  Anthony Veit [ Sat Feb 23, 2019 2:13 am ]
Post subject: 

How much does it cost to build one or order one?

Author:  Erik_MAA [ Wed Jul 03, 2019 2:22 pm ]
Post subject: 

What better way to celebrate 4th of July weekend than working on the Pulse Rifles? Or at least, that is the plan. More updates to come!

Author:  seven [ Tue Jul 16, 2019 5:14 am ]
Post subject: 

Any updates on the rifles?

Author:  Erik_MAA [ Tue Jul 16, 2019 1:33 pm ]
Post subject: 

Unfortunately I've been busy with other projects, and all of my weekends for the next few weeks are booked.

If weather shapes up I may try and get some stuff done in the evenings after work. Lately it's been holding around 100 degrees with high humidity, so I haven't felt like spending a lot of time out in the garage, sanding and painting.

I have another Matrix PR with expected delivery tomorrow, which will bring my total PR count to six: One resin "hero", three Matrix, and two Spulses.

Author:  seven [ Thu Jul 18, 2019 6:51 am ]
Post subject: 

I'm in the same boat with the weather. Really digging the black pulse look. starting to imagine a nickle plated pulse with a shiny black shroud. maybe some other detail reminiscent of a xeno. "m41-xn0"

Author:  Erik_MAA [ Wed Sep 04, 2019 1:59 pm ]
Post subject: 

Attachment:
Crypticon guns.jpg
Crypticon guns.jpg [ 275.8 KiB | Viewed 5407 times ]


Did a little maintenance and upgrayyedd work before Crypticon this weekend.

Set up all my Matrix guns with the barrel vent mod.

Something I noticed consistent on the Matrix guns was wiring and switch issues. All of the guns had either a broken battery connector wire, a broken switch, or both. I replaced the connectors and switches and set the guns up for the "Charlie" counter mod, and put window tint over the counters.

Got a new Matrix in and since I already have a black one an and OD one, I went for Brown Bess using the "Mocha" paint mentioned in my colour match thread. Very happy with the results! I built this rifle to "showroom" condition, my others being well-weathered.

For my Hero gun, the shroud had developed a couple of cracks and the resin Thompson and shotgun were having trouble holding together. I did some reinforcement to the internal "chassis" of the Thompson/shotgun combo, and repaired and repainted the shroud.

I also did some minor repairs on my Morita and some additional paint/weathering on the XM25.

I'll be showing these off in the Crypticon Prop-A-Torium this weekend!

Page 1 of 2 All times are UTC [ DST ]
Powered by phpBB © 2000, 2002, 2005, 2007 phpBB Group
http://www.phpbb.com/