The discussion of the Alien series of films and the props used in them is the aim, but if it's got Big Bugs and Big Guns, then they are welcome too!


Post new topic Reply to topic  [ 76 posts ]  Go to page 1, 2, 3, 4  Next
Author Message
 Post subject: Prophets Xeno Build
PostPosted: Fri Aug 16, 2013 9:31 am 
User avatar

Location: South-West UK
Country: United Kingdom
Sooo as some of you may or may not be aware i decided to sell my USCM gear to fund a xeno project. Whilst the Marines will always have a special place in my heart it's the xeno that captured my imagination as a kid (and onwards). I can honestly say it's the only on-screen 'monster' that's ever scared me (the first time i saw Aliens i was 8 and watching it on my own, in my grandads bungallow, in the woods :shock: ).

So after a bit of a wait and all the usual customs shenanegans my kit arrived yesterday -

Attachment:
1.jpg
1.jpg [ 348.24 KiB | Viewed 6152 times ]


The first thing as always is to get it all laid out and make sure it's all present and correct -

Attachment:
2.jpg
2.jpg [ 330.74 KiB | Viewed 6152 times ]


Next job is to give it all a good scrub. It's covered in mold release and talc so that all needs to go before anything else -

Attachment:
3.jpg
3.jpg [ 515.63 KiB | Viewed 6152 times ]


Then after an airing it all back inside and was given a good towel-dry

Attachment:
4.jpg
4.jpg [ 322.41 KiB | Viewed 6152 times ]


I next spent a few hours trimming all the parts. Needless to say theres loads of flashing that needs to be trimmed off. A sharp pair of scissors seems to be the way forward here. This is hard work and takes a long time so it's not to be rushed. Once you've cut it off you can't put it back on again !

Like a lot of people i suppose i'm starting with the head. It's the biggest part and needs a good deal of work. There is a large plug in the mouth that needs to be cut away and trimmed and there are a lot of mold lines over it -

Attachment:
5.jpg
5.jpg [ 116.12 KiB | Viewed 6152 times ]


Top
 Profile  
Reply with quote  
 Post subject: Re: Prophets Xeno Build
PostPosted: Fri Aug 16, 2013 9:36 am 
User avatar

Location: South-West UK
Country: United Kingdom
After first trimming with scissors i then attacked the lines with a dremel and sanding drum. This works quite well (if very messy) -

Attachment:
6.jpg
6.jpg [ 173.93 KiB | Viewed 6151 times ]


After zapping with the dremel i found that fine sandpaper gets it all nice and flush. Oh and also using an old paintbrush to brush off the latex swarf really helps.

The upper teeth are hollow and a little floppy so i've filled them with a latex/tissue paper mulch which works well for shaping and filling larger areas. These have now been glued in place and i've used more mulch to cover the edge at the gum where the teeth join -

Attachment:
8.jpg
8.jpg [ 121.18 KiB | Viewed 6151 times ]


The next job will be some fine dental work to shape the teeth better and attaching the lower jaw. I'm going to coat the teeth in fibreglass resin first so that when they take the chrome paint they should shine nicely

Watch this space !


Top
 Profile  
Reply with quote  
 Post subject:
PostPosted: Fri Aug 16, 2013 10:02 am 
Perfect Organism
User avatar

Location: Hampshire
Service Number: A96/TQ1.8.34962E2
Country: United Kingdom
:) You're making fast progress. Keep at it - it's well worth it. Damn, it's worth it just for the smell! ;)

I HATE building/repairing costumes and I still say it's worth it!

Keep the photos coming. I'll dig out some ref photos for you.


Top
 Profile  
Reply with quote  
 Post subject:
PostPosted: Fri Aug 16, 2013 10:24 am 
Perfect Organism
User avatar

Location: Hampshire
Service Number: A96/TQ1.8.34962E2
Country: United Kingdom
https://www.dropbox.com/sh/g4xxoko4jbxe7bd/kb0deRyMEC

Many of these are, of course, "borrowed" from various websites. But I collect them here for a specific purpose. I know they aren't all of SU suits, or all Aliens suits. But I've always been more interested in making the Alien of my mind's eye rather than a movie costume.

I do have a few of my own build photos, but I can't find them. I have a horrible feeling they only exist on LTO tapes after the hard disk failure I had 3 years back ... :shock:


For the screen-used layout of parts look at:
https://www.dropbox.com/sh/g4xxoko4jbxe ... c023.jpg?m
https://www.dropbox.com/sh/g4xxoko4jbxe ... 04_o.jpg?m
https://www.dropbox.com/sh/g4xxoko4jbxe ... 97_n.jpg?m
https://www.dropbox.com/sh/g4xxoko4jbxe ... 68_n.jpg?m

Some of the Boden parts are somewhat smaller, and some of the leg parts are different. But you can get the idea.


Top
 Profile  
Reply with quote  
 Post subject: Re: Prophets Xeno Build
PostPosted: Fri Aug 16, 2013 10:34 am 
User avatar

Location: South-West UK
Country: United Kingdom
Excellent. Thanks for that

Trimming it all was a bit of a nightmare but compared to doing stormtrooper armour it's a doddle.

Two things were immediately apparently once i started work;

1) I'm going to need to make the chest area larger (I'm a 46" chest). I'm not sure how i'm going to achieve this just yet. I think i'll do the same as you did; cutting out the sternum. This way i can add in a velcro panel to make getting it on easier and also put in a 'shim' on either side of it to make it overall wider too. What this looks like i don't yet know. I may well attempt to make some bespoke latex pieces to expand the ribs or use latex tubing to fill the gaps. I'll have to see how it looks.

2) The tail is longer, larger and heavier than i first anticipated. It's filled with foam but has a hollow core. What i ideally want is the tail to be rigid so it stands up and over my shoulder. In order to do this im going to need to split it down it's length and insert an aluminium (or even possibly steel) bar, bent into the right shape then glued back together. This will then be welded to a flat plate at the cocsix end. The idea being to have a corresponding flat plate attached to the back brace and attach it via bolts/wingnuts (which will then be covered over with a flap so you cannot see it). Again i'll see


Top
 Profile  
Reply with quote  
 Post subject: Re: Prophets Xeno Build
PostPosted: Fri Aug 16, 2013 10:43 am 
Perfect Organism
User avatar

Location: Hampshire
Service Number: A96/TQ1.8.34962E2
Country: United Kingdom
Prophet-KGB wrote:
In order to do this im going to need to split it down it's length and insert an aluminium (or even possibly steel) bar, bent into the right shape then glued back together. This will then be welded to a flat plate at the cocsix end.

Be very sure you actually want that before going to all that trouble just to avoid a very thin, often invisible bit of string - It will end up being static, uncomfortable and occasionally dangerous. The lack of movement was enough for me to abandon the idea.

My primary tail (which I need to repaint in time for DCon...) has rope (and an impeller fan, and ducting, and batteries) in it to make it's shape much nicer when hung, compared with the ruined one you saw at Pecorama.

As for the chest - there is no easy answer with the Boden chest; it's too small. I never got the front of mine looking all that neat. But, it was very easy to get on/off at least. I'm 44inch chest.


Top
 Profile  
Reply with quote  
 Post subject:
PostPosted: Fri Aug 16, 2013 11:01 am 
Pint of AB negative please
User avatar

Location: HOUNSLOW, west london
Service Number: A09/TQ2.0.12136E1
Country: United Kingdom
Get someone to help you, Gareth will tell you the hours of fun we have had while he bends over and I get him sticky

_________________
SSgt Kris "Bloodsucker" Kobus, VAS.
A09/TQ2.0.12136E1


Top
 Profile  
Reply with quote  
 Post subject: Re: Prophets Xeno Build
PostPosted: Fri Aug 16, 2013 11:02 am 
User avatar

Location: UK all the way
Country: United Kingdom
Great work so far, really looking forwards to more progress pics. :D


Top
 Profile  
Reply with quote  
 Post subject:
PostPosted: Fri Aug 16, 2013 12:41 pm 
OORAH TO ASHES
User avatar

Location: scotland glasgow
Service Number: A12/TQ1.0.82146E1
Country: United Kingdom
Looking great so far I have to ask how much was the kit and where did you get it


Top
 Profile  
Reply with quote  
 Post subject: Re: Prophets Xeno Build
PostPosted: Fri Aug 16, 2013 12:59 pm 
User avatar

Location: South-West UK
Country: United Kingdom
I suppose i just prefer the idea of having the tail up and out of the way as opposed to swishing around behind me with kids trying to rip it off. The other idea i had was to use a semi-rigid strut (like a bent, plastic pipe) and have it so that the tail attaches to the suit up on the shoulder somewhere. So there would be little strain on the back

Pug50 wrote:
My primary tail (which I need to repaint in time for DCon...) has rope (and an impeller fan, and ducting, and batteries) in it to make it's shape much nicer when hung


Rope, fan etc in a tail ? Do explain :?:

capn thrag wrote:
Looking great so far I have to ask how much was the kit and where did you get it


Sent you a PM


Top
 Profile  
Reply with quote  
 Post subject:
PostPosted: Fri Aug 16, 2013 1:36 pm 
Pint of AB negative please
User avatar

Location: HOUNSLOW, west london
Service Number: A09/TQ2.0.12136E1
Country: United Kingdom
It gets hot in them suits so the fan is in the tail connected to a very complex circulating network of tubes to carry cool air around the body

_________________
SSgt Kris "Bloodsucker" Kobus, VAS.
A09/TQ2.0.12136E1


Top
 Profile  
Reply with quote  
 Post subject:
PostPosted: Fri Aug 16, 2013 2:13 pm 
User avatar

Location: South-West UK
Country: United Kingdom
Ohhhhh. Does it actually work ?


Top
 Profile  
Reply with quote  
 Post subject: Re:
PostPosted: Fri Aug 16, 2013 2:33 pm 
User avatar

Location: UK all the way
Country: United Kingdom
nocternus wrote:
..the fan is in the tail connected to a very complex circulating network of tubes to carry cool air around the body


So every time he farts he knows about it big time


Top
 Profile  
Reply with quote  
 Post subject: Re: Re:
PostPosted: Fri Aug 16, 2013 2:47 pm 
Perfect Organism
User avatar

Location: Hampshire
Service Number: A96/TQ1.8.34962E2
Country: United Kingdom
Osmotic wrote:
nocternus wrote:
..the fan is in the tail connected to a very complex circulating network of tubes to carry cool air around the body


So every time he farts he knows about it big time


Ha! Well, farts are fine (everyone likes their own brand, right?) but drinking something like Fanta and then belching can result in an Alien screaming and clutching at it's neck!


The fan is a bit less impressive than that - it's one tube with a load of holes. I'll take some photos as I rebuild/repaint it. But it is a BIG help, especially in hot conditions.


Top
 Profile  
Reply with quote  
 Post subject:
PostPosted: Fri Aug 16, 2013 4:20 pm 
Mad Cat
User avatar

Location: Active duty: USS Catalpa
Service Number: AO3/TQ6.0.79749E8
Country: United States
Prophet, this is a great thread, good to see it as it progresses.

Gareth, I'm interested in this fan system you have. I have a Predator costume I've only worn once because it's sooo dam hot. Some kind of cooling system would help tons.

_________________
"Awww, someone tell me that's a boot!

It's a boot!"

III drops


Top
 Profile  
Reply with quote  
 Post subject:
PostPosted: Fri Aug 16, 2013 6:05 pm 
User avatar

Location: long island , NY
Country: United States
Prophet could you email me to about the info on the suit to thx. Great work on the alien warrior. Looking great!

_________________
Cpl Matthew Rendar. M56 smart gun operator. 2nd bat 7th colonial marines "Rendars Raiders "
Image


Top
 Profile  
Reply with quote  
 Post subject:
PostPosted: Fri Aug 16, 2013 9:37 pm 
User avatar

Location: Cornwall
Country: United Kingdom
dare you to wear it to work !


Top
 Profile  
Reply with quote  
 Post subject:
PostPosted: Fri Aug 16, 2013 10:21 pm 
User avatar

Location: South-West UK
Country: United Kingdom
I'll wear it to your work ;)

I could hide in the plumbing section


Top
 Profile  
Reply with quote  
 Post subject:
PostPosted: Fri Aug 16, 2013 10:39 pm 
User avatar

Location: Cornwall
Country: United Kingdom
lol up in the vents bay !


Top
 Profile  
Reply with quote  
 Post subject:
PostPosted: Sat Aug 17, 2013 1:34 am 
So cool! So is it a latex foam? Sorry to ask such a newbie question lol. What type of paints do you use for it?


Top
  
Reply with quote  
 Post subject: Re:
PostPosted: Sat Aug 17, 2013 9:35 am 
User avatar

Location: South-West UK
Country: United Kingdom
Magnus wrote:
So cool! So is it a latex foam? Sorry to ask such a newbie question lol. What type of paints do you use for it?


Hi. Yes the bigger parts (tail, head, horns, back) are foam filled latex. The rest are simply flat latex parts. You can use bog-standard water-based acrylics for painting. I've found in the past it's best to mix up a pot of 80/20 paint/latex mix. So the paint dries as rubber. You can always then give it a wash over of watered down latex to seal it and add a shine after

--------------------------------------

Got a chance to do a little more last night. I've pinned the lower jaw in place with a pair of coach bolts. Firstly measured by stick a couple of screwdivers in his face -

Attachment:
DSC_0051.jpg
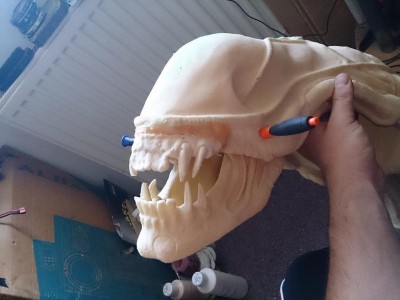
DSC_0051.jpg [ 54.54 KiB | Viewed 5971 times ]


Then pushed the bolts through WITHOUT drilling the parts. This ensures a really tight fit -

Attachment:
DSC_0052.jpg
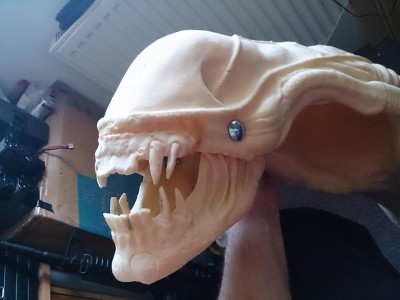
DSC_0052.jpg [ 51.53 KiB | Viewed 5971 times ]


After the bolt heads and surrounding areas were covered with the same latex/tissue paper paste i used earlier. You can just about see this in the next picture.

I also fibreglassed the teeth. Firstly i cut the individual teeth out on the top set because the detailing was quite weak here and you want the teeth to be a real focal point. After cutting they've all be coated in a layer of resin. Not only does this make them semi-rigid but also leaves them with that nice shine. 'Hard' teeth are a lot easier to fill gaps in than 'soft' ones. I think these will take the chrome paint very nicely -

Attachment:
DSC_0054.jpg
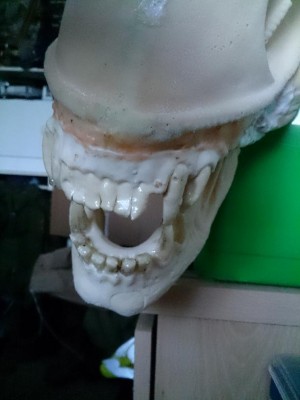
DSC_0054.jpg [ 45.82 KiB | Viewed 5971 times ]


Once i'm happy with the head/jaw area i'll move onto the neck. I'll need to remove a small amount from the inside of the head in order to fit my bonce in there. Not a lot mind you. The neck area is key really as this is where your face will be. With that in mind i want as much fabric there as possible. I plan to do this by removing some of central 'tubing' and replacing it with ribbed fabric. At least this way moisture won't collect on the inside quite as much. Obviously it's still going to be hot, sweaty and all those good things but i can still minimise the amount by removing latex parts and replacing with similar looking fabric parts. I've borrowed one of Gareths pictures to show the kind of areas that i'm planning on replacing -

Attachment:
untitled.JPG
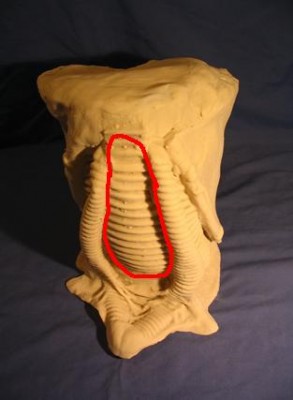
untitled.JPG [ 14.7 KiB | Viewed 5971 times ]


I'll look at it in detail first when i get there


Top
 Profile  
Reply with quote  
 Post subject:
PostPosted: Sat Aug 17, 2013 9:49 am 
Perfect Organism
User avatar

Location: Hampshire
Service Number: A96/TQ1.8.34962E2
Country: United Kingdom
Looking good! Don't replace too much of the neck in one go - as you said before: You can always cut more. I'll be interested to see the ribbed fabric you have in mind!

For the base coat of black etc, consider using black aerosol PlastiDip instead of latex/acrylic - it's expensive and stinks but it all but eliminates the need to touch up the paint after every wear. I've had two suits painted with acrylic/latex and it's fragile. Clear PlastiDip also is good for overcoating any highlights/colour you apply with acrylic but it will tend to "wash off" the acrylic a bit as it dries. But again, it makes the paint indestructible.

PlastiKote is cheaper and easier to get, but nowhere near as good IMO.


Top
 Profile  
Reply with quote  
 Post subject:
PostPosted: Sat Aug 17, 2013 9:55 am 
User avatar

Location: South-West UK
Country: United Kingdom
Cool cheers for the heads up. I'll use that instead


Top
 Profile  
Reply with quote  
 Post subject:
PostPosted: Sat Aug 17, 2013 11:40 am 
Pint of AB negative please
User avatar

Location: HOUNSLOW, west london
Service Number: A09/TQ2.0.12136E1
Country: United Kingdom
He is not kidding about the smell, spray outside

_________________
SSgt Kris "Bloodsucker" Kobus, VAS.
A09/TQ2.0.12136E1


Top
 Profile  
Reply with quote  
 Post subject:
PostPosted: Sat Aug 17, 2013 1:37 pm 
User avatar

Location: Cornwall
Country: United Kingdom
If you want to protect the latex paint and add a perminant shine .when top coat the lot in isoflex liguid rubber clear primer .its what all the larp weapons are coated in stops the latex from getting damaged and from fadeing . Then use silicone spray to stop the latex from sticking to its self .also cleans it .avalible from me or helfords


Top
 Profile  
Reply with quote  
Display posts from previous:  Sort by  
Post new topic Reply to topic  [ 76 posts ]  Go to page 1, 2, 3, 4  Next


You cannot post new topics in this forum
You cannot reply to topics in this forum
You cannot edit your posts in this forum
You cannot delete your posts in this forum
You cannot post attachments in this forum

Search for:
Jump to: