The Aliens Legacy
http://forum.alienslegacy.com/

My Wifes Armour Build.......FINALLY!! (pic heavy)
http://forum.alienslegacy.com/viewtopic.php?f=3&t=13007
Page 1 of 1

Author:  CheifProfanity [ Tue Apr 30, 2013 9:52 pm ]
Post subject:  My Wifes Armour Build.......FINALLY!! (pic heavy)

This post has been a long time coming....

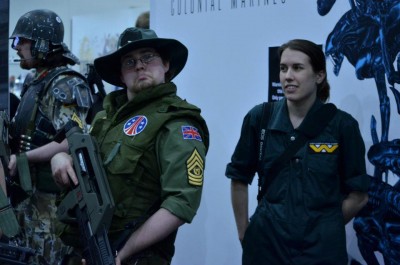
This story starts back at the May expo last year. After an amazing two days in costume including one day of costuming for Gearbox, Liz (my wife for those of you who dont know) and I where driving home. We had spent out sunday in our Marine costumes

Attachment:
Me on the left, Liz on the right
Me and liz.jpg
Me and liz.jpg [ 73.24 KiB | Viewed 3803 times ]


Now although these where good cosutmes for cheep scatch built cosutmes we never drew much attention, especially with Abe hanging around! On the drive home Liz turns to me and smiles saying "I want to get into armour, I want to join in properly" Now at this time we where only engaged and it braught two thoughts to my mind, Firstly IM GOING TO HAVE THE COOLIST WIFE IN THE WORLD!!! and secondly...how the hell am I going to do this...??

A few months went by and I had started looking for armour for the pair of us. Of course with any project like this the main thought is costs and how ever much I would love to place an order to Spat for over £1000 with a wedding in our furture it wasnt going to happen. Then in True UKCM style a gift appeard out of the blue, Glenn Allan Sent me a message, letting me know he was looking to get rid of a few things. A few discussions later and the promis of naming our first bourn after him in Augest last year we where the proud owners of two full sets of armour! There was only one problem, Although mine fit my burly manly (if not slightly portly) frame nicely, Lizs set was a little....well....she looked like a turtle....so much so I wont post the picture we took of her trying on the armour....

At this point I would love to say i went home, broke out some tools and went to work straight away BUT I kinda had to finish decorating our house.....oh yeah and get married!

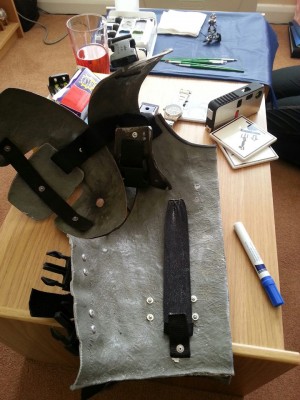
Now a few more months down the line we hit January and with the release of A:CM comming up I decied its finally time to start work on Liz Armour. Now after having Liz try it on far too many times I found i needed to reduce the width (from hip to hip) and depth (bellybutton to back). Now the Depth was easy to fix. Using a hacksaw i trimmed off an Inch from each of the edges next to the buckels where the armour clam shells together. Now came the trickyist and scaryist part of this build. I looked into many ways of making the armour fit Liz from hip to hip, I went from bending the armour using a heat gun (which I was told was a very bad idea as its a fiberglass kit) to filling Liz with cakes to make her wider to fit the armour.....she was not fond of this Idea. It soon became aparent that I would have To split both the front back plates in half, take two inches of material out of each, and then stick them back together....this was not a fun idea...

And this happened....

Attachment:
First cut....
split.jpg
split.jpg [ 131.19 KiB | Viewed 3803 times ]


As you can Imagin, at this point I'm panicing....as there is no going back! luckerly the gods of prop building and hot glue where on my side

Attachment:
The chest stuck back together
stuck front.jpg
stuck front.jpg [ 74.39 KiB | Viewed 3803 times ]


Attachment:
Stuck Back
stuck back.jpg
stuck back.jpg [ 102.87 KiB | Viewed 3803 times ]


With both the chest and back plate I used the two inches of materail I had cut off as a backing and hot glued it into place (to give you an idea of how much material that was on the small of Liz's back there is a letter L and R....this used to say LIFER...) This gave the armour a base structre to build off, but not only did this look like somthing that had been split by a Xeno....it also had no strength....so I got to play with fiberglass!!! sadly this did mean I ruined the paint job but at this point all I was worried about was putting it all back together!

Attachments:
Fiberglassed chest plate
fiber front.jpg
fiber front.jpg [ 119.39 KiB | Viewed 3803 times ]

Author:  bigbisont [ Tue Apr 30, 2013 9:56 pm ]
Post subject:  Re: My Wifes Armour Build.......FINALLY!! (pic heavy)

Ballsy and awesome! Way to dive in!

Looking good so far.

Author:  nocternus [ Tue Apr 30, 2013 9:57 pm ]
Post subject:  Re: My Wifes Armour Build.......FINALLY!! (pic heavy)

bigbisont wrote:
Ballsy and awesome! Way to dive in!

Looking good so far.


Wait till you get to the end it looks fantastic

Author:  CheifProfanity [ Tue Apr 30, 2013 10:00 pm ]
Post subject:  Re: My Wifes Armour Build.......FINALLY!! (pic heavy)

Attachment:
Fiber Back
fiber back.jpg
fiber back.jpg [ 104.06 KiB | Viewed 3794 times ]


It was at this point I started to realise that I was getting there. The Armour had structure and strenght....that and each half was back in one peice!

next came the slow and labourous task of sanding and filling and sanding and filling and sanding and filling and sanding and

Attachment:
Sanding and filling....
filler front and back.jpg
filler front and back.jpg [ 72.86 KiB | Viewed 3794 times ]


and sanding and filling...

Attachment:
Thats no moon.....
thats no moon.jpg
thats no moon.jpg [ 75.71 KiB | Viewed 3794 times ]


I personally think Halfords now own me.....i baugh so dam much BUT it made life very easy....

It was at this time I realised that to finsh what I had started I had to do the one thing I really didnt want to do, and that was to remove all the strapping and shoulder bells to re paint the armour. I had no experance with pop riviting and was quite scared of doing it BUT if i wanted to make this work, it had to be done. I got to work with my drill and removed all the straps...then out came the spray..

Attachment:
Black Ops....
undercoat.jpg
undercoat.jpg [ 50.23 KiB | Viewed 3794 times ]


Now as i can only put 5 pictures in any post Im going to stop here...and fill my next post with painting progress pictures!

Author:  Chef [ Tue Apr 30, 2013 10:01 pm ]
Post subject: 

Hey Chief....

Good on yer for trying.

If you need any GRP tips, just shoot me a PM.

You could have glassed on the back, and just notched a small V on the front to lay in a tiny amount of chopped strand. Would have saved a stack of work in the future.

Make sure you squeeze all that air out from the resin/glass.

smelly stuff that it is!

Author:  CheifProfanity [ Tue Apr 30, 2013 10:06 pm ]
Post subject:  Re: My Wifes Armour Build.......FINALLY!! (pic heavy)

Ok I lied, I just wanted to say that my camo design was heaverly helped by Dan Cooper. I used his previous work as a base for my own so you will see his screen shots being used as referance materail!

Attachment:
First Greens
green.jpg
green.jpg [ 53.2 KiB | Viewed 3788 times ]


Attachment:
Green and yellows...or light browns your choice
green yellow.jpg
green yellow.jpg [ 61.48 KiB | Viewed 3788 times ]


Attachment:
Green and both browns
green yellow brown.jpg
green yellow brown.jpg [ 68.85 KiB | Viewed 3788 times ]


Attachment:
Second Coat
second coat.jpg
second coat.jpg [ 60.56 KiB | Viewed 3788 times ]


Attachment:
And the backplate
back coat.jpg
back coat.jpg [ 81.69 KiB | Viewed 3788 times ]


its at this point things spead up a bit as A) I kept getting distracted and B) I forgot to take pictures....

Author:  CheifProfanity [ Tue Apr 30, 2013 10:20 pm ]
Post subject:  Re: My Wifes Armour Build.......FINALLY!! (pic heavy)

So finally, after two months of work, fiberglass embeded in my fingers and paint in my nailes I got to this point.

Attachment:
strap work back on
strapping.jpg
strapping.jpg [ 93.01 KiB | Viewed 3784 times ]


Attachment:
Chest and back fully painted, fresh off the line
compleate.jpg
compleate.jpg [ 113.86 KiB | Viewed 3784 times ]


Attachment:
All fitted together
together.jpg
together.jpg [ 125.21 KiB | Viewed 3784 times ]


Now how ever proud I am of this paint job one thing remains. This still looks like a costume, this is not the armour of a Bad Ass Ultimate killing machine! and although it took me a few weeks to find and a shaky hand to apply I got hold of some grate polish and weathered this sucker down!

Attachment:
Weathered back and shoulders
20130415_075659.jpg
20130415_075659.jpg [ 1.99 MiB | Viewed 3784 times ]


annoyingly the picture of her back is too big to upload so you are going to have to wait. But it was at this point that my job was offically OVER! i had sucsesfully taken a full size set of USCM armour and shrunk it down to fit my wife. I was one happy Marine. Next up.....Graffiti!...

Author:  CheifProfanity [ Tue Apr 30, 2013 10:37 pm ]
Post subject:  Re: My Wifes Armour Build.......FINALLY!! (pic heavy)

At this point Liz took over, its her cosutme after all!!!

We wernt going for any kind of screen accuarcy with these costumes. these where our Marines in the Aliens universe. After alot of thinking Liz decied on a few small peices to start with, with the idea of adding more later of course!

But with that, and a few bits of surplus and pouches I give you Pvt E.Hohenkerk, 69th Reg 1st Batt Homers Heros

Attachment:
Not a hugger....
20130420_184417.jpg
20130420_184417.jpg [ 1.83 MiB | Viewed 3779 times ]


Attachment:
20130420_184756.jpg
20130420_184756.jpg [ 1.79 MiB | Viewed 3779 times ]


Attachment:
20130420_184801.jpg
20130420_184801.jpg [ 1.78 MiB | Viewed 3779 times ]


Attachment:
20130420_184804.jpg
20130420_184804.jpg [ 1.76 MiB | Viewed 3779 times ]


I did do a little shoot in our lounge of lizs compleated marine, all that is missing from this is neck rubber trim! It has been a long project but one I am happy to have done. It has been chalanging but I have learnt alot but im happy that it came out so well and the responce liz has had being in it. We unveiled the full costume at Wales Comic Con and it was Liz and My first time out in full plate together and we loved it! Liz has allready spotted some things I need to improve (mostly with gaffa and more padding) but like all costumes, its never finished....it just keep getting improved....


Thanks for reading! any feedback is taken gratefully!

Attachments:
A Butterfly for lost family
20130422_181742.jpg
20130422_181742.jpg [ 1.77 MiB | Viewed 3779 times ]

Author:  CheifProfanity [ Tue Apr 30, 2013 10:49 pm ]
Post subject:  Re: My Wifes Armour Build.......FINALLY!! (pic heavy)

Attachment:
Mr and Mrs Hohenkerk 69th Reg 1st Batt Homers Heros
Me and liz.jpg
Me and liz.jpg [ 77.28 KiB | Viewed 3772 times ]


Attachment:
My Bad Ass Wife
Bad Ass Liz.jpg
Bad Ass Liz.jpg [ 64.76 KiB | Viewed 3772 times ]


This Makes me one very happy Marine......

Author:  Glenn [ Tue Apr 30, 2013 10:55 pm ]
Post subject:  Re: My Wifes Armour Build.......FINALLY!! (pic heavy)

Good work! nice to see my sets of armour found a good home :D ... and Liz's armour looks better on her than it ever did on me :wink:

still have a welder kit and the pulsemeter watch if you need it

Author:  CrashDown [ Tue Apr 30, 2013 11:58 pm ]
Post subject: 

Did look great! Big pat on the back!

BTW look out for a PM.

Author:  Moosh89 [ Wed May 01, 2013 12:08 am ]
Post subject: 

Hahaha, thats awesome!!!

Author:  MattRendar [ Wed May 01, 2013 2:52 am ]
Post subject: 

Looks great! Very nice job .

Author:  NeedanID [ Wed May 01, 2013 4:06 am ]
Post subject: 

Looking good.

Author:  Magnus [ Wed May 01, 2013 4:26 am ]
Post subject: 

Well done. A ton of work, but that paid off. Great job re-doing your wife's armour, you can't even tell it was cut in half.

Page 1 of 1 All times are UTC [ DST ]
Powered by phpBB © 2000, 2002, 2005, 2007 phpBB Group
http://www.phpbb.com/