The discussion of the Alien series of films and the props used in them is the aim, but if it's got Big Bugs and Big Guns, then they are welcome too!


Post new topic Reply to topic  [ 48 posts ]  Go to page 1, 2  Next
Author Message
 Post subject: Hack Pouches and Bypass Kits
PostPosted: Wed Mar 20, 2013 4:06 pm 
Prop Churner Outer
User avatar

Location: Bath, Maine
Service Number: A03/TQ1.0.12143G1
Country: United States
Attachment:
hacks.jpg
hacks.jpg [ 155.31 KiB | Viewed 19436 times ]


With a number of members (Moosh, Mudshark, myself) all planning builds, and Charlie just finishing his, I thought making a thread for sharing information and ideas would be worthwhile.

I am going to post photos of my own build on here too, but I would love this to be wide open to anyone trying a build. If folks have older threads I've missed or want to have their own thread going forward, add a link here and we can keep everyone in the loop. As a middle-management friend of mine likes to say, "knowledge shared is power multiplied." 8)

-----------------------------------------------

Derek's awesome build and a lot of great info about the original prop (don't toss your Seiko Pulsemeter sensors!):

viewtopic.php?f=3&t=4534&hilit=hack+pouch

Charlie's Hack Pouch build on his thread (page 4):

viewtopic.php?f=3&t=12661

High res screengrabs of the A:CM version:

viewtopic.php?f=28&t=12701

_________________
:delta: My entry-level prop and costume tutorials: viewtopic.php?f=3&t=12751 :delta:


Top
 Profile  
Reply with quote  
 Post subject:
PostPosted: Wed Mar 20, 2013 4:12 pm 
Prop Churner Outer
User avatar

Location: Bath, Maine
Service Number: A03/TQ1.0.12143G1
Country: United States
For my own hack pouch I'm playing around with a grooming kit I got for a dollar today at the Salvation Army:

Attachment:
pouch1.jpg
pouch1.jpg [ 189.55 KiB | Viewed 19432 times ]


I took out all the toiletries and added a few things to just start getting a general sense of it:

Attachment:
pouch2.jpg
pouch2.jpg [ 336.1 KiB | Viewed 19432 times ]


The red wire was from a kid's toy (I thought it looked unique) and the black wire is a Gentex microphone cable (as seen on Dropship helmets). I'm seriously considering cutting the zippered gusset off, but I'll wait and see. The things in here now are really just placeholders. I have a large collection of broken calculators, ribbons and circuit boards to pick from. The spot on the lower right were I put some calculator keys would be a great spot for a circuit board that needs to be taken out of the pouch quickly for example.

I do want to incorporate some of my favorite bits from Hudson and Winter's pouches too.

_________________
:delta: My entry-level prop and costume tutorials: viewtopic.php?f=3&t=12751 :delta:


Top
 Profile  
Reply with quote  
 Post subject: Re: Hack Pouches and Bypass Kits
PostPosted: Wed Mar 20, 2013 4:42 pm 
Jigoku e masshigura
User avatar

Location: Kinki Region
Service Number: A06/TQ0.0.32122E1
Country: Japan
Great idea starting this thread! If/when I have anything useful to contribute I'll be sure to post it here. :)

A trip to Radio Shack or a recycled electronics shop would probably yield some good odds & ends, too. I was also thinking about using an old calculator... I had a very old 70's era TI calculator that would probably be perfect. I think it's still in storage somewhere, but finding it might be a problem...

I'm sure I have an old OG canvas military surplus tri-fold tool kit and a gun cleaning kit back home in the states. One of those could be what I'll use to get my kit started, but it'll have to wait till I head home this summer. :(

_________________
GySgt Gustafson, Dru R.
Callsign: Mud Shark
A06/TQ0.0.32122E1
Image


Top
 Profile  
Reply with quote  
 Post subject:
PostPosted: Wed Mar 20, 2013 5:33 pm 
Mobile Mayhem
User avatar

Location: Rapid View, Saskatchewan
Service Number: A10/TQ1.O.32157E1
Country: Canada
Alrighty!! Nerd details!!

So I was intrigued by the A:CM Bypass kit, because it looks like it can be fairly accurately built for little cost.

I took a bunch of in progress screens that I posted here somewhere, of it closed and as it opens and I looked around on eBay for alligator clip test leads. The smallest I could find were 1.5" long, and judging by the size of the player characters hand, it looks about accurate. So with that, I took a screen of it open with the 4 clips still inside the pouch into Photoshop, and I measured one clip and called its bounding box 1.5", I then multiplied it by copy and pasting it several times and stretched it top to bottom and left to right which gave me an approximate dimension of the pouch closed, which was roughly 8" x 5". I confirmed this by the glitch I got in my video where the bypass kit actually disappears for a second, revealing the cradling hand, I took a piece of paper and folded it in half and layed it across my hand, as seen in the screen and it's pretty close, mind you, my hand is a little smaller so the paper seemed a bit larger.

I got thinking, What could I find, readily available about that size? Then it hit me, a pocket sized planner! Off to eBay I went, and did some searching for nylon zipped planners. I found one in almost the exact shade of green/black in roughly the right size! (I believe it was 7.5" by 4.5") I thought for awhile before buying it, "Could I find some nylon or neoprene in that same colour to match it to create the 3rd flap cover??" I wasn't comfortable with that gamble, so I sacrificed screen accuracy and sprung for a black one instead, that was 8" x 5.5"

Image
Image

This one is 1.25" deep which seemed pretty close compared to the screens of it closed.

I also found a seller selling 1.5mm thick black nylon covered neoprene if I can't find any in town to sew a cover on.

I found a cheapo chinese yellow multimeter on the cheap too, I haven't purchased it yet, cause the shipping on the planner was pretty brutal, $20 for shipping from the US to Canada? ouch haha. I had asked them to calculate the shipping before I bought it 2 weeks ago but never received a reply back, so judging by the shipping price for the US, I figured it couldn't be more than $10 or so, so I bought it, then asked for shipping, Now I know why they didn't reply the first time!

Anyway, using my little method of measuring the contents, I figured the multimeter is roughly 4.5" x 2.5". This one, although not exactly screen accurate, but close enough measures 5" x 2.75" x .75"

Image

The clips, I found these

Image

I can cut off the sheilding and superglue the other leg onto them, and cover the legs with red or black shrink tubes to create the handles, since I can't find the style on the kit in that small of a size.

The circuitboard on the top left of the kit, I have a fried PS3 controller which the board should be about that size :) Glad I kept it!!

I also have 1000 3mm LEDs, in every colour you can imagine that I got for cheap a long time ago, I was going to light up some PS3 controllers but they will do nicely to make the little lights on the top left

The other little device in the middle between the circuit board and the multimeter I figure is roughly 6.5" x 4" and the screen is 3" x 3". I found this

Image

It is a chinese mp4 player, the screen is 2.8", and although is not square, it will do nicely to display a Weyland Yutani movie, maybe with some fake readings and such, all I have to do is make some buttons to go under it, and the L antenna :)

The hardest part to locate??? THAT DARN WRIST STRAP!!! Do you think I can find an olive or tan wrist strap ANYWHERE??? NOPE!!, Well I did find one, but I need to buy 15 and hope they include that colour! haha

Image

I emailed camotech to see if they can do up a few little embroidered tabs with the Weyland Yutani logo for the cover, They should only be like $2.50 each, which is great :)

All that would be left is sewing the little pocket and the zippered pocket from the neoprene for the inside right below the section for the clips

Will post more as I get these things :)

_________________
Lt. Melissa L. Klassen, ALG
AL Colonial Admin. - Executive Officer (XO) -- 2021-2022
RCCM | Royal Canadian Colonial Marines - Commanding Officer (CO) -- 2021-2022

Read the AL Charter Rules & Regulations: https://docs.google.com/document/d/1i3gd9QUyIqI_6rfk8kpxspbKU-JT4MBAjLPxfCkvGJ8


Top
 Profile  
Reply with quote  
 Post subject:
PostPosted: Wed Mar 20, 2013 5:42 pm 
Prop Churner Outer
User avatar

Location: Bath, Maine
Service Number: A03/TQ1.0.12143G1
Country: United States
This is great! Good job Moosh.

For anyone looking to duplicate the spanners from the Hudson pouch, here's a link to buy the heads:

http://www.all-spec.com/products/58-0143.html

I have a bunch of handles (as seen in my second photo). Anyone want to go halvsies?

_________________
:delta: My entry-level prop and costume tutorials: viewtopic.php?f=3&t=12751 :delta:


Top
 Profile  
Reply with quote  
 Post subject:
PostPosted: Wed Mar 20, 2013 8:33 pm 
MODEL 120-A2
User avatar

Service Number: A04/TQ0.0.72178E5
Country: United States
I would recommend keeping the zippered pouch. Not out of accuracy, but out of necessity. Wires and stuff will end up falling out, slipping, getting caught, etc. Zipper closure prevents that. I tend to think of this a "colour" prop. Your adding it to put some detail, but it's not going to be a major showpiece (like, say, the Pulse Rifle).

I got my alligator clips off Amazon. There are some that match the A:CM game clips; I actually use 3 types in my bypass kit. I went with 3 because of my real-world electronic uses. Invariably, you will want to have small minigrabber leads, especially when working on any circuit boards.

The screen looking ones are:

http://www.amazon.com/gp/product/B00AAQ ... UTF8&psc=1

They don't come with wires, but it's not hard to add them. The other clips and wires were:

http://www.amazon.com/gp/product/B0002J ... UTF8&psc=1

http://www.amazon.com/gp/product/B0002J ... UTF8&psc=1

The one thing I wish I had included was some small tools; especially a screwdriver.

Charlie

_________________
"There is a clause in the contract which specifically states any systematized transmission indicating a possible intelligent origin must be investigated. On penalty of total forfeiture of shares. No money."


Image


Top
 Profile  
Reply with quote  
 Post subject:
PostPosted: Wed Mar 20, 2013 8:38 pm 
MODEL 120-A2
User avatar

Service Number: A04/TQ0.0.72178E5
Country: United States
And just as "why I did what I did." When I build my bypass kit: the multimeter and "computer" (read: blackberry) are wired to the circuit board at the top. The circuit board has a ribbon cable connecting to the junction box. All the test leads are wired into the junction box. Theoretically, assuming it actually worked, you'd have an actual ability to send/receive signals from the processor to the leads and override. I covered my circuit board because, well, most of the equipment I've used doesn't like exposed circuit. Too easy to bump it, short, etc. Also...I broke the original circuit board, and it looked a lot cooler than my replacement. :(

Charlie

_________________
"There is a clause in the contract which specifically states any systematized transmission indicating a possible intelligent origin must be investigated. On penalty of total forfeiture of shares. No money."


Image


Top
 Profile  
Reply with quote  
 Post subject: Re:
PostPosted: Wed Mar 20, 2013 9:06 pm 
User avatar

Location: Orlando, FL
Country: United States
SGT KITTEN wrote:
And just as "why I did what I did." When I build my bypass kit: the multimeter and "computer" (read: blackberry) are wired to the circuit board at the top. The circuit board has a ribbon cable connecting to the junction box. All the test leads are wired into the junction box. Theoretically, assuming it actually worked, you'd have an actual ability to send/receive signals from the processor to the leads and override. I covered my circuit board because, well, most of the equipment I've used doesn't like exposed circuit. Too easy to bump it, short, etc. Also...I broke the original circuit board, and it looked a lot cooler than my replacement. :(

Charlie


I noticed the Blackberry and chuckled. You thought out your kit well and it shows.

_________________
"I'm just an old city cowboy trying not to fall out of his saddle."


Top
 Profile  
Reply with quote  
 Post subject: Re:
PostPosted: Thu Mar 21, 2013 12:09 am 
Mobile Mayhem
User avatar

Location: Rapid View, Saskatchewan
Service Number: A10/TQ1.O.32157E1
Country: Canada
SGT KITTEN wrote:
I would recommend keeping the zippered pouch. Not out of accuracy, but out of necessity. Wires and stuff will end up falling out, slipping, getting caught, etc. Zipper closure prevents that. I tend to think of this a "colour" prop. Your adding it to put some detail, but it's not going to be a major showpiece (like, say, the Pulse Rifle).

I got my alligator clips off Amazon. There are some that match the A:CM game clips; I actually use 3 types in my bypass kit. I went with 3 because of my real-world electronic uses. Invariably, you will want to have small minigrabber leads, especially when working on any circuit boards.

The screen looking ones are:

http://www.amazon.com/gp/product/B00AAQ ... UTF8&psc=1

They don't come with wires, but it's not hard to add them. The other clips and wires were:

http://www.amazon.com/gp/product/B0002J ... UTF8&psc=1

http://www.amazon.com/gp/product/B0002J ... UTF8&psc=1

The one thing I wish I had included was some small tools; especially a screwdriver.

Charlie


I saw those more screen accurate clips on eBay but decided against them because they are just a little too big for the measurements I took. I thought about finding some "roach clips" but felt weird about it haha. The ones I am looking at come with red n' black wires already, with the little plugs on the ends as seen in the screens

_________________
Lt. Melissa L. Klassen, ALG
AL Colonial Admin. - Executive Officer (XO) -- 2021-2022
RCCM | Royal Canadian Colonial Marines - Commanding Officer (CO) -- 2021-2022

Read the AL Charter Rules & Regulations: https://docs.google.com/document/d/1i3gd9QUyIqI_6rfk8kpxspbKU-JT4MBAjLPxfCkvGJ8


Top
 Profile  
Reply with quote  
 Post subject:
PostPosted: Thu Mar 21, 2013 1:15 am 
MODEL 120-A2
User avatar

Service Number: A04/TQ0.0.72178E5
Country: United States
Here are some closeups, with a ruler, of the bigger alligator clips I used.

Image

Image

Image

Charlie

_________________
"There is a clause in the contract which specifically states any systematized transmission indicating a possible intelligent origin must be investigated. On penalty of total forfeiture of shares. No money."


Image


Top
 Profile  
Reply with quote  
 Post subject:
PostPosted: Thu Mar 21, 2013 7:29 am 
Mobile Mayhem
User avatar

Location: Rapid View, Saskatchewan
Service Number: A10/TQ1.O.32157E1
Country: Canada
I bought that meter, 2 sets of the wired alligator clips with the red n' black wires and banana plugs and was going to buy all 15 of those stupid wrist straps for a measley dollar just so I could get the tan or olive coloured ones, but it was ended, and not relisted, so I did some more searching and stumbled upon THIS!:

Image

It just SCREAMS Weyland Yutani, so I snatched up 3, for a dollar each with free shipping, I know... I could have bought like 50 of them for that price, but I'm happy :) I like the "rough and tough" grippy piece on the end, very "industrial" looking! I can provide a link if anyone is interested, they are offered for buy it now. The store has other colours as well. I almost bought a grey and black one, then I scrolled down further and BAM!, Weyland Yutani haha

I also went and bought some colour diffused LEDs instead of my clear dome ones, so you'll still see the colour even when they are not lit up.

_________________
Lt. Melissa L. Klassen, ALG
AL Colonial Admin. - Executive Officer (XO) -- 2021-2022
RCCM | Royal Canadian Colonial Marines - Commanding Officer (CO) -- 2021-2022

Read the AL Charter Rules & Regulations: https://docs.google.com/document/d/1i3gd9QUyIqI_6rfk8kpxspbKU-JT4MBAjLPxfCkvGJ8


Top
 Profile  
Reply with quote  
 Post subject:
PostPosted: Mon Apr 22, 2013 11:47 am 
Prop Churner Outer
User avatar

Location: Bath, Maine
Service Number: A03/TQ1.0.12143G1
Country: United States
For the exterior of my bypass kit I needed to hide a logo, so I added the Eagle patch from my Gearbox A:CM game:

Attachment:
IMG_1967.JPG
IMG_1967.JPG [ 491.03 KiB | Viewed 19230 times ]


Here's the interior as it currently stands:

Attachment:
IMG_1969.JPG
IMG_1969.JPG [ 311.52 KiB | Viewed 19230 times ]


The wire that is coming out of the top of the kit has an aligator clamp on it. That's hard to see in the photo though. I need to have a lot of the wires "go somewhere", as they are clearly just hangling out at the moment, but I think I'm liking the overall setup as it echoes the content of Hudson's kit pretty well. I'd still like to replace the screwdriver tops with a few of those Moody wrenches, but they are pretty hard to source.

The one thing that is missing is a keypad. That's a detail that is consistent between both bypass kits, so I'm going to have to make room for one in mine too.

_________________
:delta: My entry-level prop and costume tutorials: viewtopic.php?f=3&t=12751 :delta:


Top
 Profile  
Reply with quote  
 Post subject:
PostPosted: Mon Apr 22, 2013 12:17 pm 
MODEL 120-A2
User avatar

Service Number: A04/TQ0.0.72178E5
Country: United States
I like it! Could you maybe put a circuit card in the bottom right side and route the wires to it?

Charlie

_________________
"There is a clause in the contract which specifically states any systematized transmission indicating a possible intelligent origin must be investigated. On penalty of total forfeiture of shares. No money."


Image


Top
 Profile  
Reply with quote  
 Post subject:
PostPosted: Mon Apr 22, 2013 12:42 pm 
Prop Churner Outer
User avatar

Location: Bath, Maine
Service Number: A03/TQ1.0.12143G1
Country: United States
That makes sense. I do want a couple of buttons to push too though.

_________________
:delta: My entry-level prop and costume tutorials: viewtopic.php?f=3&t=12751 :delta:


Top
 Profile  
Reply with quote  
 Post subject: Re:
PostPosted: Mon Apr 22, 2013 1:52 pm 
MODEL 120-A2
User avatar

Service Number: A04/TQ0.0.72178E5
Country: United States
retrogarde wrote:
That makes sense. I do want a couple of buttons to push too though.


I agree. Buttons are a must.

Charlie

_________________
"There is a clause in the contract which specifically states any systematized transmission indicating a possible intelligent origin must be investigated. On penalty of total forfeiture of shares. No money."


Image


Top
 Profile  
Reply with quote  
 Post subject: Re: Hack Pouches and Bypass Kits
PostPosted: Wed May 01, 2013 10:32 pm 
Mobile Mayhem
User avatar

Location: Rapid View, Saskatchewan
Service Number: A10/TQ1.O.32157E1
Country: Canada
OK! Been busy attacking eBay for little odds and ends over the last few weeks. It's slow going, cause it takes 2-3 weeks for it to get to me.

I also dug through my electronics stuff and my broken electronics stuff and made some discoveries :)
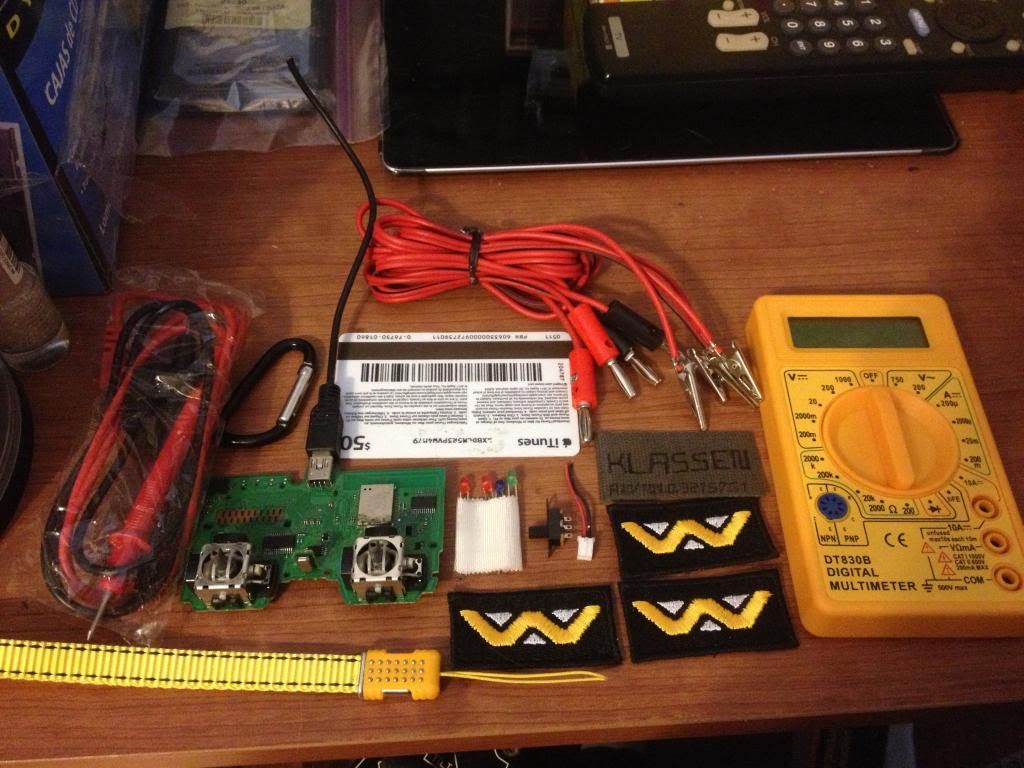
On hand, I have

- Black planner, which I ripped out the rings and the leather card sleeves
- Yellow Multimeter (I had to remove the back to save space on the Z axis, so I will just cover the back with electrical tape or something. I probably won't ever use it anyway, but if I did, the electrical tape should protect it. The fuse for it sticks out a little past the edges of the housing though :( )
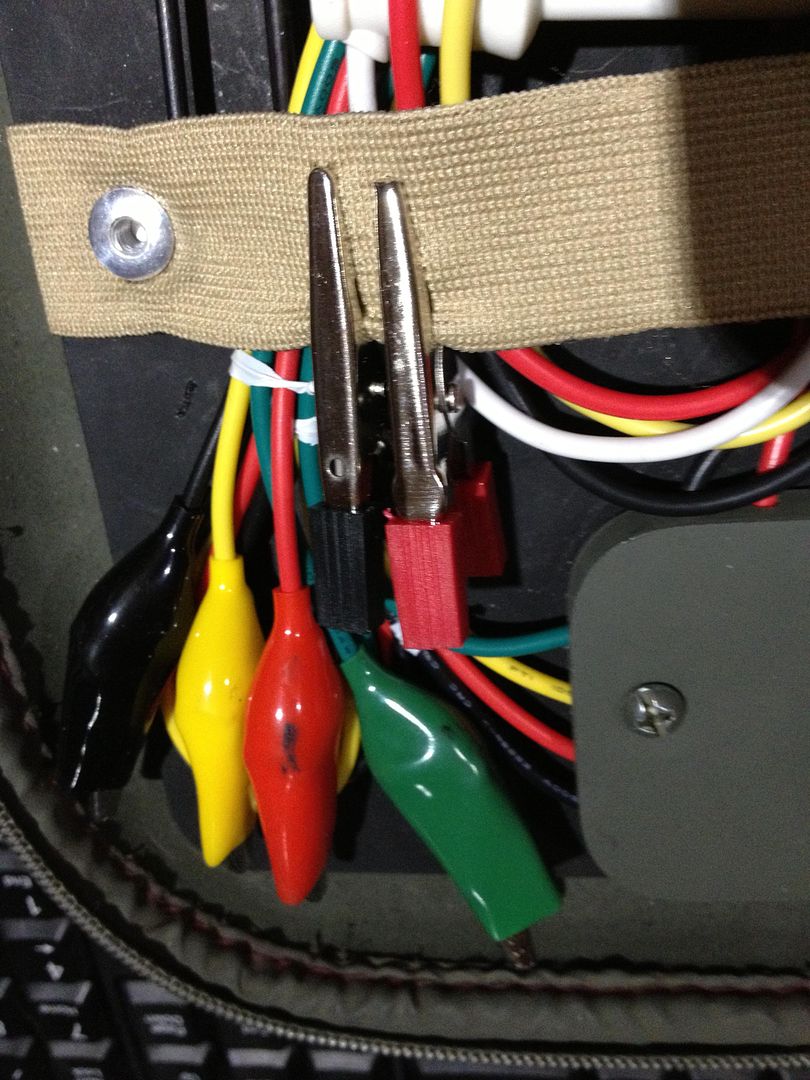
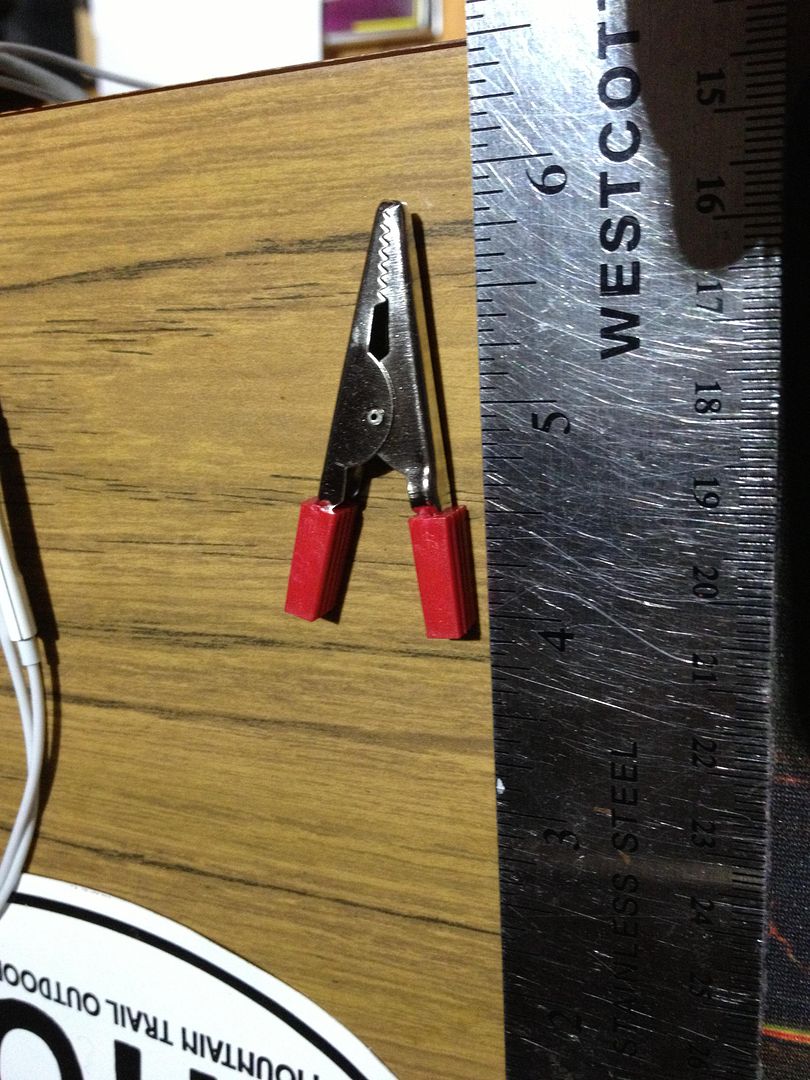
- Pen test leads that came with the multimeter
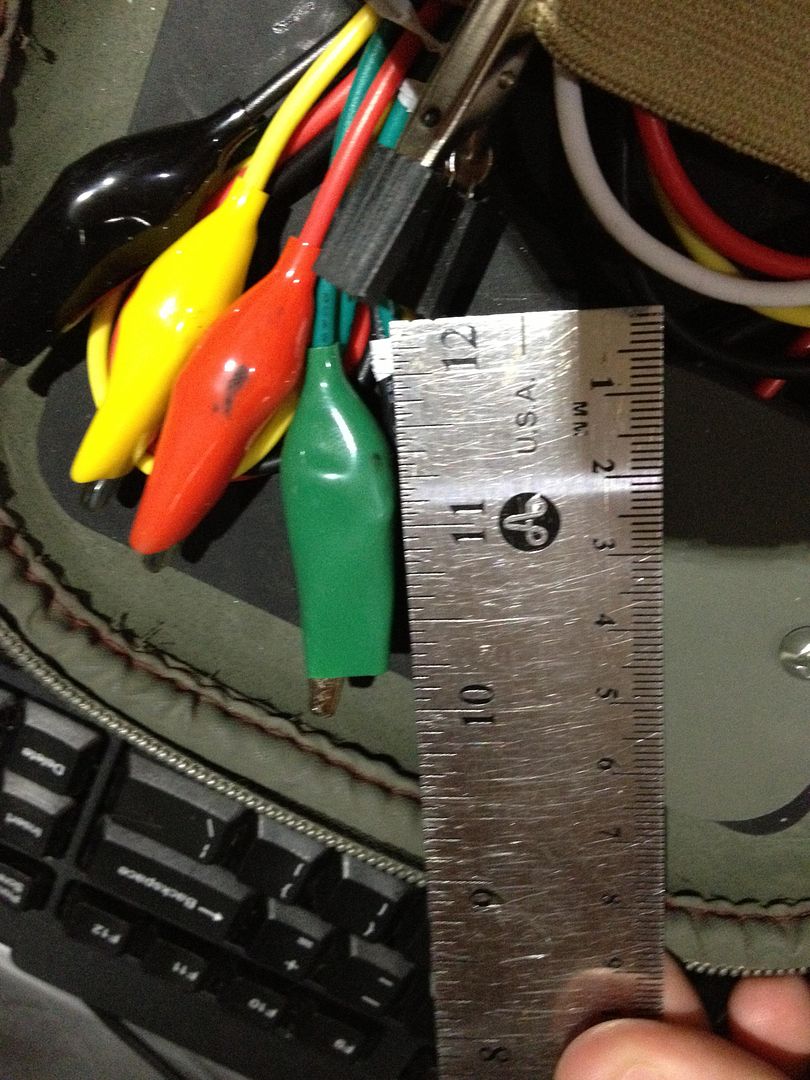
- Alligator clip test leads with banana plugs (I am changing these, the cables are too thick when bunched up together like in the game, so I bought 2 pairs of cheap earbuds, red and black that I will cut the speakers off of and put the alligator clips onto, the plugs in the game look small like the 3.5mm jacks anyway, and there is only 2 visible)
- Diffused LEDs: 2 red, 1 blue and 1 green
- SPDT Mini Slide Switch: To turn the LEDs on and off
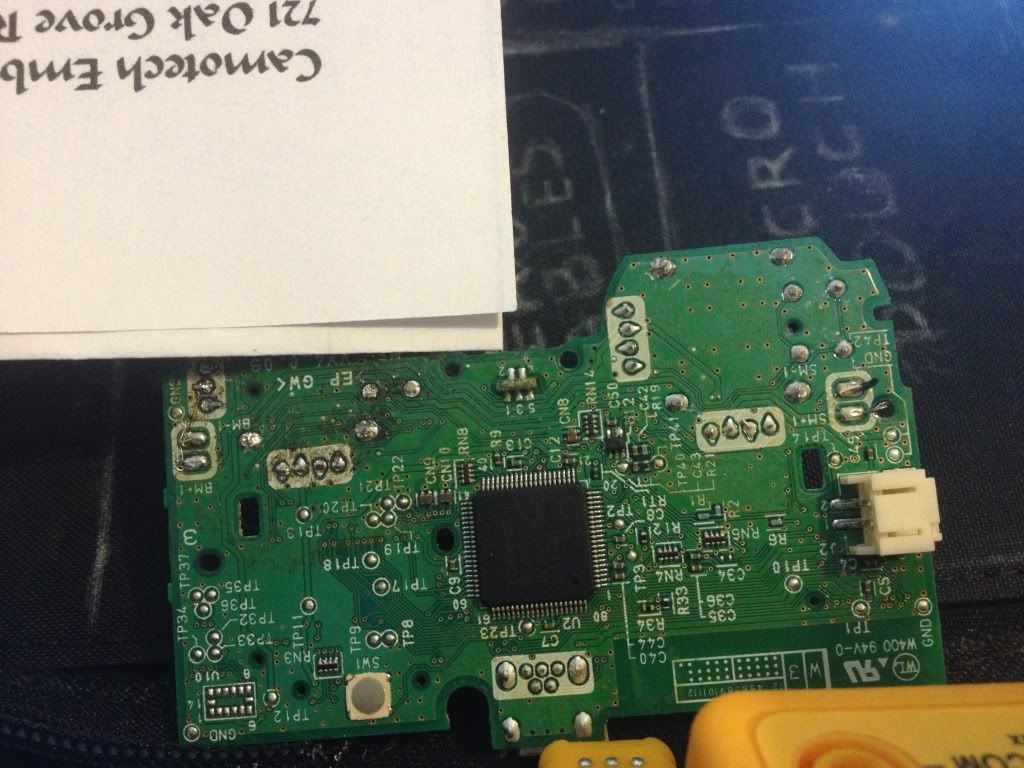
- Fried PS3 controller motherboard: This is too perfect!, I'm glad I threw it in my salvage box! I just need to take the analogue sticks and the Six Axis off. It has a Mini B USB port and a Mini White Tamiya female plug, so I can plug it into a few things (mentioned later)
- Male Mini White Tamiya plug: from the same PS3 controllers battery which I am sure isn't safe to use anymore... *SNIP*!
- Mini B USB end: cut off of my Turtle Beach PX3 charging cable which I never use, since I use a regular USB cable plugged into my PS3 to charge it. This one isn't a data cable, so it was useless to me anyway. Bonus is if I need it, I have the standard USB 2.0 plug to use as well!
- A used iTunes card: I will paint this and gloss clearcoat it without painting the magnetic stripe or the barcode on it and wire the Male Tamiya plug or a ribbon cable to it, to make it kind of like young John Connors ATM hacking device in T2, having it plug into the PS3 controller motherboard. Now, what to paint on it??? Additionally I can just get a cheap magnetic card printed from eBay with whatever design I want... Haven't decided yet.
- A yellow and black wrist strap for the "Pocket PC" I am building (mentioned later)
- Customized name tape and 3 Weyland Yutani patches: I had Linda from Camotech make these WY patches (or Morale tabs). I got 6 of them for $15 :), Also the name tape is the excess I cut off of my tapes for my Service C shirt that I saved (I save everything!) with black sharpie marker and black sharpie pen, my name and service number.
- Black carabiner: Just because I think it will look good hanging from the outside

Image

Inside the stripped planner, my evil plans

Image

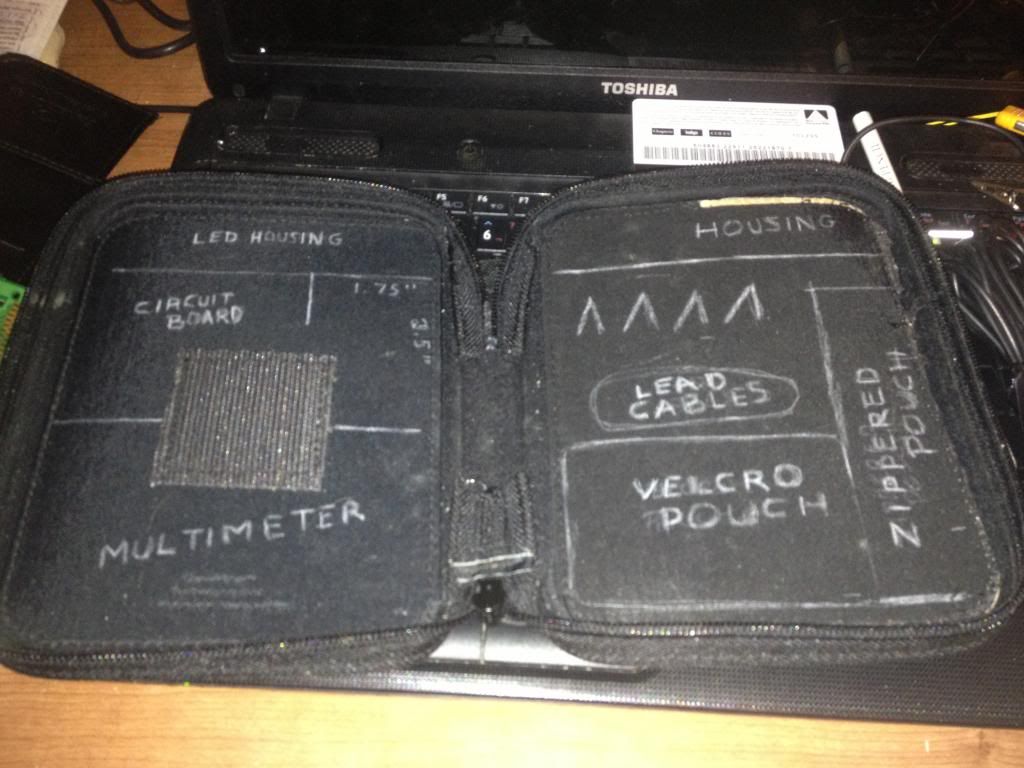
"LED HOUSING" and "HOUSING" are the little bar covers at the tops of the A:CM Bypass Kit. I have 3D modeled these to be 3D printed

Image

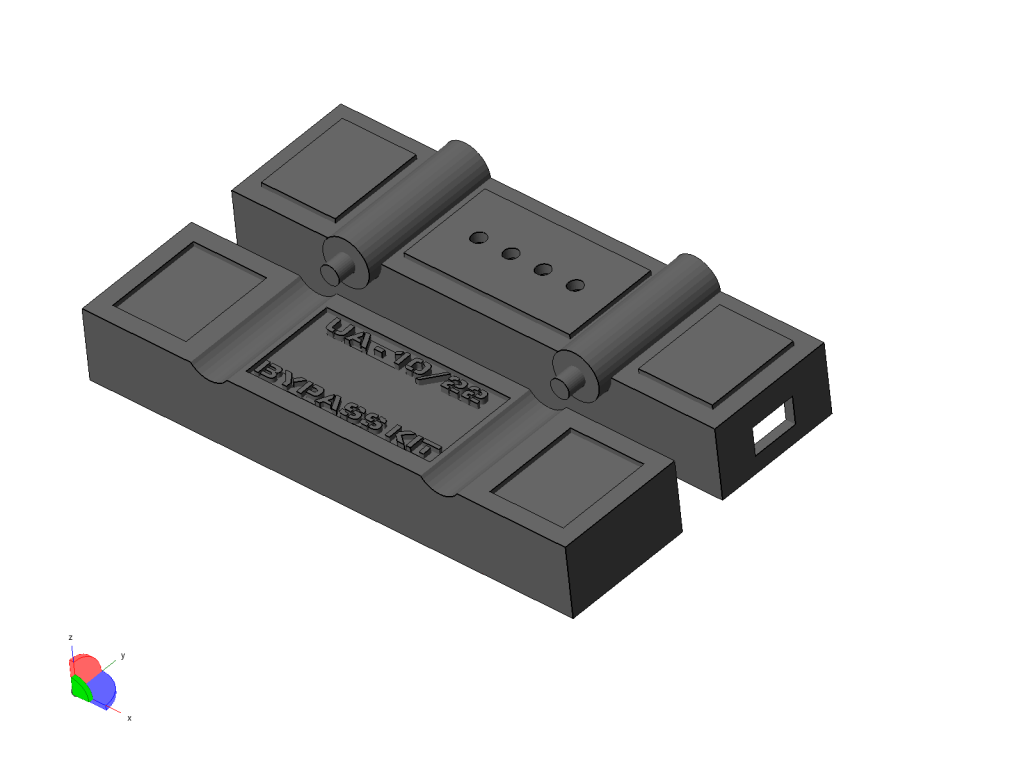
I have named my kit the "UA - 10/22 BYPASS KIT". Because that side's housing seemed too blank so I thought... "What would the model be called?". Well, fun fact is "10/22" is actually my birthday ;). I have the hole on the side of the one for the SPDT slide switch. I have also ordered some 2x AAA battery holders, one will fit under the LED housing to power the LEDs. I did want to make the LEDs scroll through in sequence, but my electronic skills aren't that great yet and I don't understand it. (I've researched this extensively haha!)... Maybe later I'll figure it out :)

Image

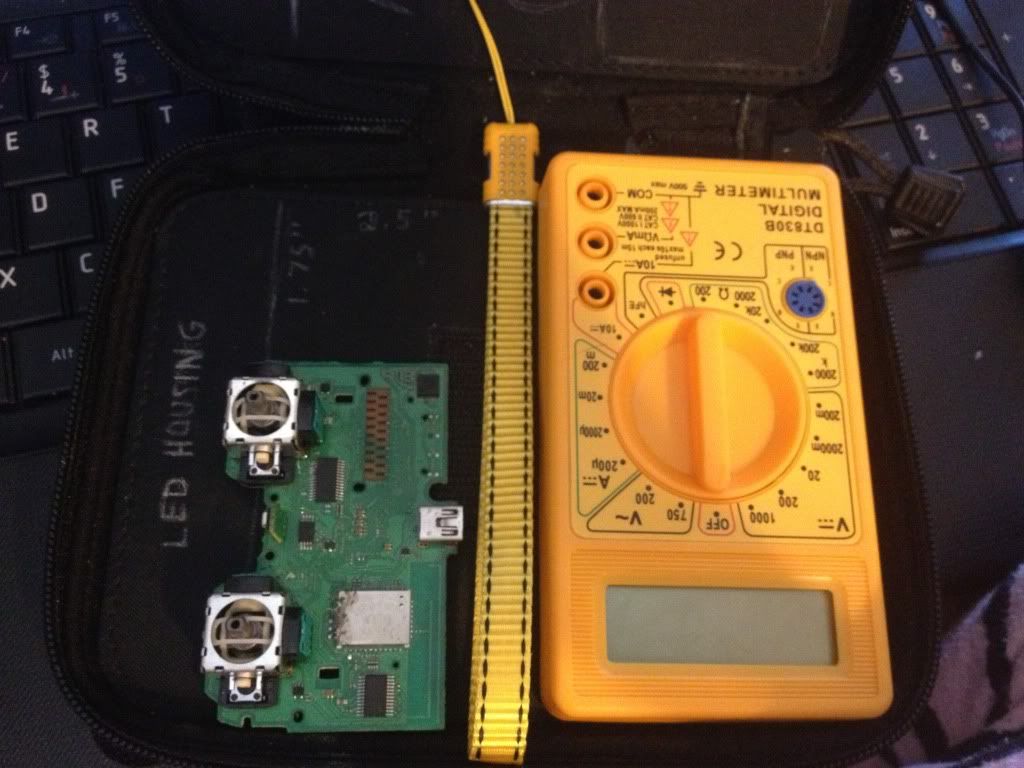
As you can see, the Multimeter takes up a lot of space, but there's still about .75" space between the multimeter and where the bottom of the circuit board ends, I will either rest the Pocket PCs wrist strap here, or the pen test leads for the multimeter.

I will be clipping the board back so it is more rectangle in shape once I get those sticks off, as seen like this, with the paper covering one side, so it fits better in the planner below the housing for the top. I will secure it to the planner by using some olive drab elastic band that I have ordered, so I can remove it to "use it".

Image

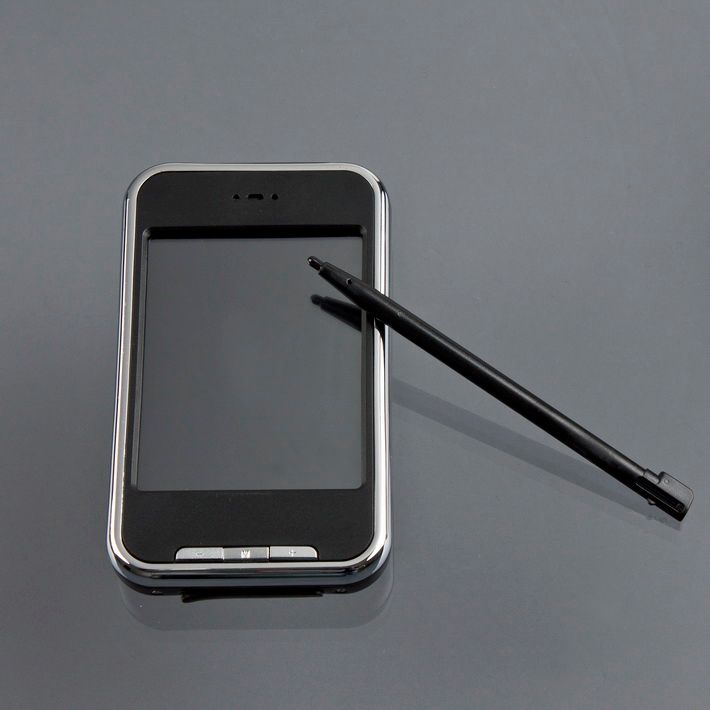
The space to the right of the board marked " 1.75" x 2.5" " is where I am putting my built "Pocket PC". I bought a chinese knock off iPod Nano 6th Generation, and I will model a small rectangle housing for it, with some little buttons on the bottom. I will then take my Mini B USB plug and splice a 3.5mm audio jack on the other end and have it plug into the nano, connecting the circuit board via USB, and the magnetic card via the Tamiya connector. The Nano will be able to play a loop animation that will say "Processing" or "Bypassing", etc...

The Pocket PC will have the L shaped antenna folded on the side as well, and the PC will be secured using velcro, as well as the Multimeter.


That takes care of one side!

Now, for the other side, up in the top photo of the planner, you can see 4 little arrow thingies, those are my Alligator clip positions. They will be secured by the olive drab elastic, the "LEAD CABLES" is where their cords will be bunched up and velcroed down.

The "VELCRO POUCH" will be big enough to store the magnetic stripe card and any little cables, like the Mini B to 3.5mm cable if it isn't attached to the Pocket PC and circuit board.

"ZIPPERED POUCH" is where my "tools" will go. I bought a 5 piece mini spanner wrench set, a 6 piece Allen wrence keyring and a pen style precision screwdriver with 6 different heads that store inside the shaft that will go in the cylindrical zippered pouch.

On it's way to me:

- 2x AAA battery holder
- Earbuds (for the Alligator clips)
- Wrenches and screwdriver
- Heavy duty zipper (cheaper on eBay than in town haha)
- D rings (I plan on sewing a "handle" to go on the spine of the planner on the outside, which will have a D ring with the black carabiner attached to hang the pouch off of me or my chair.
- 1/2" olive drab elastic
- "ChiPod Nano"

Still have to order

- Top housings for LEDs and other side
- Pocket PC shell housing, but I will do this once I have the nano in hand and can make sure it fits right :)

Gotta prod my "seamstress" to help me make my front cover with my patches and stuff on it, and the right side inside with the pouches which I will glue down since I don't think the sewing machine we have will sew through the planner stuffing and all haha. Maybe our old leather sewing machine will, but I gotta wait for my brother to come home to help get it from the neighbors since it weighs a ton. That won't be til May long weekend...

Almost there!!!

_________________
Lt. Melissa L. Klassen, ALG
AL Colonial Admin. - Executive Officer (XO) -- 2021-2022
RCCM | Royal Canadian Colonial Marines - Commanding Officer (CO) -- 2021-2022

Read the AL Charter Rules & Regulations: https://docs.google.com/document/d/1i3gd9QUyIqI_6rfk8kpxspbKU-JT4MBAjLPxfCkvGJ8


Top
 Profile  
Reply with quote  
 Post subject:
PostPosted: Wed May 01, 2013 10:59 pm 
Mad Cat
User avatar

Location: Active duty: USS Catalpa
Service Number: AO3/TQ6.0.79749E8
Country: United States
Moosh, you may be able to remove the print from the iTunes card without having to paint over it.
You'd have to use Acetone, but you mentioned your Mom doesn't like paint fumes, and acetone isn't exactly "mild" on the aroma scale, so keep that in mind.

Unless you WANT to repaint it, in which case, disreguard the above.

_________________
"Awww, someone tell me that's a boot!

It's a boot!"

III drops


Top
 Profile  
Reply with quote  
 Post subject:
PostPosted: Wed May 01, 2013 11:33 pm 
Mobile Mayhem
User avatar

Location: Rapid View, Saskatchewan
Service Number: A10/TQ1.O.32157E1
Country: Canada
Ha, ya, Acetone definitely isn't inside friendly! haha, but I will keep it in mind!, my Dad is home now and his smeller is all messed up so maybe if I give up he can do it for me outside or in the garage. Cool idea, though, thanks!

_________________
Lt. Melissa L. Klassen, ALG
AL Colonial Admin. - Executive Officer (XO) -- 2021-2022
RCCM | Royal Canadian Colonial Marines - Commanding Officer (CO) -- 2021-2022

Read the AL Charter Rules & Regulations: https://docs.google.com/document/d/1i3gd9QUyIqI_6rfk8kpxspbKU-JT4MBAjLPxfCkvGJ8


Top
 Profile  
Reply with quote  
 Post subject:
PostPosted: Thu May 02, 2013 9:49 pm 
Site Admin
User avatar

Location: Wasteland Minnesota, USA
Service Number: A06/TQ2.0.65181E6
Country: United States
Has anyone posted a higher resolution image of the ACM version?

_________________
"A writer needs a pen, a painter a brush, and a filmmaker an army." - Orson Wells.

http://www.rookscastle.com
http://www.alchemyarms.com


Top
 Profile  
Reply with quote  
 Post subject:
PostPosted: Thu May 02, 2013 10:45 pm 
MODEL 120-A2
User avatar

Service Number: A04/TQ0.0.72178E5
Country: United States
Moosh put up some good shots in the other thread. Moosh, can you repost them here?

Charlie

_________________
"There is a clause in the contract which specifically states any systematized transmission indicating a possible intelligent origin must be investigated. On penalty of total forfeiture of shares. No money."


Image


Top
 Profile  
Reply with quote  
 Post subject:
PostPosted: Thu May 02, 2013 11:10 pm 
Mobile Mayhem
User avatar

Location: Rapid View, Saskatchewan
Service Number: A10/TQ1.O.32157E1
Country: Canada
This is a compilation of all angles I could capture using my HDPVR :)

Sorry some are dark, it was the environment haha.

I have to put it in my Dropbox cause it's too big to upload here.

Link: https://www.dropbox.com/s/6gs4cq46pewyf ... Angles.png

_________________
Lt. Melissa L. Klassen, ALG
AL Colonial Admin. - Executive Officer (XO) -- 2021-2022
RCCM | Royal Canadian Colonial Marines - Commanding Officer (CO) -- 2021-2022

Read the AL Charter Rules & Regulations: https://docs.google.com/document/d/1i3gd9QUyIqI_6rfk8kpxspbKU-JT4MBAjLPxfCkvGJ8


Top
 Profile  
Reply with quote  
 Post subject:
PostPosted: Fri Jun 14, 2013 9:37 pm 
MODEL 120-A2
User avatar

Service Number: A04/TQ0.0.72178E5
Country: United States
Target (at least the one near me in CT) has the first aid bags on sale again. $6 or free with 3 first aid supply purchases. They are slightly larger than my original and I think would work better

Charlie

_________________
"There is a clause in the contract which specifically states any systematized transmission indicating a possible intelligent origin must be investigated. On penalty of total forfeiture of shares. No money."


Image


Top
 Profile  
Reply with quote  
 Post subject:
PostPosted: Thu Mar 27, 2014 5:46 pm 
Prop Churner Outer
User avatar

Location: Bath, Maine
Service Number: A03/TQ1.0.12143G1
Country: United States
I'm back to work on a Hack Pouch. I ditched my earlier attempt as it was too far from screen accurate, and rather bulky to boot.

So the first revelation I had was that we've been looking at Hudson's pouch upside down:

Attachment:
pouchrightsideup.jpg
pouchrightsideup.jpg [ 157.11 KiB | Viewed 18942 times ]


Take a look at the numbers on the keypad!

While that doesn't change the contents one bit, it does mess with my orientation as this is one of those props I have seered into my brain. I'm always going to think the wrenches and red button are on the left and the keypad is on top in the middle...

So I've begun assembling my own replica. This time around I'm really trying to at least match the setup of the original, even if i can't match all the contents exactly:

Attachment:
pouchprogress.jpg
pouchprogress.jpg [ 191.13 KiB | Viewed 18942 times ]


I'm using waxed canvas for the pouch itself, and while it has rounded edges (unlike the original) it at least has the correct herringbone edging. I really love how waxed canvas shows wear and tear and I'm certainly going for a well used look.

The three panels are made of plastic (the original almost looks like cardboard), but it will be resurfaced with either paint or paper to match the original a bit better. I have a set of Moody wrench tops (I'm just getting handles to complete them) and the red push botton so the right side is nearly complete. The middle is nearly done except for the keypad. Most likely I'll just scratch build one to match/fit the pouch. The left side has a small screen on the bottom and I haven't been able to find one with the pins on the top and bottom. I tried making my own but I'm not happy with how it looks and it takes up too much room.

The key honestly is realising how little room there actually is in this thing. Everything has to be extremely flat for folding and when you see it hanging off Hudson's webbing it looks tiny. I almost started to wonder if we had another "APC interior" situation (i.e. the prop hack pouch was only for closeups, while the costume pouch was smaller or at least empty).

Lots of work still to do. I'm hoping somehow I'll find Pulsemeter sensors to complete the left side, but for now I have a pair of small LED flashlights that (once painted) will suffice.

_________________
:delta: My entry-level prop and costume tutorials: viewtopic.php?f=3&t=12751 :delta:


Top
 Profile  
Reply with quote  
 Post subject:
PostPosted: Fri Mar 28, 2014 5:53 am 
Mobile Mayhem
User avatar

Location: Rapid View, Saskatchewan
Service Number: A10/TQ1.O.32157E1
Country: Canada
looks awesome retro!

Mine not so much haha, I need to finish mine!

_________________
Lt. Melissa L. Klassen, ALG
AL Colonial Admin. - Executive Officer (XO) -- 2021-2022
RCCM | Royal Canadian Colonial Marines - Commanding Officer (CO) -- 2021-2022

Read the AL Charter Rules & Regulations: https://docs.google.com/document/d/1i3gd9QUyIqI_6rfk8kpxspbKU-JT4MBAjLPxfCkvGJ8


Top
 Profile  
Reply with quote  
 Post subject:
PostPosted: Fri Mar 28, 2014 5:38 pm 
Mad Cat
User avatar

Location: Active duty: USS Catalpa
Service Number: AO3/TQ6.0.79749E8
Country: United States
In the lower left corner, that part looks like a calculator screen.

Then you have the sensors as Retro mentioned along with a few coaxial wires and what look to be even more alligator clips on wires.

That keypad looks like it would be easy for someone with a 3D printer to recreate. Then all it needs is a simple sticker with the numbers.

The computer parts in the middle...man, I wouldn't even try to match those completely. Then there's the mini screw drivers/wrenches on the far right....you'd think this would be easy to recreate.

_________________
"Awww, someone tell me that's a boot!

It's a boot!"

III drops


Top
 Profile  
Reply with quote  
Display posts from previous:  Sort by  
Post new topic Reply to topic  [ 48 posts ]  Go to page 1, 2  Next


You cannot post new topics in this forum
You cannot reply to topics in this forum
You cannot edit your posts in this forum
You cannot delete your posts in this forum
You cannot post attachments in this forum

Search for:
Jump to: