The discussion of the Alien series of films and the props used in them is the aim, but if it's got Big Bugs and Big Guns, then they are welcome too!


Post new topic Reply to topic  [ 340 posts ]  Go to page 1, 2, 3, 4, 5 ... 14  Next
Author Message
 Post subject: Charlie's CM Build (Pic Heavy and Extremely Long-Winded)
PostPosted: Wed Feb 27, 2013 1:02 am 
MODEL 120-A2
User avatar

Service Number: A04/TQ0.0.72178E5
Country: United States
Well I have decided to embark on a Colonial Marines costume. Aliens has been a favourite movie of mine since I first saw back in ’86. Although it doesn’t trump ALIEN as supreme sci-fi in my mind, it’s an awesome movie and the visuals are wonderful. Since I have completed my Nostromo costume, I haven’t done a lot in regards to prop work. I’m looking forward to getting back into work. I’ll add in here that I am NOT a fanatic for screen accuracy. I like making realistic, detailed props but I will happily ignore or alter details as I see fit to get the costume I want.
As I usually do, I’ve started a work binder with drawings, sketches, plans, and screen caps. I have been kicking around this idea for a while, but seeing the new Matrix Pulse Rifle pushed me over the edge. I saw pictures, read some reviews, and said what the heck, it will look on the wall if nothing else. Since I saw that, my wife gave me her approval (thanks babe!) and so I’ve started my research and spending in earnest.

First item I received is actually the Pentax 110 1:2.8 18mm camera lens. I found out about them in researching the armor, starting watching ebay, and found a lens set cheap that no one had bid on. Funny how such a minor part is how I started the build.

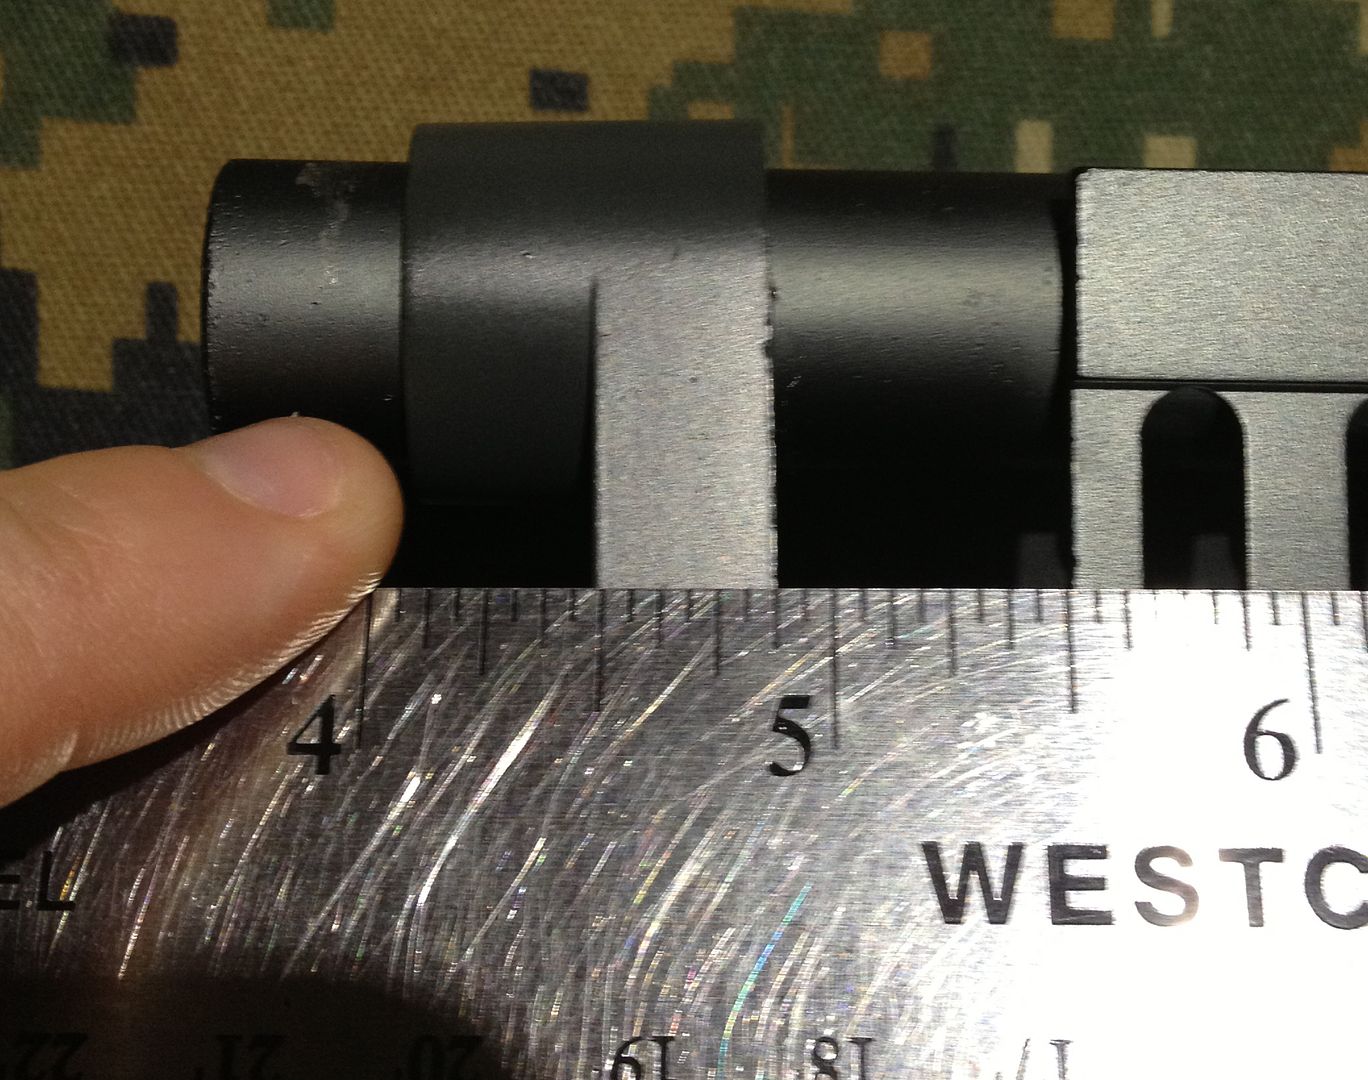
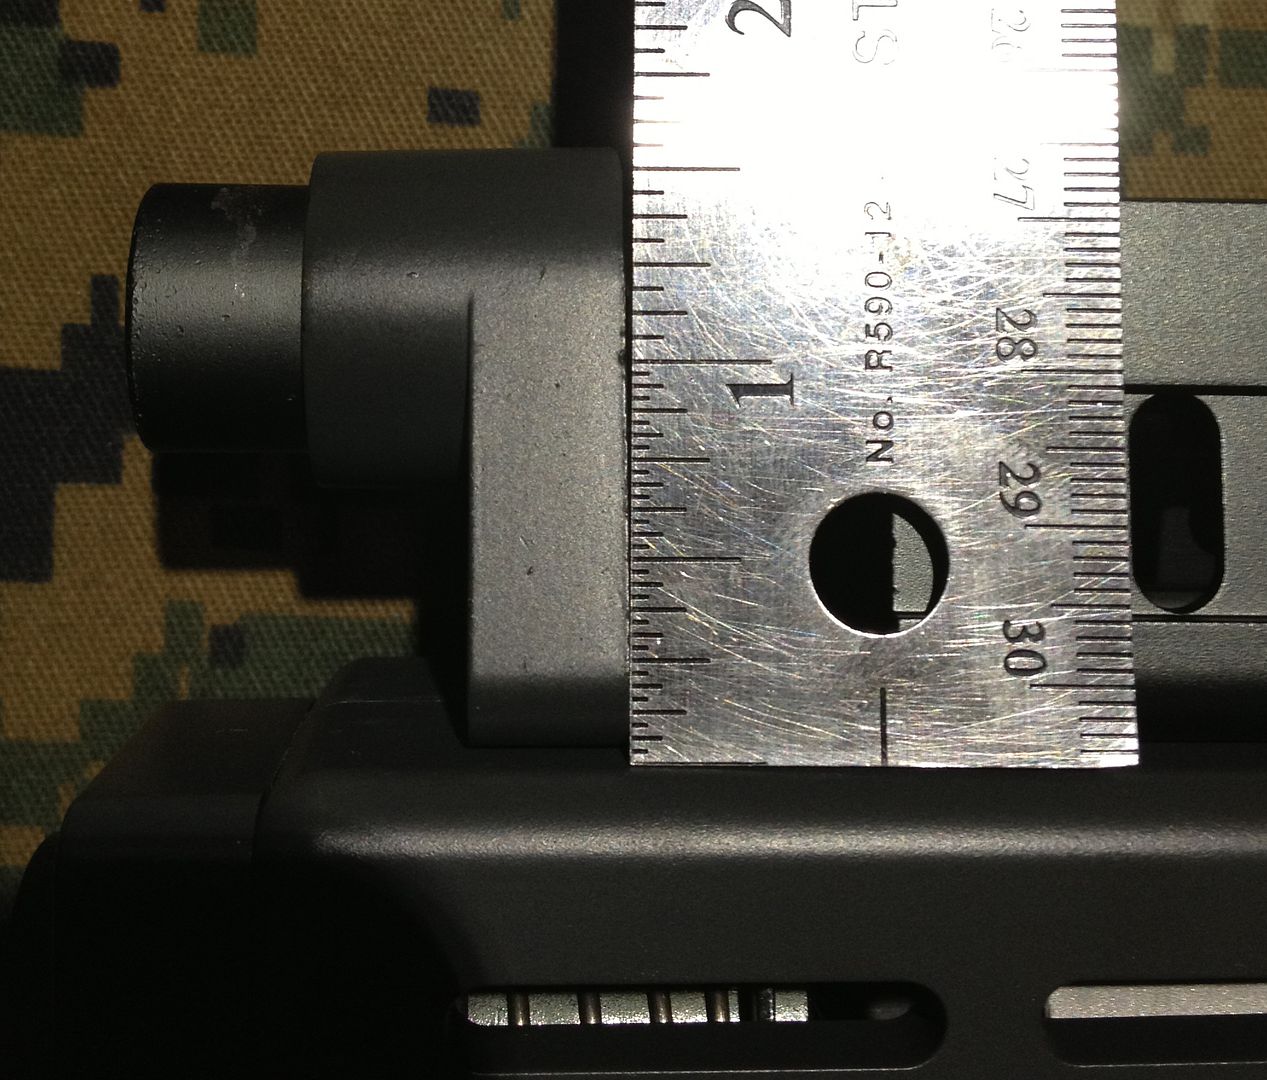
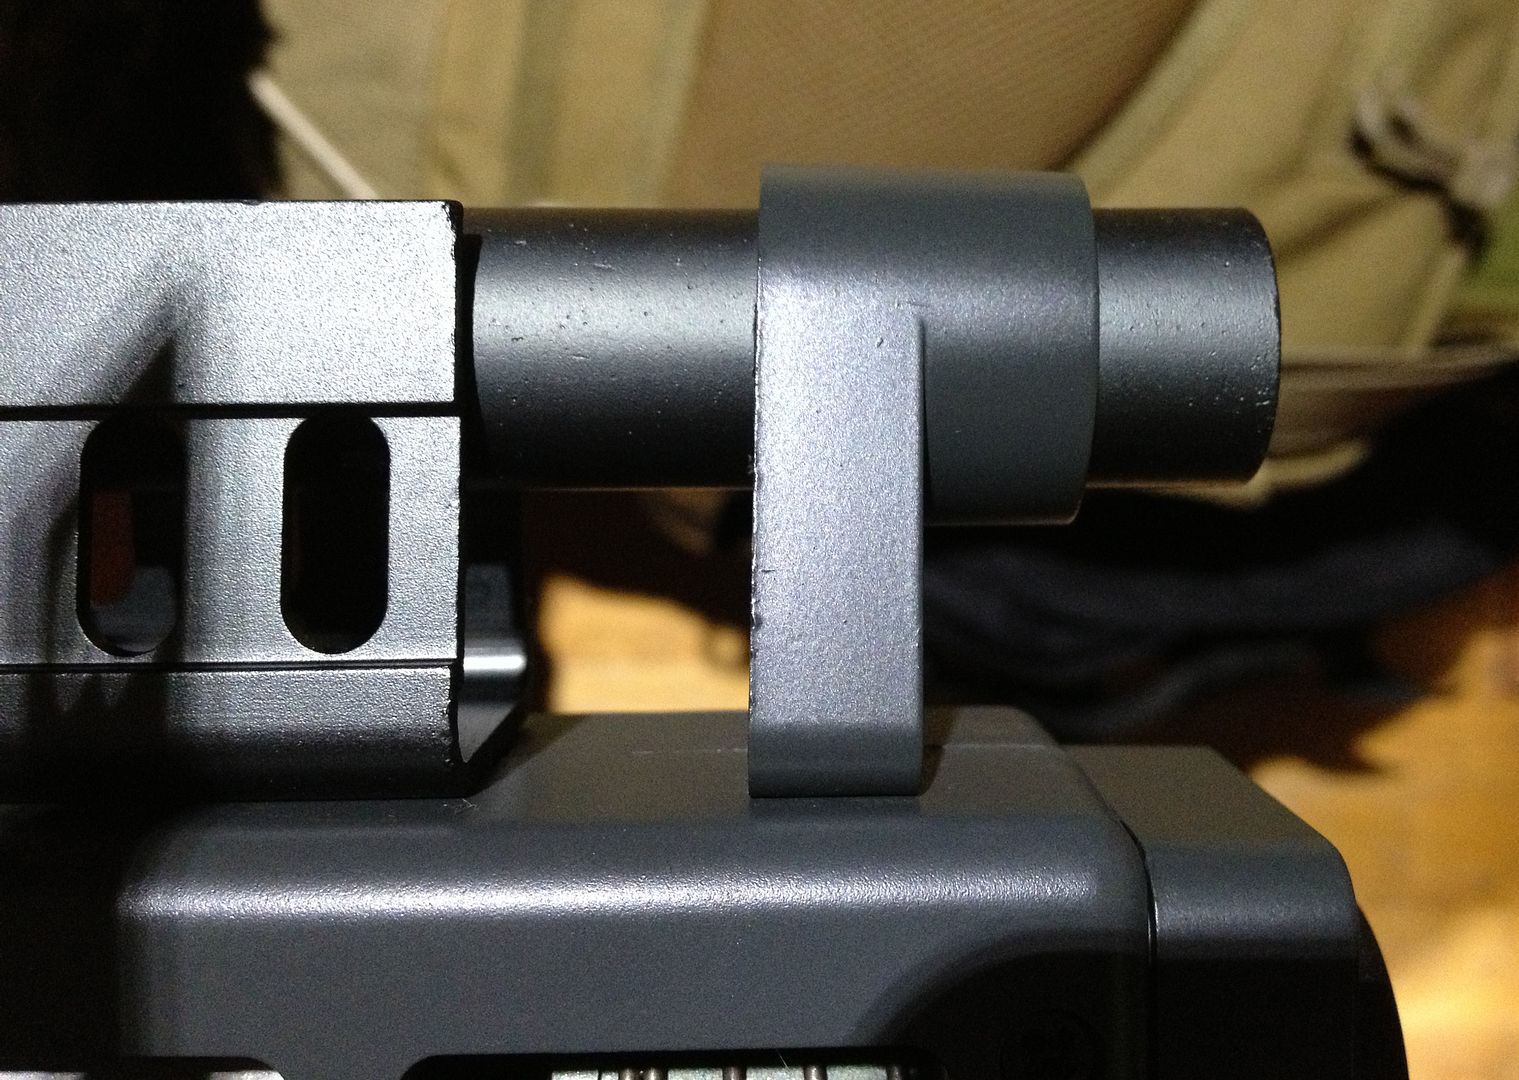
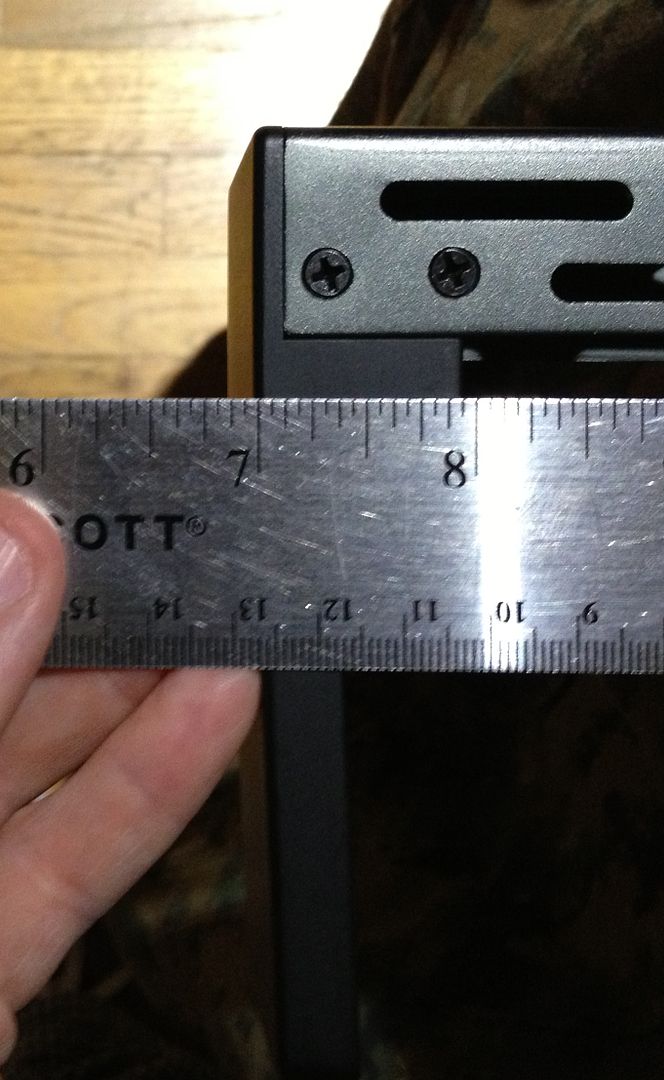
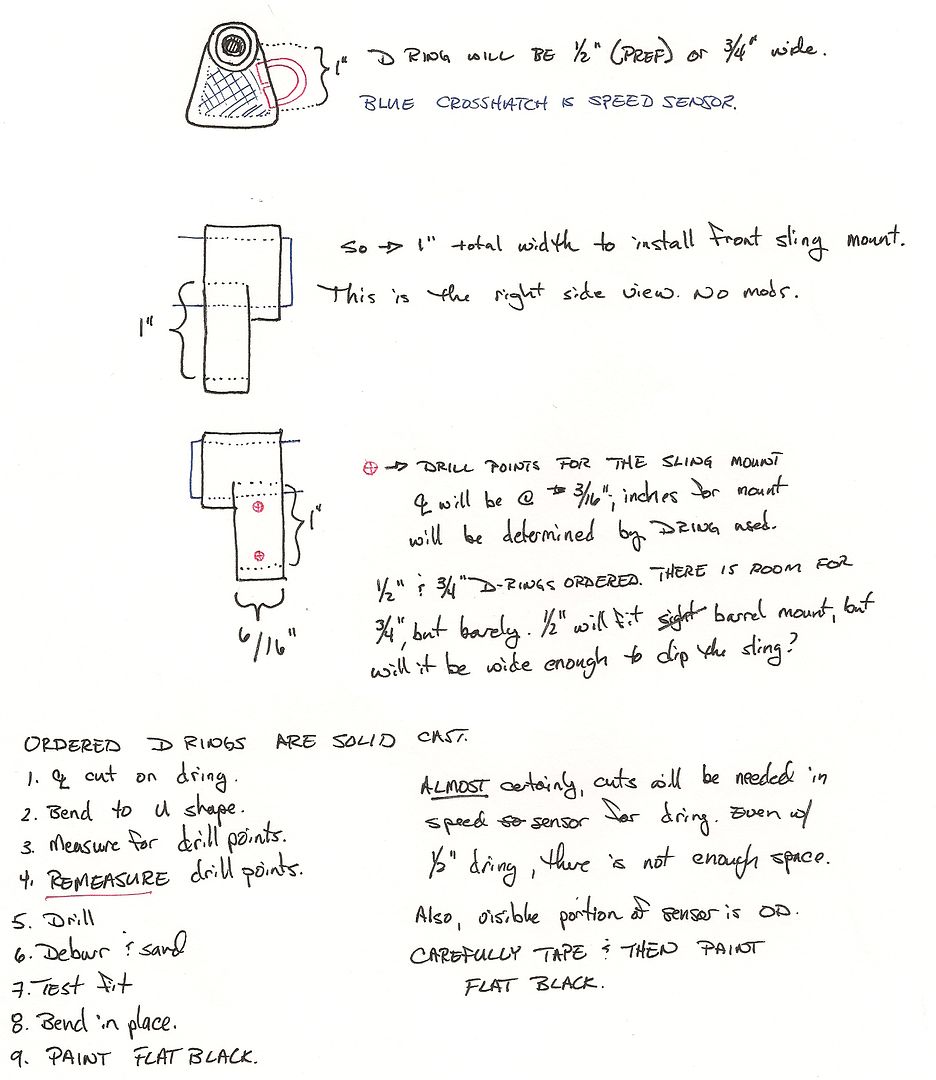
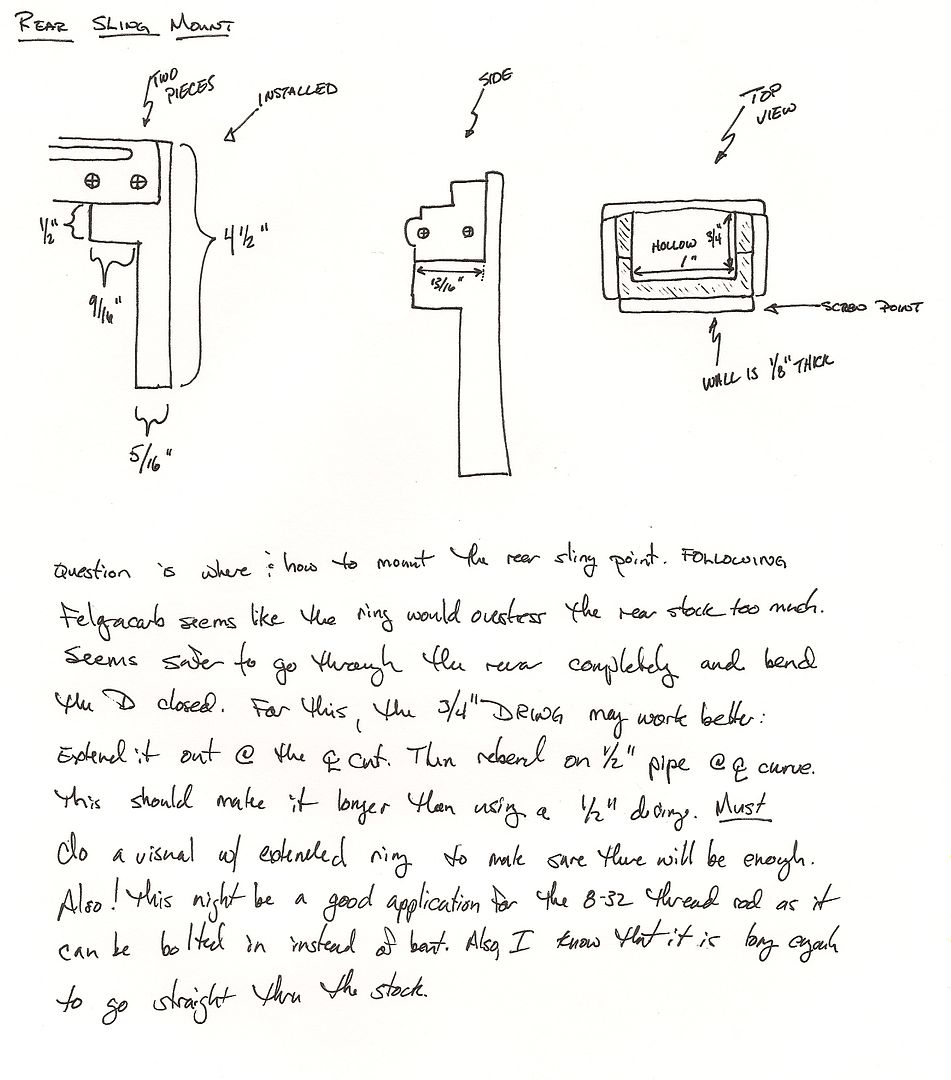
Next up is the PR: it’s the Matrix Pulse Rifle from evike.com. I know there is separate thread for all the details and commentary on it. Here I will stick to strictly what I do to modify mine the way I want. Right now I am making sure I have the room and the tools and the proper planning to carry out the mods I want. For starters, I want to repaint the SPAS cage from a light grey to black. The grenade port comes in the green ABS that matches the shroud; that needs to be silver. I also want to add realistic weathering to the details of the gun, but I am debating if I want to paint the shroud as though it is weathered metal or just say its polymer. Sling mounts need to be added to the front and rear. I’ve talked with Noble here on the RPF; I’ll be getting his sling and mag kit. The final touch will be getting a CNC machined 30mm grenade to replace the stock shotgun shell in the launcher.

For the BDUs, I’m planning on using modified US Army ACUs in a multicam camo pattern. I’ve looked around at several different types, including the old BDU style and the new ACU and a few of the European patterns. I decided on the new ACU style mainly because it comes in multicam. No, that’s not a screen accurate pattern, but it has the “feel” of USCM BDUs and frankly, I just love multicam.  I will be removing the shoulder pockets, modifying the collar, and adding appropriate patches. I have decided to leave the slant pockets on the ACU shirt and pants are they are. It’s not screen accurate, but it will be covered by armor. I suppose it’s cheating a bit, but I can live without the hassle of modifying the pockets. The shoulder ones are definitely coming off. Leaving the Velcro and attaching the patches that way is too much of deviation; none of the Marines on screen had anything close to that . I’ve ordered the 5”x3” Screaming Eagle patch for the right shoulder, the 3” USSC Roundel (or Delta patch, whatever you’d like to call it) for the left breast pocket and the 2 ¾” x 3 7/8” white bordered US Flag. All these came from patchesnpins.com I used them for my Nostromo patches and they had good quality items. I’m currently debating what to do for the nametapes; I want to use OD green tape with black lettering. I’m trying to decide if I want to just go with the standard printing, or get blank green and sharpie it on. Patchesnpins offers the nametapes embroidered with a good representation of the movie font, but they don’t offer custom names. I would hate to have a nice looking USCM and then a hand done nametape. I will probably, just for ease of getting it, ordered stock nametapes in the normal US Army font and then play around with custom ones later. Having looked at a lot of websites and using my own experience, I’ve decided to go with Propper ACUs for two reason: 1) they are slightly cheaper, and 2) they have DON’T PANIC printed in large friendly letters on the cover. *grin* Actually, they are the least expensive of the ones I looked at, but I’ve used Propper clothing before. Good tough stuff and it will last for a while. I also know what sizes they have that will fit me (a medium is not always a medium depending on which company you use!). The ACUs are battle-rip, so they will have the proper faint cross-hatch pattern, but they are not IR compliant. (I’m not getting that realistic, and those BDUs are expensive).

For armor I will be utilizing Spat and his cave of wonders.  I’ve heard nothing but good things about him (D*C stories aside) and he was very helpful and informative in his emails to me. I’m going to go with a standard USCM armor set, with the plastic helmet option. I used a real Kevlar PASGAT with my Resident Evil costume; I don’t want to think about how bad a steel one would be lugging around all day. I know Spat is busy with armor orders now; assuming everything on my end goes well the armor will be ordered second week of March. It’ll be months before I get it (no fault on Spat; I well understand how much time it takes to make a nice kit) so I will have a chance to plan out what I want to do as far as painting and customization. Right now I’m going to start with an unweathered dark green set. I’m seriously considering multicaming the armor as well. This is very painful, very intensive process (it involves stencils, and restenciling, and restenciling, and repeating over and over AND OVER) since it’s an 8 colour camo, but I have had good results practicing. It’s not spot on (I’m not Crye industries) but it’s a decent match and blends well with my multicam clothing. It’s an option, but I am going to have put more thought in it. The movie armor and BDUs are distinctly different schemes. And watching the movie, to me, there is a definite contrast between the “dark” armor and the “light” BDUs. I’m not sure the best way to replicate that. Thoughts and ideas would be appreciated.

This is my bulk starting point. I’m doing my sketching of lots of minor details (what customized paint, different pouches, what kind of boots, etc). As more plans become finalized, I will add posts, including uploads of my sketches and diagrams. The PR will probably be the next big portion to tackle, just because it’s here and I already have the tools necessary for the mods (grenade aside). As always compliments and constructive criticism are greatly appreciated.

And I always like to start off with a nice cover for the binder:
Image

_________________
"There is a clause in the contract which specifically states any systematized transmission indicating a possible intelligent origin must be investigated. On penalty of total forfeiture of shares. No money."


Image


Last edited by SGT KITTEN on Sun May 18, 2014 11:57 am, edited 1 time in total.

Top
 Profile  
Reply with quote  
 Post subject:
PostPosted: Wed Feb 27, 2013 1:35 am 
User avatar

Location: San Clemente, Ca.
Service Number: A05/TQ1.0.32155E1
Country: United States
If you wear a medium tall i have a set of propper multicam that was tried on once and then sat in a closet for years. Pm me if interested.


Top
 Profile  
Reply with quote  
 Post subject: Re:
PostPosted: Wed Feb 27, 2013 5:41 am 
MODEL 120-A2
User avatar

Service Number: A04/TQ0.0.72178E5
Country: United States
Revolver Ocelot wrote:
If you wear a medium tall i have a set of propper multicam that was tried on once and then sat in a closet for years. Pm me if interested.


The talls are too big for me, but thanks for letting me know about it.

Charlie

_________________
"There is a clause in the contract which specifically states any systematized transmission indicating a possible intelligent origin must be investigated. On penalty of total forfeiture of shares. No money."


Image


Top
 Profile  
Reply with quote  
 Post subject:
PostPosted: Wed Feb 27, 2013 5:42 am 
MODEL 120-A2
User avatar

Service Number: A04/TQ0.0.72178E5
Country: United States
So to start the pulse rifle modifications:
1. Add front sling mount
2. Add rear sling mount
3. Repaint SPAS cage
4. Replace shotgun shell with grenade
5. Remove Matrix label and repaint shroud metal plates
6. Repaint grenade feed ramp
7. Add trigger for grenade launcher
8. Rewire bullet sensor to trigger group
9. Install ghost ring rear and tritium front sights

So, some disassembly is going to have to happen. I can’t repaint the SPAS cage properly without at least doing that, nor can I get the front sling install without breaking it down. The question becomes how far to take it down. The driving factor is going is two-fold: am I going to make the shroud plates match the shroud colour, and am I going to weather the shroud as though it is made of metal? If I answer either one of these as yes, then it will be total disassembly of the rifle down to the Thompson components.

Based on my screen caps and reference photos, the forward shroud plate (where the Matrix logo is) and the two plates on the magwell should be the same colour as the shroud. Right now they are black. The forward shroud with the logo, at a minimum, needs to be sanded and repainted black, if not matching. However, I already know I can’t exactly match the shroud colour as it stands. I can make a good representation to the colour (my experiments in painting multicam have paid off in other respects). It will blend better, but it won’t be a perfect match to the ABS. I really do like the colour of the ABS though. It’s not a true green, nor brown, it’s a nice olive drab and matches what I think I see in the movie. So, then do I paint the shroud the make it appear as though it is weathered metal? This is where I haven’t quite made my mind up. I have screen caps of Frost’s hero rifle and Ripley’s hero rifle. Frost’s definitely has some metal weathering. Ripley’s doesn’t have ANY on the shroud I could see. I have some black and white photos (publicity ones) where I can’t see much weathering. It could be there….or it could be reflecting light. In any event, to replicate metallic weathering is a total breakdown and multiple paintings to do it right. In order to get the effect I think is most realistic, I take a piece and primer it. I then put down a layer of metallic silver (actually an aluminum dust based paint, a bit like cold cast except in a can). Then a layer of clear coat. I repeat that process. When it’s dry I use masking fluid (liquid latex) to mark off damaged areas and then start painting with the appropriate outer color. When that is dry, rub off the masking fluid and it takes the paint with it. Good for scratches and chips. Also, use of two layers of silver and clear means that I can take 600grit sandpaper and rub through without exposing the plastic underneath. So I can get a realistic worn part (this will be the method of weathering the SPAS cage) without dry brushing. Anyway, amount of work isn’t too big of an issue, but I am more inclined to leave the ABS as ABS. Most modern firearms (and even the old school 60s M-16) has plastic/polymer parts. Seeing as my “fake” PR is almost 12 lbs, a real metal one would weigh somewhere in the neighborhood of 15. Add in metal shrouds and that’s bit of weight to go lugging around. I’m very tempted to weather the metal plates as metal and then just leave the ABS as is. It will get scratched and dinged and dirty as I lug it around. Anyway, that is the bulk of my thoughts on the bulk painting. It will take me a while to get this accomplished. My job is ramping up for the next two or three months; I’ll be working nights with 1 day off out of 6. Fun fun. The weather here is too cold and rainy for good painting anyway. I'll add more posts for each of the mods to explain it out. Hopefully within the next few weeks I'll have some good follow ups with pictures.

Charlie

_________________
"There is a clause in the contract which specifically states any systematized transmission indicating a possible intelligent origin must be investigated. On penalty of total forfeiture of shares. No money."


Image


Top
 Profile  
Reply with quote  
 Post subject:
PostPosted: Wed Feb 27, 2013 6:31 am 
User avatar

Location: San Clemente, Ca.
Service Number: A05/TQ1.0.32155E1
Country: United States
Krylon OD camo spray paint found at auto parts stores is a really good match to the shroud, it is only slightly different depending on the lighting. I did a quick spray of the side plates, magwell plates and rear u plate.


Top
 Profile  
Reply with quote  
 Post subject: Re:
PostPosted: Wed Feb 27, 2013 9:28 am 
MODEL 120-A2
User avatar

Service Number: A04/TQ0.0.72178E5
Country: United States
Revolver Ocelot wrote:
Krylon OD camo spray paint found at auto parts stores is a really good match to the shroud, it is only slightly different depending on the lighting. I did a quick spray of the side plates, magwell plates and rear u plate.


I saw that mentioned over on RPF as well. I have several camo paints, both rustoelum and kylon. I'm pretty sure I have an OD, but I think its the rustoelum. Either way I will see if I can find that Krylon and do a few tests to see what matches I can get.

Charlie

_________________
"There is a clause in the contract which specifically states any systematized transmission indicating a possible intelligent origin must be investigated. On penalty of total forfeiture of shares. No money."


Image


Top
 Profile  
Reply with quote  
 Post subject:
PostPosted: Wed Feb 27, 2013 11:40 am 
Harvester of Sorrow
User avatar

Location: Lancashire (Wirral born)
Service Number: A04/TQ1.0.32156E1
Country: United Kingdom
Just so you know, the SPAS cage doesn't take paint to well, even when well prepped. Mine started to bubble very slightly but the effect actually looks like decent gun metal now :)

_________________
Image AKA: Simon


Top
 Profile  
Reply with quote  
 Post subject:
PostPosted: Wed Feb 27, 2013 12:33 pm 
Prop Churner Outer
User avatar

Location: Bath, Maine
Service Number: A03/TQ1.0.12143G1
Country: United States
Hey Charlie!
I'm a huge fan of your Nostromo unifrom thread on the RPF. I'm excited to see what you do here. I use the OD Krylon on all my USCM props. It is a fantastic paint and a fantastic color.

While I do not share your love of MultiCam, the new Aliens video game features it as an option, and Tentacle Chris wore it the whole time he was promoting the game for SEGA. The real issue is having the contrast (as you mentioned) between your armour and your BDUs. Could you use some darker colors when you paint the armour to create that distinction?

Cheers!

_________________
:delta: My entry-level prop and costume tutorials: viewtopic.php?f=3&t=12751 :delta:


Top
 Profile  
Reply with quote  
 Post subject: Re:
PostPosted: Wed Feb 27, 2013 7:22 pm 
MODEL 120-A2
User avatar

Service Number: A04/TQ0.0.72178E5
Country: United States
88reaper88 wrote:
Just so you know, the SPAS cage doesn't take paint to well, even when well prepped. Mine started to bubble very slightly but the effect actually looks like decent gun metal now :)


I hadn't heard that yet; I will keep an eye on it. Did the ABS itself bubble or the paint?

retrogarde wrote:
Hey Charlie!
I'm a huge fan of your Nostromo unifrom thread on the RPF. I'm excited to see what you do here. I use the OD Krylon on all my USCM props. It is a fantastic paint and a fantastic color.

While I do not share your love of MultiCam, the new Aliens video game features it as an option, and Tentacle Chris wore it the whole time he was promoting the game for SEGA. The real issue is having the contrast (as you mentioned) between your armour and your BDUs. Could you use some darker colors when you paint the armour to create that distinction?

Cheers!


Thank you for the compliments on my Nostromo thread! I am a bit worried about how to do the contrast between the armor and the BDUs. I'm worried that if I replicate the multicam accurately on the armor, it will blend too much with the BDUs and then I lose all the details when pictures are taken. Now, that would be awesome for real world camo, but not so much for this. My current plan is to have the BDUs completed well before armor gets here. I'm ordering the armor in flat dark green. Typically I start multicam with the tan layers, but I can reverse that. Also, I use 8 colours in multicam; half are light and half dark. It would be easy to just switch out the lights for different darks. This would follow the multicam splotches, but it wouldn't really look like multicam.

I'm also considering the effect it would have on painting the armor personalizations. I have a few ideas and sketches I am putting together; to may those stand out, I may just end up going back to close approximation of the movie camo on the armor.

Once I get the BDUs finished, I'm going to put them on the mannequin and do some tests with various camo samples to get a feel for what would look good with the armor. I'll put the pics up here when I do that and get some feedback on what you guys think is good.

Charlie

_________________
"There is a clause in the contract which specifically states any systematized transmission indicating a possible intelligent origin must be investigated. On penalty of total forfeiture of shares. No money."


Image


Top
 Profile  
Reply with quote  
 Post subject:
PostPosted: Wed Feb 27, 2013 8:46 pm 
MODEL 120-A2
User avatar

Service Number: A04/TQ0.0.72178E5
Country: United States
Does anyone have the number of the Krylon OD? I have been checking their website; I found a Krylon Camo Fusion in Olive (#4293) but that's it.

Charlie

_________________
"There is a clause in the contract which specifically states any systematized transmission indicating a possible intelligent origin must be investigated. On penalty of total forfeiture of shares. No money."


Image


Top
 Profile  
Reply with quote  
 Post subject:
PostPosted: Wed Feb 27, 2013 9:08 pm 
Moderator & screen used
User avatar

Location: United Kingdom
Service Number: A08/TQ1.0.02136E1
Country: United Kingdom
The background behind the stars of the Delta emblem should be black, not blue. Here's a photo of one of the screen-used patches from my website. This one is from Drake's flak jacket:

Image

Harry

_________________
Image
http://www.facebook.com/TheHHACA - @TheHHACA


Top
 Profile  
Reply with quote  
 Post subject: Re:
PostPosted: Wed Feb 27, 2013 9:40 pm 
MODEL 120-A2
User avatar

Service Number: A04/TQ0.0.72178E5
Country: United States
Harry Harris wrote:
The background behind the stars of the Delta emblem should be black, not blue. Here's a photo of one of the screen-used patches from my website. This one is from Drake's flak jacket:

Harry


I did not know that! Thanks for the correction!

Charlie

_________________
"There is a clause in the contract which specifically states any systematized transmission indicating a possible intelligent origin must be investigated. On penalty of total forfeiture of shares. No money."


Image


Top
 Profile  
Reply with quote  
 Post subject:
PostPosted: Wed Feb 27, 2013 9:49 pm 
Moderator & screen used
User avatar

Location: United Kingdom
Service Number: A08/TQ1.0.02136E1
Country: United Kingdom
It's a common mistake that happens everywhere - even in Aliens: Colonial Marines sadly.

Harry

_________________
Image
http://www.facebook.com/TheHHACA - @TheHHACA


Top
 Profile  
Reply with quote  
 Post subject: Re:
PostPosted: Thu Feb 28, 2013 12:25 am 
User avatar

Location: San Clemente, Ca.
Service Number: A05/TQ1.0.32155E1
Country: United States
SGT KITTEN wrote:
Does anyone have the number of the Krylon OD? I have been checking their website; I found a Krylon Camo Fusion in Olive (#4293) but that's it.

Charlie


4293 is the one i used.


Top
 Profile  
Reply with quote  
 Post subject:
PostPosted: Thu Feb 28, 2013 2:03 am 
Harvester of Sorrow
User avatar

Location: Lancashire (Wirral born)
Service Number: A04/TQ1.0.32156E1
Country: United Kingdom
It was just the paint that bubbled, but it ended up looking really good. The effect looks similar to sponging the paint on but allot smoother, I'm really happy it as it blends in with the real metal painted parts.
I used Humbrol 30 (matte black enamel) but it came out a nice gun metal tone.

_________________
Image AKA: Simon


Top
 Profile  
Reply with quote  
 Post subject: Re:
PostPosted: Thu Feb 28, 2013 2:18 am 
Duke Bronson
User avatar

Country: Canada
Harry Harris wrote:
It's a common mistake that happens everywhere - even in Aliens: Colonial Marines sadly.
That never happens! What're you talking about?!?


Top
 Profile  
Reply with quote  
 Post subject: Re: Re:
PostPosted: Thu Feb 28, 2013 3:03 am 
Moderator & screen used
User avatar

Location: United Kingdom
Service Number: A08/TQ1.0.02136E1
Country: United Kingdom
SFC Baldwin wrote:
Harry Harris wrote:
It's a common mistake that happens everywhere - even in Aliens: Colonial Marines sadly.
That never happens! What're you talking about?!?


:lol:

Harry

_________________
Image
http://www.facebook.com/TheHHACA - @TheHHACA


Top
 Profile  
Reply with quote  
 Post subject:
PostPosted: Thu Feb 28, 2013 2:59 pm 
Prop Churner Outer
User avatar

Location: Bath, Maine
Service Number: A03/TQ1.0.12143G1
Country: United States
When it comes to commonly available Delta patches that got the color wrong I've found a few minutes with a black sharpie marker will make it SA. I don't mind it when it's a dark navy blue, but sky Gearbox used a sky blue...

_________________
:delta: My entry-level prop and costume tutorials: viewtopic.php?f=3&t=12751 :delta:


Top
 Profile  
Reply with quote  
 Post subject:
PostPosted: Thu Feb 28, 2013 8:37 pm 
MODEL 120-A2
User avatar

Service Number: A04/TQ0.0.72178E5
Country: United States
The one that came with the Collector's Edition for A:CM is also the wrong size. It's a bit too small. Same with the Screaming Eagle patch.

Charlie

_________________
"There is a clause in the contract which specifically states any systematized transmission indicating a possible intelligent origin must be investigated. On penalty of total forfeiture of shares. No money."


Image


Top
 Profile  
Reply with quote  
 Post subject:
PostPosted: Thu Feb 28, 2013 9:06 pm 
MODEL 120-A2
User avatar

Service Number: A04/TQ0.0.72178E5
Country: United States
I've started my measurements for installing the front and rear sling points. I'm not going to start disassembly until I have all the parts: I'm waiting on the D-rings (1/2" and 3/4") to arrive and I need to get some Krylon OD paint. But, until then, here are some closeups of the mounting points:

Image

Image

Image

I know these are the opposite side I will be mounting the bracket on, but it's the same measurements on either side.

The rear stock:

Image

Here are my sketches for what I plan to do:

Image

Image

Charlie

_________________
"There is a clause in the contract which specifically states any systematized transmission indicating a possible intelligent origin must be investigated. On penalty of total forfeiture of shares. No money."


Image


Top
 Profile  
Reply with quote  
 Post subject:
PostPosted: Fri Mar 01, 2013 2:03 am 
User avatar

Location: San Clemente, Ca.
Service Number: A05/TQ1.0.32155E1
Country: United States
I wouldn't drill into that front triangle. That is where your light gate is and isnt really strong enough to support anything..


Top
 Profile  
Reply with quote  
 Post subject: Re: Charlie's Colonial Marine Build
PostPosted: Fri Mar 01, 2013 2:35 am 
Duke Bronson
User avatar

Country: Canada
I wouldn't drill into that stock. Mine broke following a short fall onto padded berber... it's not very tough.


Top
 Profile  
Reply with quote  
 Post subject: Re: Charlie's Colonial Marine Build
PostPosted: Fri Mar 01, 2013 1:43 pm 
MODEL 120-A2
User avatar

Service Number: A04/TQ0.0.72178E5
Country: United States
Revolver Ocelot wrote:
I wouldn't drill into that front triangle. That is where your light gate is and isnt really strong enough to support anything..


I've talked with another person who has modified the front triangle. It can be done, without negating the sensor, but there is a trick to etching the side so you don't damage the sensor. I'm also hoping I can figure out the circuitry to wire it into the trigger.

SFC Baldwin wrote:
I wouldn't drill into that stock. Mine broke following a short fall onto padded berber... it's not very tough.


The second half of the rear stock (the vertical portion) seems pretty sturdy and it's definitely thick enough to safely drill through. I definitely have some concerns with actually using a sling on either the front or the back. To match the screen guns, I want to do my best to mount the sling points there. The front portion is held mostly by the barrel; that's sturdy enough but the connection to the grenade launcher is plastic and much more iffy. The rear seems like it would fine if the stock wasn't extended. If it was out I could definitely see it bending/twisting with the force of the sling applied.

On a side, my Screaming Eagle and Delta patches arrived, as did the 3/4 and 1/2" D-rings. Woot woot. The flag patch is apparently on order. Not so woot. Hopefully I will be able to con my wife into getting the paint for me today, and I can start disassembly on Saturday and get some more pictures up.

Charlie

_________________
"There is a clause in the contract which specifically states any systematized transmission indicating a possible intelligent origin must be investigated. On penalty of total forfeiture of shares. No money."


Image


Top
 Profile  
Reply with quote  
 Post subject:
PostPosted: Fri Mar 01, 2013 4:21 pm 
Dirty Bird
User avatar

Location: San Diego CA
Service Number: A07/TQ0.0.82154E1
Country: United States
well hot damn if the sling mounts work you will have to show how you did it so some of us can mod ours. i hade torn my whole PR apart to repaint and weather it a while ago i hate taking it apart.

_________________
SGT Chris Kraemer "BIRD"
S/N: A07/TQ0.0.82154G1 Sgt Kraemer

Image


Top
 Profile  
Reply with quote  
 Post subject:
PostPosted: Fri Mar 01, 2013 10:06 pm 
MODEL 120-A2
User avatar

Service Number: A04/TQ0.0.72178E5
Country: United States
There is a thread on the RPF and one of the members there, Felgacarb, showed me how put his mounts on. My concern right now is the D-rings. I ordered 3/4" and 1/2". The one half would fit on the rifle fine, but I have serious doubts that any sling (esp Nobles) would fit once it is installed. That leaves the 3/4", which is fairly large, but the ring itself is rather thick (1/8" thick metal). Not a lot of room to play, but I don't think the extended ring would be enough to go all the way through the rear stock. I have another option, involve a threaded 8-32 rod that is bent in a U, that I am exploring as an option. Felgacarb used 3/4" d-rings on his mod, so I know that it will fit the front sight; I don't care for the way he mounted it to the rear, so I will have to do some more planning there. Hopefully Saturday I will be able to get the d-rings cut and stretched and the bulk of the rifle disassembled.

Charlie

_________________
"There is a clause in the contract which specifically states any systematized transmission indicating a possible intelligent origin must be investigated. On penalty of total forfeiture of shares. No money."


Image


Top
 Profile  
Reply with quote  
Display posts from previous:  Sort by  
Post new topic Reply to topic  [ 340 posts ]  Go to page 1, 2, 3, 4, 5 ... 14  Next


You cannot post new topics in this forum
You cannot reply to topics in this forum
You cannot edit your posts in this forum
You cannot delete your posts in this forum
You cannot post attachments in this forum

Search for:
Jump to:  
cron