The Aliens Legacy
http://forum.alienslegacy.com/

My uniform build
http://forum.alienslegacy.com/viewtopic.php?f=3&t=11533
Page 1 of 2

Author:  retrogarde [ Mon Jun 18, 2012 11:41 am ]
Post subject:  My uniform build

As this beast comes together I wanted to get some feedback etc. I'm not probably breaking new ground with any of this, but I'd still like to document the process.

Attachment:
shirtsm.jpg
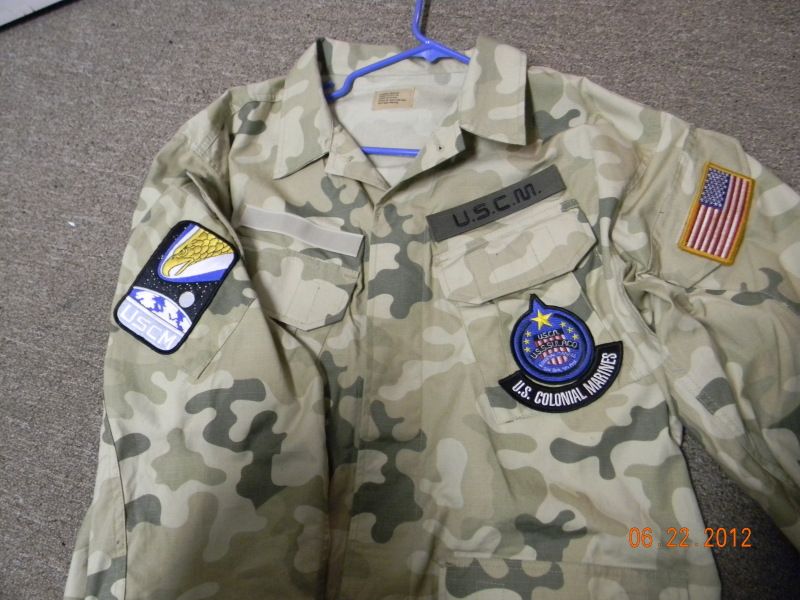
shirtsm.jpg [ 107.29 KiB | Viewed 14228 times ]


So I went with Polish camo as it was in my price range, and with it came a lot of details that needed fixing. I removed the bottom two pockets from the shirt, the buttons and tabs from the sides, and fixed the collar into a Mandarin style (not anywhere near as hard as I'd feared it would be). I had to raise the top flaps on the remaining pockets a little bit as the pair of USCM patches weren't going to fit otherwise. You will notice that is my modified ship patch for the USS Conrad.

The name tapes are from Camotech. After watching the behind the scenes interview with "Apone" a few times I noticed that the tapes go a little bit above the top of the pocket, not directly above as I had first believed.

The shoulder patches are also positioned based on Apone's. The Weyland-Yutani garment label comes courtesy of HORPAT Industries (thanks Aaron!) and is such a nice added bit of detail. :delta:

For the moment I've left the added material on the sleeves alone as I plan to leave them rolled up, but when I have a chance I will seam rip them too to make the sleeves less bulky.

I still need to move the right leg pocket on the pants and then my BDU's will be complete. Comments or concerns at this stage? I'd love to know now if I've messed anything up! Hopefully I can get a photo taken soon of me in the uniform so folks can see how the shoulder patches look (they seem strangely placed in the photo above).

Author:  Cpl Potter [ Mon Jun 18, 2012 10:41 pm ]
Post subject: 

looking good

Author:  88reaper88 [ Mon Jun 18, 2012 11:55 pm ]
Post subject: 

Too 'new' for my taste personally (I like a used look myself) but your doing great so far.
Aaron's tag looks brilliant, really sells it as a real-world item :D

Author:  AaronHorrocks [ Tue Jun 19, 2012 12:18 am ]
Post subject: 

Love it. If you roll the sleeves more Marine Corps style, the'll fit better and look better. Don't worry about them being "bulky" because fixing that is all in the technique. I can show you in person. No need to take material out of them as a work-around.

Author:  retrogarde [ Tue Jun 19, 2012 12:41 am ]
Post subject: 

Thanks guys!
Simon: any techniques you have used to break in uniforms would be of interest! I got a second name tape for the back of my helmet and distressed that with a serrated knife (to fray the edges a bit), coffee and a touch of brown ink (photo coming soon).
Aaron: Much as I would love to have you show me in person, I'm not going to be at DragonCon and I live on the wrong coast for an impromptu visit! Is there a YouTube tutorial or something that I could learn from?

Author:  AaronHorrocks [ Tue Jun 19, 2012 2:46 am ]
Post subject:  Re: My uniform build

It's a skill... It's hard to learn it from watching a video, but here's the best one I could find:
http://www.youtube.com/watch?v=fSy-344m-Xw

Lay your uniform out flat. Get the wrinkles out.

Rolling sleeves depends on your uniform size and your arms.

Your first fold will be the cuff length, but a fake uniform might not have the right cuff length for a USMC style rolled sleeve. The first fold should be 3 fingers thick, and the last fold should be 4 fingers thick. You should have 5 or 6 folds by the time you're done. They should also hug your arm tight, but not so tight that they cut off circulation.

Each time that you roll, your sleeve up, think of it like folding. You want to smooth out each roll and get it as flat as possible. Upon each other fold, keep your fingers and thumb holding the existing folds together. This will help keep wrinkles out.

When you're done, try it on. If your sleeve are too loose, you'll have to do it again. This time lay the uniform flat down facing the deck. Then fold the upper/top part back up so it's facing up. Your crease should be at the bottom edge of the sleeve, across the center of the chest. Depending on your needs, you may want to have a 1/4" or 1/2" of the bottom edge of the sleeve folded up in the sleeve roll... Also depending on your arms, that fold should run half the length of your sleeve, up to the full length of the sleeve. You will have to keep this extra fold tight, maintaining pressure with one hand at all times while doing these folds.

When your sleeves are tight and crisp, they would only wrinkle or bunch up when you curls your arms up, if at all.
Now you should have the sharpest sleeves in your section! OOH-RAH DEVILDOG!
Image


Also, your local Recruiter may be kind enough to show you how. He's just down the street.

USMC Recruiting
242 Bath Road
Brunswick, ME 04011
(207) 729-0067

Author:  retrogarde [ Tue Jun 19, 2012 3:06 am ]
Post subject: 

Hot damn, I think I'll swing by the recruiting office tomorrow morning. They'll either think it's cool and help or they'll slam the door in my face. Here's hoping they're Aliens fans!

Author:  retrogarde [ Tue Jun 19, 2012 5:16 am ]
Post subject: 

As promised, some shots of the blouse on me. First, one from straight on:

Attachment:
uniform3sm.jpg
uniform3sm.jpg [ 158.75 KiB | Viewed 14149 times ]


Now the left sleeve:

Attachment:
uniform2sm.jpg
uniform2sm.jpg [ 139.71 KiB | Viewed 14149 times ]


And now the right sleeve:

Attachment:
uniform1sm.jpg
uniform1sm.jpg [ 110.23 KiB | Viewed 14149 times ]


How is my patch placement?

Author:  88reaper88 [ Tue Jun 19, 2012 9:54 am ]
Post subject: 

The best way to break kit in is....... WEAR IT!
Do the housewok in it, sleep in it, go for a run in it, basically over use it for a week or so and it'll have a good used 'vibe' to it.
Wear it, wash it, repeat :)

But remember military uniforms get replaced easily so don't go mad with it.

Author:  MattRendar [ Tue Jun 19, 2012 12:19 pm ]
Post subject: 

I did the same thing with Polish camis. The only difference. Is i have pockets on the shoulders but i made it work. Thanks for sharing mate.

Author:  retrogarde [ Tue Jun 19, 2012 8:57 pm ]
Post subject: 

Matt: do you have any photos? I'm curious to see the difference.

Simon: I'll start wearing my BDU's to the gym!

Author:  PVB [ Tue Jun 19, 2012 10:03 pm ]
Post subject:  Re: My uniform build

AaronHorrocks wrote:
It's a skill... It's hard to learn it from watching a video, but here's the best one I could find:
http://www.youtube.com/watch?v=fSy-344m-Xw

Lay your uniform out flat. Get the wrinkles out.

Rolling sleeves depends on your uniform size and your arms.

Your first fold will be the cuff length, but a fake uniform might not have the right cuff length for a USMC style rolled sleeve. The first fold should be 3 fingers thick, and the last fold should be 4 fingers thick. You should have 5 or 6 folds by the time you're done. They should also hug your arm tight, but not so tight that they cut off circulation.

Each time that you roll, your sleeve up, think of it like folding. You want to smooth out each roll and get it as flat as possible. Upon each other fold, keep your fingers and thumb holding the existing folds together. This will help keep wrinkles out.

When you're done, try it on. If your sleeve are too loose, you'll have to do it again. This time lay the uniform flat down facing the deck. Then fold the upper/top part back up so it's facing up. Your crease should be at the bottom edge of the sleeve, across the center of the chest. Depending on your needs, you may want to have a 1/4" or 1/2" of the bottom edge of the sleeve folded up in the sleeve roll... Also depending on your arms, that fold should run half the length of your sleeve, up to the full length of the sleeve. You will have to keep this extra fold tight, maintaining pressure with one hand at all times while doing these folds.

When your sleeves are tight and crisp, they would only wrinkle or bunch up when you curls your arms up, if at all.
Now you should have the sharpest sleeves in your section! OOH-RAH DEVILDOG!

Also, your local Recruiter may be kind enough to show you how. He's just down the street.

USMC Recruiting
242 Bath Road
Brunswick, ME 04011
(207) 729-0067

No USMC offices here, so I used the YT vid. :wink:

Before and after pic:

Attachments:
bdu10.jpg
bdu10.jpg [ 178.77 KiB | Viewed 14097 times ]

Author:  AaronHorrocks [ Wed Jun 20, 2012 1:21 am ]
Post subject: 

Retrogarde, could you at all possible replace that top button with velcro? That'd make it more "Screen Accurate".

PVB, that's a heck of an improvement! You went from Army-ass to Gunny-roll.

Author:  retrogarde [ Wed Jun 20, 2012 2:04 am ]
Post subject: 

Aaron: velcro is a great idea. I'll do that tonight. I tried to find the recruitment office today but they seem to have moved. So , with PVB's photos giving me confidence, I used the YouTube link as well. Suffice it to say my sleeves are *much* improved!

So is the screaming eagle patch on my right sleeve placed high enough? I haven't sewn it in place yet, so I can still move it if I need to.

Also, I ended up taking the extra material off the sleeves, and I think I may have enough material for... a helmet cover. ( viewtopic.php?f=3&t=11460 ) I'm torn on that one as I just put in a bunch of work making mine, but how cool would it be to have the helmet cover match my BDU's? Sigh...

Author:  PVB [ Wed Jun 20, 2012 12:31 pm ]
Post subject:  Re:

retrogarde wrote:
So is the screaming eagle patch on my right sleeve placed high enough? I haven't sewn it in place yet, so I can still move it if I need to.

Looking at the SU BDUs on Harry's site, they look fine:

http://www.harryharris.com/tunic.htm

Author:  PVB [ Wed Jun 20, 2012 12:32 pm ]
Post subject:  Re:

AaronHorrocks wrote:
PVB, that's a heck of an improvement! You went from Army-ass to Gunny-roll.

:D

Admittedly, they were just rolled up before, rather than any attempt at folding them up in stages. :)

Author:  MattRendar [ Thu Jun 21, 2012 10:50 pm ]
Post subject: 

I'll post them tonite

Author:  MattRendar [ Sat Jun 23, 2012 2:21 am ]
Post subject: 

heres my modern uniform top . just have to get my name tape . Image
Image

Author:  retrogarde [ Sat Jun 23, 2012 7:02 pm ]
Post subject: 

Matt: I'm jealous that your Sulaco patch and the arched patch beneath it (runner?) fit without needing to modify the pocket height. Name tapes through Camotech are easy and cheap, they do great work!

Author:  retrogarde [ Sat Jun 23, 2012 7:07 pm ]
Post subject: 

I've moved the right pocket to the front:

Attachment:
newpants.jpg
newpants.jpg [ 99.64 KiB | Viewed 13989 times ]


There is a seam at the knee that made it really easy to line up with the left pocket, so this was a very simple modification.

I'm still going to put a small piece of velcro in place of the top button on the blouse, but other than that the BDU's are as screen accurate as I can make them!

Author:  bughunt10 [ Thu Jun 28, 2012 4:06 pm ]
Post subject:  Re: My uniform build

Looks very cool guys! Congrats!

Author:  retrogarde [ Mon Jul 09, 2012 3:03 pm ]
Post subject: 

Two quick shots of how things are progressing. First, the right side:

Attachment:
profile1.jpg
profile1.jpg [ 339.18 KiB | Viewed 13928 times ]


Now the left side:

Attachment:
profile2.jpg
profile2.jpg [ 304.43 KiB | Viewed 13928 times ]


Since taking these pictures I have cut into the helmet another 1/2 an inch so that the "ear defender" lines up with my ear better. Also, a pair of Spat-made lobster plates are on their way courtesy of a fellow CM.

I made a cover for my helmet entirely out of spare material from the Polish camo blouse and it turned out pretty well I'd say, except the material really is too thin and I had a tough time around the helmet camera. Luckily, a screen accurate cover is on the way from HORPAT industries, so I will be replacing this one. Sure it won't match my BDU's, but a painted helmet wouldn't have either! :wink:

I'm making a Medic's uniform so I put a Caduceus on the helmet strap just like Dietrich had.

Author:  Hunter [ Tue Jul 10, 2012 11:00 pm ]
Post subject: 

Looks awesome retrogarde

Helen

Author:  retrogarde [ Wed Jul 11, 2012 1:36 am ]
Post subject: 

Thanks Helen! It's getting better, bit by bit.

Author:  AaronHorrocks [ Wed Jul 11, 2012 2:20 am ]
Post subject:  Re: My uniform build

Looking great! The collar is the real kicker once you got that going.

And BTW, ladies, I've been selling retrogarde a bunch of stuff, and he's on the ball getting his uniform and gear squared away!
Kudos and Delta! :delta:

Page 1 of 2 All times are UTC [ DST ]
Powered by phpBB © 2000, 2002, 2005, 2007 phpBB Group
http://www.phpbb.com/