| The Aliens Legacy http://forum.alienslegacy.com/ |
|
| My pulse rifle build (Pic Heavy) http://forum.alienslegacy.com/viewtopic.php?f=3&t=11030 |
Page 1 of 6 |
| Author: | Venger [ Tue Jan 31, 2012 6:32 pm ] |
| Post subject: | My pulse rifle build (Pic Heavy) |
Here's the first part of what I think will be many. I made a start cutting, filing and sanding the rough parts off the shroud, barrel and handle. 
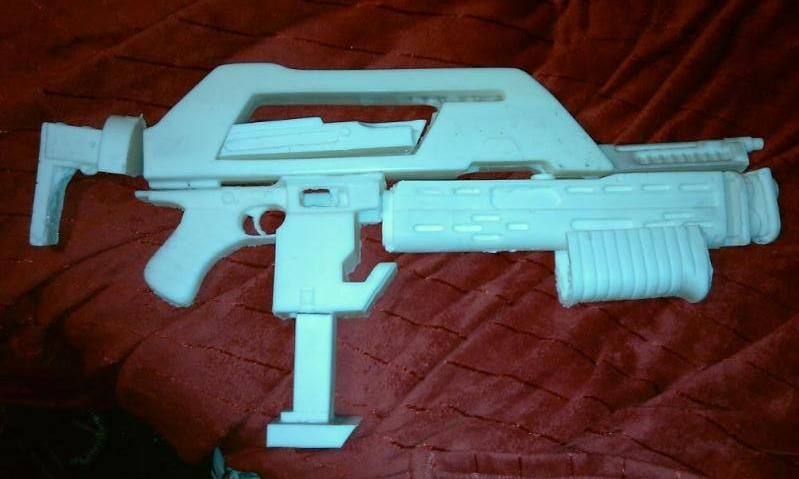
I've put it together to see how 'out' the parts are. Some require more work than others. I then came across an issues. You'll notice on the barrel a 'Bump' that holds the shroud out of position. My first thought is it's supposed to be there, but after putting it together with the old trusty masking tape, I'm now sure I should get rid of it. Anyone have any thoughts on this matter? Work was going to continue this evening, but my rotary tool has decided to die and I'll now need to purchase another one. There's only so much you can remove with a file and sandpaper. Here are some pics. ![]() ![]() ![]()
|
|
| Author: | Ttaskmaster [ Tue Jan 31, 2012 7:05 pm ] |
| Post subject: | Re: My pulse rifle build (Pic Heavy) |
Venger wrote: You'll notice on the barrel a 'Bump' that holds the shroud out of position. My first thought is it's supposed to be there, but after putting it together with the old trusty masking tape, I'm now sure I should get rid of it. Anyone have any thoughts on this matter? I think this may be a poorly done recast of someone else's rifle. That bump is present in some form on many a rifle, including mine - I have a Tommin adapter that holds my grenade launcher onto the barrel section. It features something a little like this and ensures proper spacing between the two elements. I'd suggest keeping it in place and filing it until your barrel and GL are straight. Or, just getting a SPAT rifle |
|
| Author: | Venger [ Tue Jan 31, 2012 7:09 pm ] |
| Post subject: | Re: My pulse rifle build (Pic Heavy) |
Ttaskmaster wrote: Venger wrote: You'll notice on the barrel a 'Bump' that holds the shroud out of position. My first thought is it's supposed to be there, but after putting it together with the old trusty masking tape, I'm now sure I should get rid of it. Anyone have any thoughts on this matter? I think this may be a poorly done recast of someone else's rifle. That bump is present in some form on many a rifle, including mine - I have a Tommin adapter that holds my grenade launcher onto the barrel section. It features something a little like this and ensures proper spacing between the two elements. I'd suggest keeping it in place and filing it until your barrel and GL are straight. Or, just getting a SPAT rifle Yeah I'll leave it where it is for now. Finish the sanding and grinding until it's ready to glue and if it still looks odd, I'll take it down untill the gun barrel sits level. I'd get a spats if I had several £££, but I'm skint after buying armour and other odds and sods. I need to still get some BDU's yet. Spats rifle and armour will come later. |
|
| Author: | nocternus [ Tue Jan 31, 2012 8:48 pm ] |
| Post subject: | |
looks to be like the bump is really a form of peg which would have gone into a peg hole on the btm of the shroud as this is not there i would say the bump has to go |
|
| Author: | Venger [ Tue Jan 31, 2012 9:00 pm ] |
| Post subject: | Re: |
nocternus wrote: looks to be like the bump is really a form of peg which would have gone into a peg hole on the btm of the shroud as this is not there i would say the bump has to go I can see what you mean, but looking at the rifle more closely. If I get rid of the peg altogether, I think the shroud will dip as it won't be level. It's an odd situation. I'll just leave it for now. Work on the other parts and deal with the peg issue later. |
|
| Author: | nocternus [ Tue Jan 31, 2012 9:02 pm ] |
| Post subject: | |
just add filler lol |
|
| Author: | 88reaper88 [ Tue Jan 31, 2012 9:21 pm ] |
| Post subject: | |
I'd remove it, from your mock up pic you can see that the spas cage and barrel are too far down. Getting rid of the plug should correct it. |
|
| Author: | nocternus [ Tue Jan 31, 2012 9:26 pm ] |
| Post subject: | |
looking at the stock id be very carefull what you use to remove the excess resin, to get it anywhere near what it needs to be i can see breakage happening if your to heavy handed |
|
| Author: | Venger [ Tue Jan 31, 2012 9:33 pm ] |
| Post subject: | |
The magazine chamber and handle are all one piece. The grenade barrel slots into it. As far as it's in in the picture is as far as it goes in. If someone could visually show me what they're talking about it'd help greatly. If I cut it off the actual ammo barrel, that's a separate piece would 'float' off the grenade barrel. Also I can't really move the shroud further towards the grenade end (To the right) it won't connect. Hmm. Looks like it'll need more modding than I initially thought. |
|
| Author: | 88reaper88 [ Tue Jan 31, 2012 9:43 pm ] |
| Post subject: | |
What do you mean by ammo barrel? |
|
| Author: | nocternus [ Tue Jan 31, 2012 9:46 pm ] |
| Post subject: | |
can you take a pic ot the shroud and barrel from the front? |
|
| Author: | Venger [ Tue Jan 31, 2012 9:47 pm ] |
| Post subject: | |
Ammo barrel as in the top one where the bullets cme out. Sorry for any confusion over terms. Shroud barrel from the front? Ok.
|
|
| Author: | nocternus [ Tue Jan 31, 2012 9:47 pm ] |
| Post subject: | Re: |
88reaper88 wrote: What do you mean by ammo barrel? think he means the thompson barrel |
|
| Author: | 88reaper88 [ Tue Jan 31, 2012 10:19 pm ] |
| Post subject: | |
Ah right gotcha Having looked further at your pics, I think I know your problem. They guy who cast this obviously took a PR apart and cast the seperate sections. When he cast the shroud he didn't make the magazine well hollow to alow the grenade launcher to slide inside. It looks like your going to either cut a chunk off the grenade launcher at the trigger end or hollow out the magazine housing to allow the GL to slide inside. I'm not on my pc so I can't post up a pic to explain it better but if you get a pic of another PR you'll see where the vents on the GL line up in comparison to the shroud. The top left slit should actually be party covered with the ammo counter part of the shroud. I hope that makes sense???? :S |
|
| Author: | Venger [ Tue Jan 31, 2012 10:35 pm ] |
| Post subject: | Re: My pulse rifle build (Pic Heavy) |
OK I pulled off the grenade launcher barrel. It's hollow. I've posted a pic below. So if I understand correctly I should get rid of this part - The bit that sticks out that I've circled? ![]() No need to get pics up tonight or anything as I'm not working on it anymore tonight as my rotary tool is busted anyway. |
|
| Author: | Ttaskmaster [ Tue Jan 31, 2012 10:36 pm ] |
| Post subject: | Re: My pulse rifle build (Pic Heavy) |
Looky here - See top left slit and the tab things between the GL and barrel/shroud area: Attachment: Pulsey15.jpg
|
|
| Author: | propmainiac [ Wed Feb 01, 2012 5:18 am ] |
| Post subject: | Re: My pulse rifle build (Pic Heavy) |
Looks like they used an airsoft spas cage in their mold. Im in the same boat as you with the dead rotary tool. |
|
| Author: | Venger [ Wed Feb 01, 2012 9:57 am ] |
| Post subject: | |
Thanks for all the pics. They really are a great visual aid. I don't think it's possible to get it to look 100% right as it's not the best kit to begin with. |
|
| Author: | Hunter [ Wed Feb 01, 2012 10:15 am ] |
| Post subject: | Re: |
Venger wrote: Thanks for all the pics. They really are a great visual aid. I don't think it's possible to get it to look 100% right as it's not the best kit to begin with. Looks like a challenge? Good luck with it Helen. |
|
| Author: | DKMax [ Wed Feb 01, 2012 1:12 pm ] |
| Post subject: | Re: |
Venger wrote: Thanks for all the pics. They really are a great visual aid. I don't think it's possible to get it to look 100% right as it's not the best kit to begin with. Good job so far removing the excess resin, looking much tidier |
|
| Author: | nocternus [ Fri Feb 03, 2012 9:06 pm ] |
| Post subject: | |
hows it coming along? |
|
| Author: | Venger [ Fri Feb 03, 2012 9:30 pm ] |
| Post subject: | Re: |
nocternus wrote: hows it coming along? Picked up a new rotary tool today, so I'll be doing a nice bit of work on it at the weekend. If I work hard and long enough I might even get it ready for gluing. Maybe even glued and all the gaps filled with the multiput. |
|
| Author: | nocternus [ Fri Feb 03, 2012 9:33 pm ] |
| Post subject: | |
take your time the end result will be better |
|
| Author: | Venger [ Sat Feb 04, 2012 8:34 pm ] |
| Post subject: | Re: My pulse rifle build (Pic Heavy) |
Did some work on my pulse today. Not as much as I'd like, but I can't glue it all together until I get my LED back from America. The folding stock had allot of excess resin that needed to be removed, so using a router bit for my rotary tool, I took it all away leaving a much nicer looking handle. I then put a layer of multiput so it was even. ![]() ![]() ![]() The grenade launcher barrel 'holes' had some excess resin, to using a sanding bit, I took it away and filed and sanded it until it looked better. Some 'holes' don't look as good as I'd like, but I don't want to take too much away as the barrel is hollow. ![]() ![]() There were a few other bits that needed to be flattened out in the shroud, which I did with the grinding bit and the air holes were filled with multiput. ![]() ![]() ![]() Once the putty has hardened, I'll then go back over it with a heavy grade sandpaper and get it nice and smooth. Not sure when the next update will be, it all depends on when the LED arrives and I can fit it. |
|
| Page 1 of 6 | All times are UTC [ DST ] |
| Powered by phpBB © 2000, 2002, 2005, 2007 phpBB Group http://www.phpbb.com/ |
|