The discussion of the Alien series of films and the props used in them is the aim, but if it's got Big Bugs and Big Guns, then they are welcome too!


Post new topic Reply to topic  [ 94 posts ]  Go to page Previous  1, 2, 3, 4
Author Message
 Post subject:
PostPosted: Mon Oct 15, 2012 6:03 pm 
Dirty Bird
User avatar

Location: San Diego CA
Service Number: A07/TQ0.0.82154E1
Country: United States
looks great i tried the pep way but the file just didnt turn out good i was about half way thru glassing it and it was to wide at the top where the buckles went.

_________________
SGT Chris Kraemer "BIRD"
S/N: A07/TQ0.0.82154G1 Sgt Kraemer

Image


Top
 Profile  
Reply with quote  
 Post subject: Re: ~95% Scratch Built Armor (re-vitalization project page 4
PostPosted: Fri Apr 18, 2014 2:20 pm 
THAT guy
User avatar

Location: Virginia
Service Number: A03/TQ2.0.02146E1
Country: United States
I want to get my armor looking its very best for the Calgary Expo, so I have completely stripped it down with hopes of re-working much of it.

My goal is to:
-Make it more comfortable (will be wearing it 2 straight days)
-Make it more Screen Accurate (proportions and paint)

After drilling out pretty much all the rivets, I was back to my bare plates. I think my comfort and screen accuracy of the shapes problems were one in the same. From the start I feared my breastplate was too long in the torso and I have come to realize my shoulder bells and flaps may have been a bit large/bulky as well. I also felt my chest "ridges" were too wide. So I sanded those to a new spot as well.

Basically I did a lot of chopping and trimming. I planned to re-fab most of it, but I realized I would be better off trimming up.

Before
Attachment:
CAM00280.jpg
CAM00280.jpg [ 187.01 KiB | Viewed 5451 times ]

After (also got ride of the bottom ridges around the belly. That part isn't real accurate on my build, but I can actually bend at the waist now. It will be covered with the belt anyways, right? Comfort is key...

After
Attachment:
CAM00291.jpg
CAM00291.jpg [ 155.62 KiB | Viewed 5451 times ]


I also made my shoulder flaps narrower as they looked too wide. I had to scrap the "top" layer as the cutouts that made the indentation were too big to reuse after trimming. So for the new top layer I used something with a better looking natural "curve" to it instead of the flat garbage can I used before. (old flaps with base material for new 'top layer')
Attachment:
CAM00290.jpg
CAM00290.jpg [ 167.6 KiB | Viewed 5451 times ]


The bells themselves I started to fab new, but then decided to trim as I liked the curve of the old ones and after trimming they weren't as bad as I thought. The indentations from my layering are off, but that part won't be too noticeable
Attachment:
CAM00293.jpg
CAM00293.jpg [ 274.94 KiB | Viewed 5451 times ]


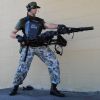
And here I sit. I decided my spray can job was quite silly. I went with a brush this time.
Attachment:
CAM00351.jpg
CAM00351.jpg [ 520.08 KiB | Viewed 5451 times ]


MY BIG QUESTION: MIG black. Do you guys use the powder or the "wash"? I don't think they have it in the US. I know some other companies have copied it. What exactly am I trying to replicate here?

I have plenty of artists charcoal I could grind up if the powder works (but don't want to destroy my charcoal for no reason if it doesn't!).

I could mix up my own acrylic wash, but dont want to waste that and ruin everything either.

What works best?


Top
 Profile  
Reply with quote  
 Post subject: Re: ~95% Scratch Built Armor (re-vitalization project page 4
PostPosted: Fri Apr 18, 2014 2:35 pm 
Ready to Rock & Roll!
User avatar

Location: Rochester, Kent, U.K.
Service Number: A08/TQ2.0.72136E1
Country: United Kingdom
Mig pigments are powders.

See here:

viewtopic.php?p=216220#p216220

You can buy them in the USA, just search popular auction sites for mig pigment.

_________________
Steve
Corporal in 69th Regt. 1st Batt. Homer’s Heroes.

"I'd like to die at the age of 80 in my own bed, with a belly full of wine and a girl's mouth around my c**k."


Top
 Profile  
Reply with quote  
 Post subject: Re: ~95% Scratch Built Armor (re-vitalization project page 4
PostPosted: Fri Apr 18, 2014 2:41 pm 
THAT guy
User avatar

Location: Virginia
Service Number: A03/TQ2.0.02146E1
Country: United States
PVB wrote:
Mig pigments are powders.

See here:

viewtopic.php?p=216220#p216220

You can buy them in the USA, just search popular auction sites for mig pigment.


Thanks, just double checking because most of the youTube videos about it were MIG's new line of liquid washes (at least the ones that popped up first on the list after the search).

Unfortunately I don't trust shipping them in at this point though so websites are out. This projects needs to be in a suitcase in 7 days, so I need to source something locally or improvise.


Top
 Profile  
Reply with quote  
 Post subject: Re: ~95% Scratch Built Armor (re-vitalization project page 4
PostPosted: Fri Apr 18, 2014 3:08 pm 
Ready to Rock & Roll!
User avatar

Location: Rochester, Kent, U.K.
Service Number: A08/TQ2.0.72136E1
Country: United Kingdom
Check local model shops then? :)

_________________
Steve
Corporal in 69th Regt. 1st Batt. Homer’s Heroes.

"I'd like to die at the age of 80 in my own bed, with a belly full of wine and a girl's mouth around my c**k."


Top
 Profile  
Reply with quote  
 Post subject:
PostPosted: Fri Apr 18, 2014 3:37 pm 
Prop Churner Outer
User avatar

Location: Bath, Maine
Service Number: A03/TQ1.0.12143G1
Country: United States
Powdered charcoal and a matte spray to set it works really well though, especially since you have it already!

Great looking paint job man.

_________________
:delta: My entry-level prop and costume tutorials: viewtopic.php?f=3&t=12751 :delta:


Top
 Profile  
Reply with quote  
 Post subject:
PostPosted: Fri Apr 18, 2014 3:42 pm 
Mad Cat
User avatar

Location: Active duty: USS Catalpa
Service Number: AO3/TQ6.0.79749E8
Country: United States
What about using watered down acrylic paint?

_________________
"Awww, someone tell me that's a boot!

It's a boot!"

III drops


Top
 Profile  
Reply with quote  
 Post subject: Re: ~95% Scratch Built Armor (re-vitalization project page 4
PostPosted: Fri Apr 18, 2014 3:57 pm 
THAT guy
User avatar

Location: Virginia
Service Number: A03/TQ2.0.02146E1
Country: United States
Thats what I almost did last night. I was about to water down some acrylic when I thought I better research it a bit first.

I guess the advantage of trying my crushed up charcoal first is that I can wash it off if it looks bad. Then I will try the home made wash. Then...if it still doesnt look good I will hit this train shop down the road. True "hobby shops" are a dying breed around here, but there is a model train focused shop down the road that must have something comparable.


Top
 Profile  
Reply with quote  
 Post subject:
PostPosted: Fri Apr 18, 2014 10:55 pm 
User avatar

Location: Cornwall
Country: United Kingdom
Black satin boot polish will darken it and be self sealing when dry.


Top
 Profile  
Reply with quote  
 Post subject: Re: ~95% Scratch Built Armor (re-vitalization project page 4
PostPosted: Tue Apr 22, 2014 1:04 pm 
THAT guy
User avatar

Location: Virginia
Service Number: A03/TQ2.0.02146E1
Country: United States
Moving along again,

I decided to have a go with what I had in hand before I got too crazy. I did end up grinding down some artist sketching charcoal. Then I brushed it on with a big soft brush.


Attachment:
CAM00370.jpg
CAM00370.jpg [ 192.04 KiB | Viewed 5372 times ]


I decided it wasn't shabby, so I went and did the rest. But for the record, the dull coat did kind of kill some of the subtleties that I liked in its freshly blackened form. If/when I do it again for Armor ver. 3.0, I will probably use shoe polish. Something more robust wouldn't be a bad thing.

Attachment:
CAM00371.jpg
CAM00371.jpg [ 185.65 KiB | Viewed 5372 times ]


Then some 'wear' on to the weathering (I think I overdid it and the silver is more prominent than the cammo in some places. I may go back and paint some of the silver out).

Attachment:
CAM00374.jpg
CAM00374.jpg [ 178.47 KiB | Viewed 5372 times ]


And now I am in the process of re-personalizing my gear. Its starting to feel like "mine" again. I'll finish up and redo the name stencils tonight.
Attachment:
CAM00373.jpg
CAM00373.jpg [ 127.78 KiB | Viewed 5372 times ]


Top
 Profile  
Reply with quote  
 Post subject:
PostPosted: Tue Apr 22, 2014 2:03 pm 
Prop Churner Outer
User avatar

Location: Bath, Maine
Service Number: A03/TQ1.0.12143G1
Country: United States
It looks (from the wear pattern on the armour) like you're fond of sliding into a room on your knees with a pulse rifle in each hand blasting the baddies.

Your kit really looks 100% better!

_________________
:delta: My entry-level prop and costume tutorials: viewtopic.php?f=3&t=12751 :delta:


Top
 Profile  
Reply with quote  
 Post subject:
PostPosted: Tue Apr 22, 2014 7:33 pm 
User avatar

Location: Almelo
Country: Netherlands
wow that armor came out great!!.
good job.


Top
 Profile  
Reply with quote  
 Post subject:
PostPosted: Tue Apr 22, 2014 8:41 pm 
User avatar

Location: Essex, UK
Service Number: A05/TQ0.0.52267E1
Country: United Kingdom
Personally I think the level of weathering is just about right. I like armour that looks really beaten up so I'd only tone it down a little if you feel it really needs it.


Top
 Profile  
Reply with quote  
 Post subject:
PostPosted: Tue Apr 22, 2014 10:13 pm 
User avatar

Location: #RDG, UK
Service Number: A11/TQ1.0.42140E1
Country: United Kingdom
Looking good!
Weathering's something that's in my near future too, the powdered charcoal may be a route I'll be going down...

Cheers,
Doug

_________________
A11/TQ1.0.4214
Sgt Doug Phillips
69th Regt. 1st Batt. Homer’s Heroes

"If it doesn't get you dirty, it's not worth doing."


Top
 Profile  
Reply with quote  
 Post subject: Re: ~95% Scratch Built Armor (re-vitalization project page 4
PostPosted: Thu Apr 24, 2014 2:44 pm 
THAT guy
User avatar

Location: Virginia
Service Number: A03/TQ2.0.02146E1
Country: United States
Thanks guys.

Tried to get some photos of the "finished" version 2.1 but it was a bit dark outside. Without the flash its dark and grainy, and with the flash it was washed out. Can't win! But here are the least horrible of the images.

I have Spats BDUs on the way, but unfortunately they won't be here in time for the Expo. I will be running under armour at least one day. For the other I am considering using my service C shirt... (its got a manderined collar and patches at least).

Under armour style...
Attachment:
CAM00377.jpg
CAM00377.jpg [ 132.24 KiB | Viewed 5307 times ]

Attachment:
CAM00378.jpg
CAM00378.jpg [ 123.15 KiB | Viewed 5307 times ]


Service C style...
Attachment:
CAM00396.jpg
CAM00396.jpg [ 106.74 KiB | Viewed 5307 times ]

Attachment:
CAM00390.jpg
CAM00390.jpg [ 135.31 KiB | Viewed 5307 times ]

Attachment:
CAM00397.jpg
CAM00397.jpg [ 175.7 KiB | Viewed 5307 times ]


Top
 Profile  
Reply with quote  
 Post subject:
PostPosted: Sun Apr 27, 2014 11:39 pm 
User avatar

Location: long island , NY
Country: United States
Looking good ! Great paint job!

_________________
Cpl Matthew Rendar. M56 smart gun operator. 2nd bat 7th colonial marines "Rendars Raiders "
Image


Top
 Profile  
Reply with quote  
 Post subject: Re: ~95% Scratch Built Armor (re-vitalization project page 4
PostPosted: Fri May 02, 2014 10:44 pm 
User avatar

Service Number: A10/TQ1.0.82246G1
Country: United Kingdom
WOW!!! That is an awesome job and you look the part too! you've used some fantastic material to fabricate a truly amazing set of armour. :delta:


Top
 Profile  
Reply with quote  
 Post subject: Re: ~95% Scratch Built Armor (re-vitalization project page 4
PostPosted: Fri May 02, 2014 11:06 pm 
User avatar

Country: Germany
Great job! I almost can't believe you've build this all from scratch! Your custom action figures are impressive and this is even more amazing.


Top
 Profile  
Reply with quote  
 Post subject: Re: ~95% Scratch Built Armor (re-vitalization project page 4
PostPosted: Sat May 03, 2014 1:17 am 
THAT guy
User avatar

Location: Virginia
Service Number: A03/TQ2.0.02146E1
Country: United States
Thanks guys! I am still holding out hope someone's camera captured some images from my last (and only!) drop. My own camera was dead. If they didn't get any, unfortunately I wont have good pics until the gear is back on the mannequin. Oh well, fingers crossed.


Top
 Profile  
Reply with quote  
Display posts from previous:  Sort by  
Post new topic Reply to topic  [ 94 posts ]  Go to page Previous  1, 2, 3, 4


You cannot post new topics in this forum
You cannot reply to topics in this forum
You cannot edit your posts in this forum
You cannot delete your posts in this forum
You cannot post attachments in this forum

Search for:
Jump to: