The discussion of the Alien series of films and the props used in them is the aim, but if it's got Big Bugs and Big Guns, then they are welcome too!


Post new topic Reply to topic  [ 340 posts ]  Go to page Previous  1 ... 6, 7, 8, 9, 10, 11, 12 ... 14  Next
Author Message
 Post subject:
PostPosted: Sat Apr 20, 2013 12:30 pm 
Nice work Charlie. Mags turned out nice. Where did you pick up the grenade box?


Top
  
Reply with quote  
 Post subject:
PostPosted: Sat Apr 20, 2013 9:22 pm 
MODEL 120-A2
User avatar

Service Number: A04/TQ0.0.72178E5
Country: United States
Ordered it from midwayusa.com. I got the 25 round box and the two five round boxes that I used in building the case.

Charlie

_________________
"There is a clause in the contract which specifically states any systematized transmission indicating a possible intelligent origin must be investigated. On penalty of total forfeiture of shares. No money."


Image


Top
 Profile  
Reply with quote  
 Post subject:
PostPosted: Sat Apr 20, 2013 11:03 pm 
Nice. I may pick one up...but I'm starting to run into problems with finding spots to put everything.


Top
  
Reply with quote  
 Post subject:
PostPosted: Mon Apr 22, 2013 1:55 pm 
MODEL 120-A2
User avatar

Service Number: A04/TQ0.0.72178E5
Country: United States
Minor update: got my name stencils from Mike Rush. I got the actual stencils and a set of the precut vinyl letters. Excellent quality and a reasonable price. And a handy info sheet on the armor placement as well!

The paintjob on the grenade box came out ok. I need to sand it again with 600 grit; there are still some initial sanding and cutting lines in it. I went over it a wet sand; I think one more coat of paint and it will be ready for some stickers. I just need to design some labels that I think are appropriate. I don't care for the SA big white lettering. I would like to do a green/yellow label but I don't think I can match the green colour easily on my printer. :( I will also need to redo the interior foam. I think I will swing by Joanns on day off and see if I can find a suitable piece I can cut and shape.

Charlie

_________________
"There is a clause in the contract which specifically states any systematized transmission indicating a possible intelligent origin must be investigated. On penalty of total forfeiture of shares. No money."


Image


Top
 Profile  
Reply with quote  
 Post subject:
PostPosted: Mon Apr 22, 2013 3:19 pm 
Dirty Bird
User avatar

Location: San Diego CA
Service Number: A07/TQ0.0.82154E1
Country: United States
the mag came out dame nice. i would like to do that to mine. which i might do some point soon.....keep up the great work.,

_________________
SGT Chris Kraemer "BIRD"
S/N: A07/TQ0.0.82154G1 Sgt Kraemer

Image


Top
 Profile  
Reply with quote  
 Post subject:
PostPosted: Wed Apr 24, 2013 4:10 pm 
MODEL 120-A2
User avatar

Service Number: A04/TQ0.0.72178E5
Country: United States
And a wee bit of an update today. I got a box in the mail yesterday full of these:

Image

Which remarkably enough, fit quite well on these:

Image

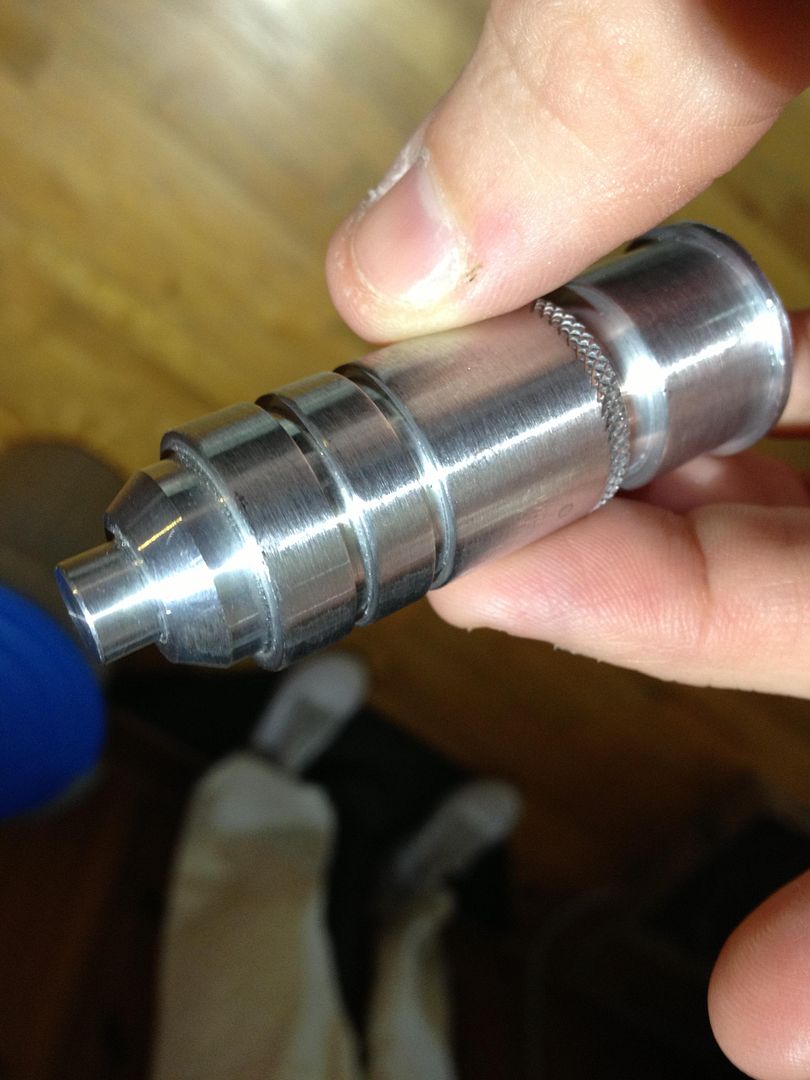
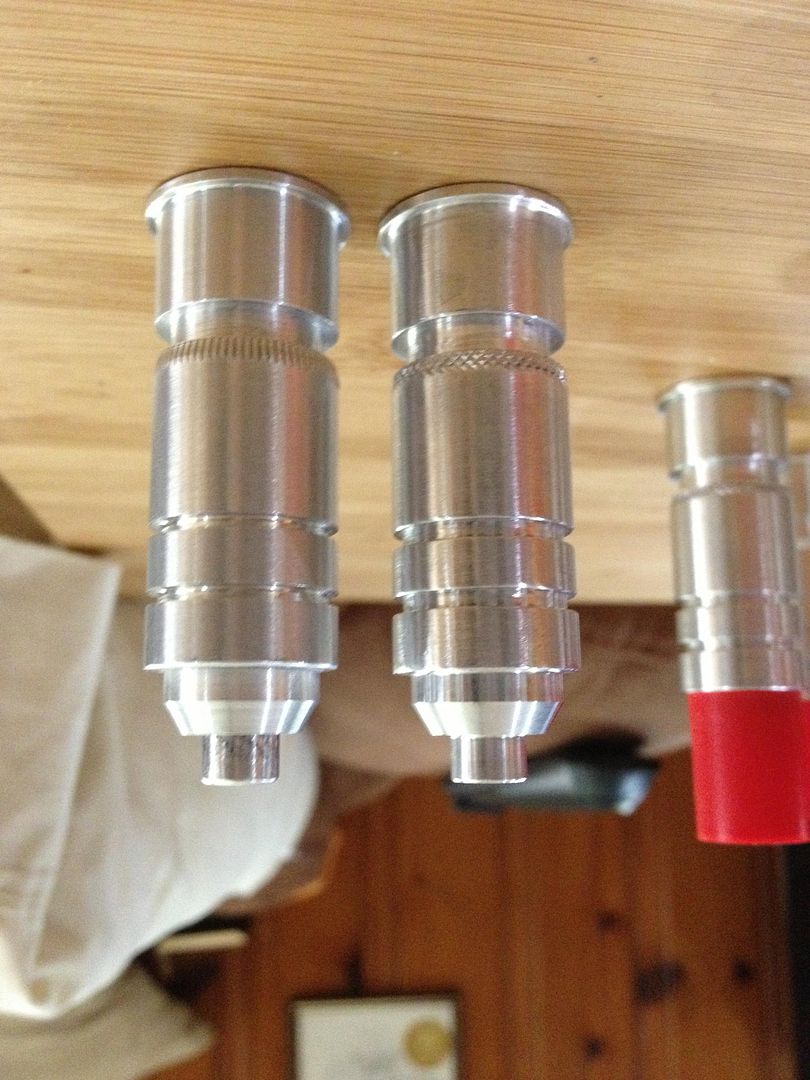
The machine shop did a great job. Here are some details:

Image

The knurl pattern is not screen accurate. They didn't have the proper tooling to do the vertical cuts, but they did have the ability to do the checkered. It's ok by my, and it makes them a little different. I like it. There is also NO moving parts; it's a solid milled piece of aluminum. Cost was a factor in this; adding the moving detonator was out of my reach. Since it will be for static displays, either in the case, in the PR, or on my straps, I wasn't worried. I do have one SD grenade that has the spring loaded detonator, should I choose to do an "action pose."

The base is drilled out for a 1/8 hole inside the larger hole. I can either put a brass rod or a spent shotgun primer in there to simulate the "real" primer. I would have had the shop do it, but it almost doubled the cost for them to cut and add the brass rod. I can take care of that myself.

Image

Sideview:

Image

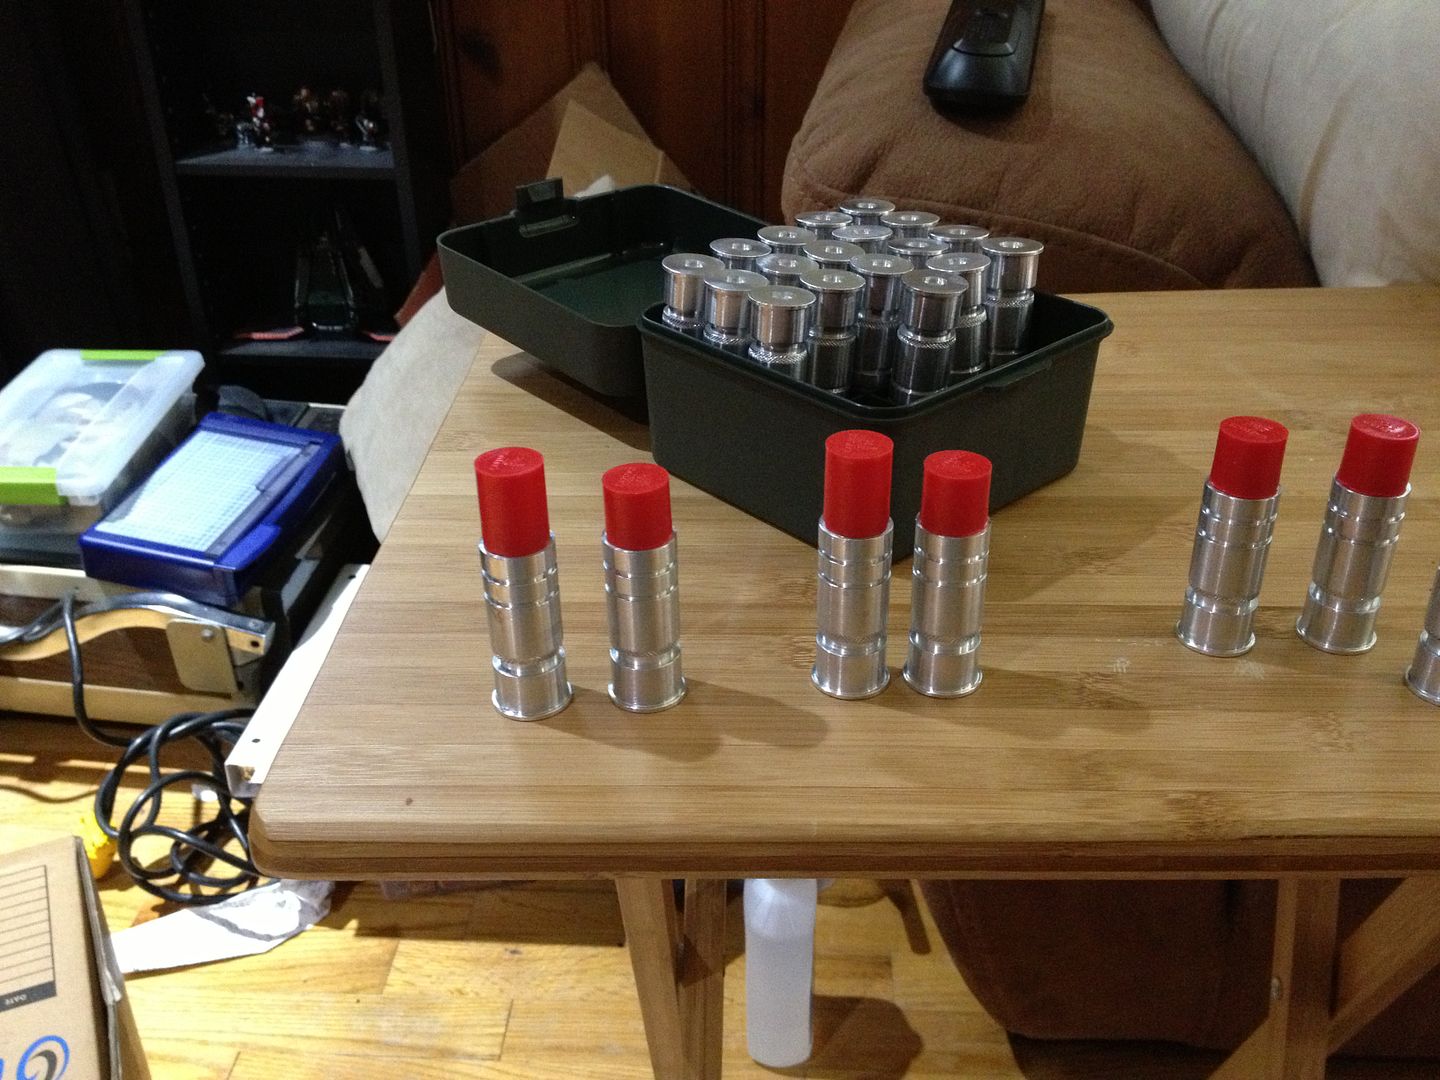
Here it is with cap installed:
Image

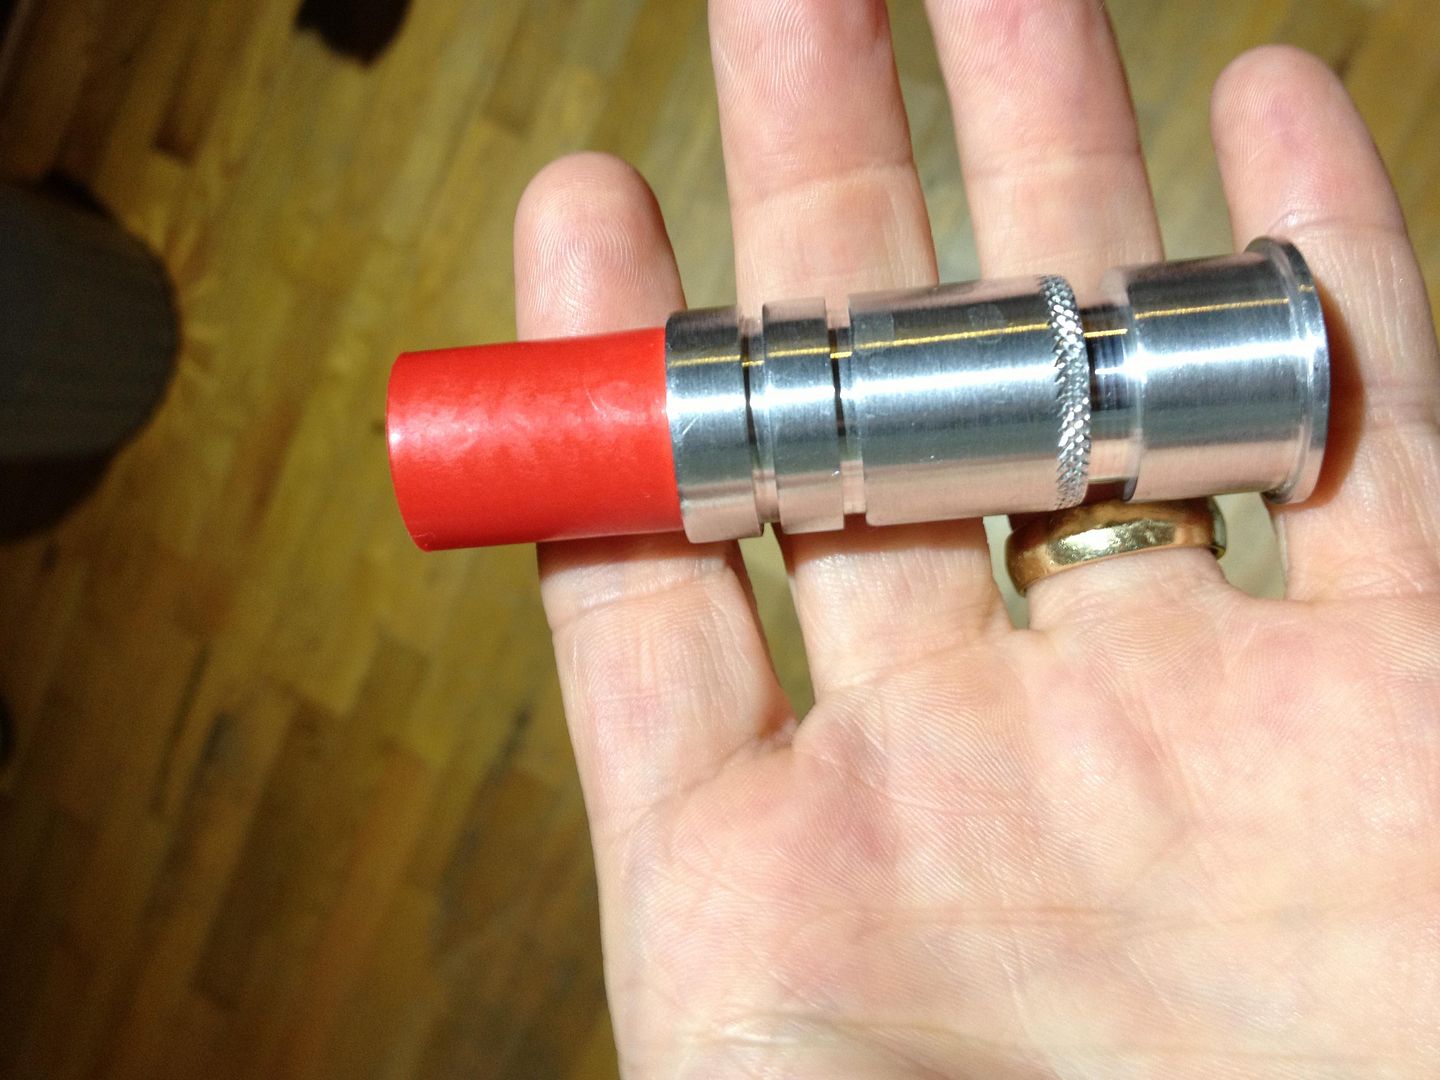
The cap is too tall. Unavoidable; took me forever just to get someone to sell me the cap outside of 1000 count boxes. The important thing for me was the diameter and the colour. I can cut the tops to fit.

Image

Here is my grenade next to an SD Studios one:

Image

Image

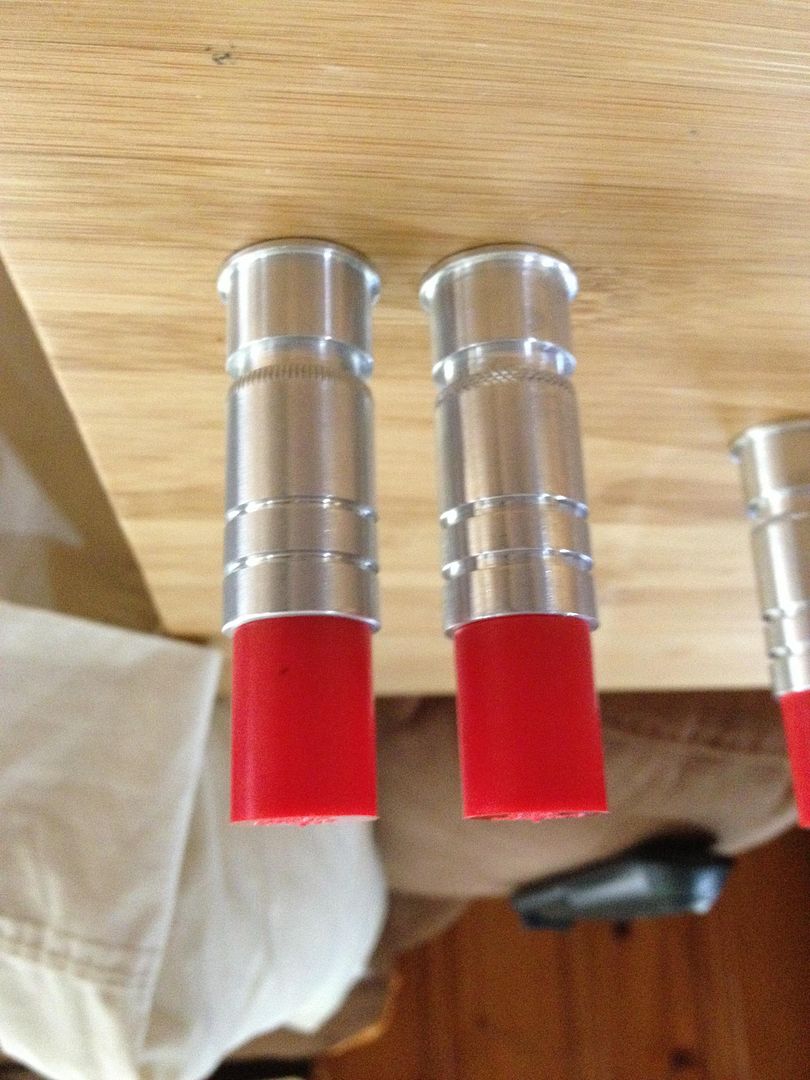
I used my thermocutter (one of the most awesome tools I have invested in) to take off 1/4" from the bottom of the caps. I only did 10 as a test (I have 50 of the caps, seemed like a good idea to order some extra to play with, and they were $0.07 apiece). Here is a cut and noncut cap next to each other.

Image

The cuts were made by hand using the simple guide on the thermocutter. I think I will use a 5/8" dowel and roll the caps on the heated wire. I think this will improve the cut and make it more even.

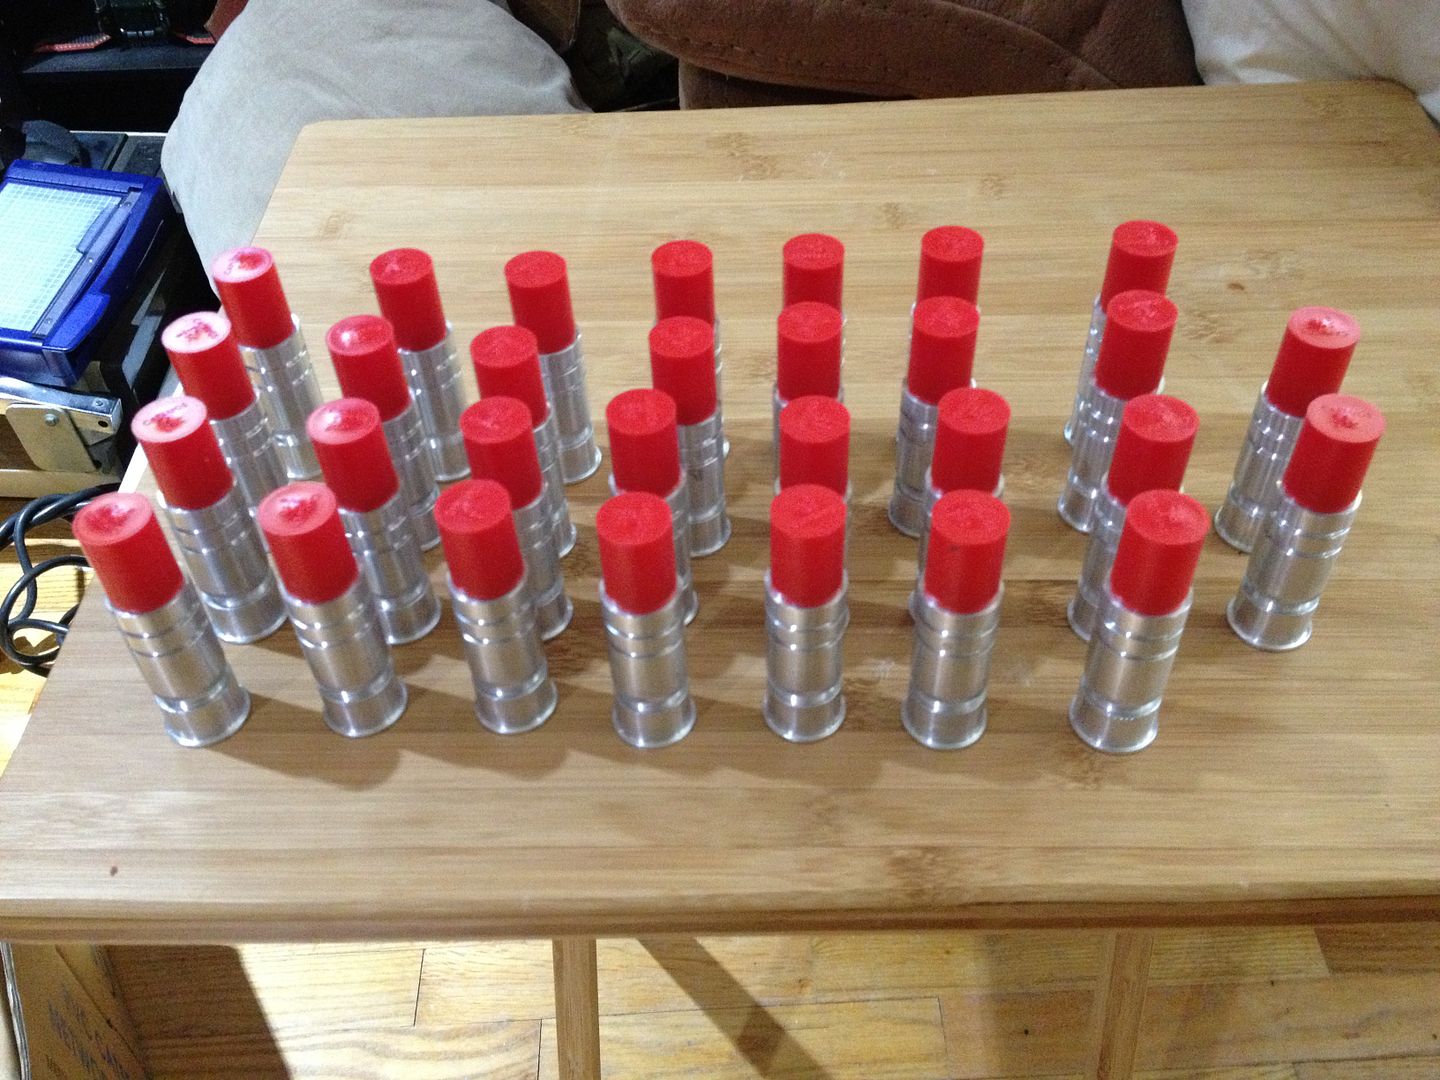
This is my grenade box, with the uncut capped grenades. They area little loose. The cut ones fit a bit better, but still wobbly. I plan on adding a thin layer of padding (probably black or green craft foam, if I can find it) to interior grid. Once that is done they should be much more stable.

Does anyone know the screen size length of the cap? I think it is 13.9mm (about .5") but I am not sure.

Charlie

_________________
"There is a clause in the contract which specifically states any systematized transmission indicating a possible intelligent origin must be investigated. On penalty of total forfeiture of shares. No money."


Image


Top
 Profile  
Reply with quote  
 Post subject:
PostPosted: Wed Apr 24, 2013 5:09 pm 
Damn...those are solid!!!! (pardon the pun)


Top
  
Reply with quote  
 Post subject:
PostPosted: Wed Apr 24, 2013 6:26 pm 
User avatar

Location: Kentucky USA
Service Number: A03/TQ1.0.12132E1
Country: United States
Those grenades look fantastic! Who did them and how much did it cost? You can PM me if you want. You should have them do a run for us who lack the skill to make them. I would throw one of those in my PR so I could keep my one SD out to play with!

_________________
viewtopic.php?f=4&t=12784
viewtopic.php?f=4&t=12917


Top
 Profile  
Reply with quote  
 Post subject: Re: Charlie's Colonial Marine Build
PostPosted: Wed Apr 24, 2013 7:11 pm 
reload
User avatar

Location: Hamburg
Service Number: A03/TQ3.0.12136E1
Country: Germany
2nd that, they do look fantatsic. And even better: Mass production.

_________________
Sgt. Frank Peters 'reload' Smartgun Operator
A03/TQ3.0.12136E1 "It will be no picknick!"
AL Colonial Admin. - Sergeant at Arms (SgtA) -- 2020-2022
GERCM - Executive Officer (XO)
UKCM Foreign Legion: The Deviant Dragoons


Top
 Profile  
Reply with quote  
 Post subject:
PostPosted: Thu Apr 25, 2013 3:37 pm 
MODEL 120-A2
User avatar

Service Number: A04/TQ0.0.72178E5
Country: United States
Well I have started working on the caps. I took a 5/8" dowel and inserted it into the cap. I then rolled the cap along the edge of the thermocutter. This scored the cap at the correct depth for the grenades.

Image

Image

Once it was scored, I took a sharp razor blade and cut through the plastic to the wood.

Image

It worked fairly well. A few came out a little iffy and required some manual trim, but for the most part it gave a clean edge and the grenades all look the same height.

I've also had to do some mods to get the grenades to fit inside the case correctly. If you'll remember, I used MTM 5 round shotgun shell cases for the PR case. Worked great using the shotgun rounds; the grenades, even with the shortened caps, stuck up too much and rattled around. I wanted them to sit deeper in the case. So I took out the band saw and removed a thin section of the bottom (about 1/8"). It looks like this now.

Image

Image

The grenades fit the case now, with no rattle. However, because of the foam layer, they wouldn't seat right. So with the help of an inventive friend of mine, I made a circular foam cutter. We took a 5/8" copper pipe fitting, sharpened the end, and put it on a dowel rod.

Image

I put the case inside the foam, put the copper dowel inside the case, pushed down and rotated. Wound up with this:

Image

Worked perfectly; the grenades sit tight and flat inside the case with no wobble.

Image

I still have the same wobble problem with the MTM 25 round box. To correct that, I got some black craft foam (the thin kind, I think it is 2mm?) The opening in the box for the grenades to sit in is a 3/4" square.

Image

So I cut a strip of the craft foam just under 3/4" (I took off 1/8").

Image

I then cut that into smaller squares using a razor edge. I didn't bother using the straight edge to hold it down and make perfect squares; they will sit well below the top of the grid and can't be seen with the grenades in at all.

Image

A little bit of super glue and they are held in place. It will let the grenades sit with no wobble. (I tested one square already).

Charlie

_________________
"There is a clause in the contract which specifically states any systematized transmission indicating a possible intelligent origin must be investigated. On penalty of total forfeiture of shares. No money."


Image


Top
 Profile  
Reply with quote  
 Post subject:
PostPosted: Thu Apr 25, 2013 4:11 pm 
Dirty Bird
User avatar

Location: San Diego CA
Service Number: A07/TQ0.0.82154E1
Country: United States
those gernades are very pretty i would love to find a shop here is San Diego to make some real metal ones. very nice score.

_________________
SGT Chris Kraemer "BIRD"
S/N: A07/TQ0.0.82154G1 Sgt Kraemer

Image


Top
 Profile  
Reply with quote  
 Post subject:
PostPosted: Thu Apr 25, 2013 5:28 pm 
MODEL 120-A2
User avatar

Service Number: A04/TQ0.0.72178E5
Country: United States
Well my plan for the small pieces and superglue did not work out too well. The grenades kept pulling them off. Luckily I only had about 2 or 3 of the grid pieces done before I realized that. So, I cut a new strip at 3/4" wide and then sectioned it into 2" pieces.

Image

Image

I then folded the 2" piece in half.

Image

Heat up the old glue gun and then I hot glued the folded piece over one of the center bars.

Image

I put the grenades in as I did each piece to help force the shape of the foam and the glue.

Image

I cut another strip and used 1 1/4" pieces instead of 2". Those were for the outside cells. Only needed 10 but they are the trickest part. I was thinking about bevelling the edge so the grenade wouldn't snag, but unfortunately I had that thought after I had finished. Ah well, I won't have enough grenades for a full box and all the extra I need for the costume and whatnot so those cells won't get used much anyway. The grenades sit nice and tight with NO wobble at all.

Image

And by nice and tight, I mean TIGHT

Image

Yes, that box is upside down.

Final thing I did was reinstall a grenade in the PR. Orignally, I had a SD Studios grenade, but I took that out so I could get all the measurements when I made my grenades. I put one of mine back in. It was actually easy to do. I reopened the front part of the grenade launcher (since it's build to do it), slide the grenade in, and aligned it to the tube. I just get lifted the rifle back and it slide in place. I eased it out of the ejection port (it won't come out, because the base is too wide, which helped). I held it perpendicular to the GL, outside of the tube, and put a generous amount of hot glue on the mounting bracket. I dropped the grenade back down, moved it a wee bit to get it back in place, and viola

Image

This will save me having to add a brass pin primer to one grenade (every little bit helps) and keeps the SD Studio grenade available.

I still have to do stickers for the 25 round box and find some place that sells brass rods. I thought about using a cleaning rod, but I don't have any that are 3/16". I do have some wooden 3/16" dowels I could cut and paint, but I really want to use metal.

Charlie

_________________
"There is a clause in the contract which specifically states any systematized transmission indicating a possible intelligent origin must be investigated. On penalty of total forfeiture of shares. No money."


Image


Top
 Profile  
Reply with quote  
 Post subject:
PostPosted: Thu Apr 25, 2013 5:43 pm 
Prop Churner Outer
User avatar

Location: Bath, Maine
Service Number: A03/TQ1.0.12143G1
Country: United States
Not a huge deal, but the white stripe on the cap can be done easily with pinstriping. I have more than enough if you would like some. You can still add it to the grenade in the PR, it will just take a bit of careful trimming.

This stuff is looking amazing!

_________________
:delta: My entry-level prop and costume tutorials: viewtopic.php?f=3&t=12751 :delta:


Top
 Profile  
Reply with quote  
 Post subject:
PostPosted: Thu Apr 25, 2013 8:30 pm 
Amazing as usual Charlie.


Top
  
Reply with quote  
 Post subject: Re:
PostPosted: Thu Apr 25, 2013 8:58 pm 
MODEL 120-A2
User avatar

Service Number: A04/TQ0.0.72178E5
Country: United States
retrogarde wrote:
Not a huge deal, but the white stripe on the cap can be done easily with pinstriping. I have more than enough if you would like some. You can still add it to the grenade in the PR, it will just take a bit of careful trimming.

This stuff is looking amazing!


haha! I mentioned pinstriping to my wife when we went out this morning and picked some up on our way home. Thank you for the offer though! I started priming the grenades. It's trying process, but then end effect is worth. I got 36" of 3/16" solid brass at a local RC car shop. I found out that the machine drilled the holes for compression fitting, so the rod is just BARELY too big to fit in. Using a razor knife, I scored the edge of the grenade ever so slightly and then I can hammer the brass pin. No glue or epoxy; it holds fine without it. Pics tonight. In an hour I only got 7 grenades done.

Charlie

_________________
"There is a clause in the contract which specifically states any systematized transmission indicating a possible intelligent origin must be investigated. On penalty of total forfeiture of shares. No money."


Image


Top
 Profile  
Reply with quote  
 Post subject:
PostPosted: Thu Apr 25, 2013 10:15 pm 
MODEL 120-A2
User avatar

Service Number: A04/TQ0.0.72178E5
Country: United States
Well, instead of hammering the pins in, I had thought, if it was cut to be a compression fitting, why not compress it? I used an old metal rule as protective barrier, and put the grenades in my vise. It took some effort, but they go in and best of all end up flat without damaging the outer aluminum.

Image

The hardest part is sanding the pins once they are cut. They are about 5/16" long; it's a real pain (literally) on fingertips.

Here is what they look like:

Image

I have about 20 done, but I'm calling it quits for the night. I am off tomorrow so I will be able to get more done.

Charlie

_________________
"There is a clause in the contract which specifically states any systematized transmission indicating a possible intelligent origin must be investigated. On penalty of total forfeiture of shares. No money."


Image


Top
 Profile  
Reply with quote  
 Post subject:
PostPosted: Thu Apr 25, 2013 10:29 pm 
Charlie, I must applaud you on your level of detail and discipline to get it. You make guys like me drool with envy! You're a true craftsman!


Top
  
Reply with quote  
 Post subject:
PostPosted: Fri Apr 26, 2013 8:56 am 

Service Number: a02/tq2.0.12143e1
Country: Australia
love your work excellent job on the grenades and P/R case


Top
 Profile  
Reply with quote  
 Post subject:
PostPosted: Fri Apr 26, 2013 12:36 pm 
Prop Churner Outer
User avatar

Location: Bath, Maine
Service Number: A03/TQ1.0.12143G1
Country: United States
Absolutely badass. :delta:

_________________
:delta: My entry-level prop and costume tutorials: viewtopic.php?f=3&t=12751 :delta:


Top
 Profile  
Reply with quote  
 Post subject:
PostPosted: Fri Apr 26, 2013 12:39 pm 
Harvester of Sorrow
User avatar

Location: Lancashire (Wirral born)
Service Number: A04/TQ1.0.32156E1
Country: United Kingdom
You should sell those, they look amazing!

Keep it up buddy!

_________________
Image AKA: Simon


Top
 Profile  
Reply with quote  
 Post subject:
PostPosted: Fri Apr 26, 2013 4:00 pm 
MODEL 120-A2
User avatar

Service Number: A04/TQ0.0.72178E5
Country: United States
Ok! All the grenades are primed now. I used the 3/16" brass rod on all of them.

Image

I also put some stickers on the M40 box.

Image

I'm really not happy with the stickers. They look ok, but not they way I wanted them to come out. It was very hard to match the green. I think I will go back and either use just cut vinyl letters, or try to work out some stickers I think will look better. I might give the old black and white a try as well. Green and yellow just don't seem to work out.

I also pinstriped the grenade caps. I'm still not sure about the proper size and placement of the white stripe, but this is good enough for so small of a detail.

Image

So far the only real disappointment I have with the grenades is that the primer is not always perfectly flat with the base. Attempts to sand it down are difficult, since I don't have a power sander it is hard to get it even. I think that if I had a rotating wheel I could get a flat finish and then polish it. It's not a super huge issue, and the grenades still stand up when placed on the base, but some tend to wobble a bit.

I don't want to rush on a fix, as I don't want to damage the grenades. Suggestions are welcome.

Oh, since Spat has been delayed with the armor due to family issues (not a problem, I totally understand) I will be without armor longer than I thought. While it is doubtful I do any drops (thanks to the new job and move, D*C is almost certainly cancelled for me), I do want something more than just BDUs. Luckily, I happen to have an old M69 flak jacket lying around. I ordered some patches from patchesnpins.com (where I got them for my BDUs) so I will make up a USCM flak jacket. My jacket is a real deal one; I'm debating about whether or not I want to lose the ballistic interior or not. I will probably keep it, even though it will be a lot heavier to wear.

Charlie

_________________
"There is a clause in the contract which specifically states any systematized transmission indicating a possible intelligent origin must be investigated. On penalty of total forfeiture of shares. No money."


Image


Top
 Profile  
Reply with quote  
 Post subject:
PostPosted: Fri Apr 26, 2013 4:55 pm 
User avatar

Location: Sunny Cornwall
Country: United Kingdom
Charlie... I doff my cap to you sir.

That's superb.

_________________
You don't have to be pitilessly sadistic to work here.... But it helps.
http://www.chefs-creations.co.uk/shop/index.php/colonial-marine

http://www.kgbairsoft.com/wordpress


Top
 Profile  
Reply with quote  
 Post subject:
PostPosted: Fri Apr 26, 2013 5:19 pm 
Dirty Bird
User avatar

Location: San Diego CA
Service Number: A07/TQ0.0.82154E1
Country: United States
for the vest its ur call. i know talking to Outcry last year at comic con he took his out do to wieght and heat. and My wife has gotten the Britich one with padding still inside and it does add a bit of wieght and also does make you over heat alot. but ethier way is fine its just how you want to run. and still luv this build and will be stealing alot of idea's from yeah.

_________________
SGT Chris Kraemer "BIRD"
S/N: A07/TQ0.0.82154G1 Sgt Kraemer

Image


Top
 Profile  
Reply with quote  
 Post subject:
PostPosted: Fri Apr 26, 2013 6:11 pm 
Charlie, for your primer issue. When you compressed the grenades...was it a matter of some of the pieces of brass rod being too tall, and thus sticking out? Or could they have gone in deeper into the recess a bit?

If it's a matter of them being too long, then you're kind of pooched. Carefull sanding/filing is your only option (dremel maybe?). If not, and there is still room for them to be compressed more, then I would use a second piece of rod to butt up against the primer piece when you compress them in the vice. The extra length of rod should be enough to get the primer flush with the grenade base, and then you can just pull off the loose piece of rod.


Top
  
Reply with quote  
 Post subject:
PostPosted: Fri Apr 26, 2013 8:12 pm 
MODEL 120-A2
User avatar

Service Number: A04/TQ0.0.72178E5
Country: United States
The problem with the grenade primers, more than anything else, was uneven cuts. I had to cut the brass rod by hand; even though I was using the band saw, it was hard for me to get them level. But I have solved the problem. It involved my dremel, 320 grit sandpaper, 600 grit sandpaper, and a polishing wheel. I used the dremel to roughly even the primer end. Then I used the 320 to wear it down even with the base. The 600 smoothed it all out, and the polish wheel removed most of the sanding marks. They look pretty good and everything is even now. My fingers and arms are killing me though. :)

Here they are after polishing. I don't know if you will be able to tell the difference from the first pictures, but there is a definite change when you hold them.

Image

Charlie

_________________
"There is a clause in the contract which specifically states any systematized transmission indicating a possible intelligent origin must be investigated. On penalty of total forfeiture of shares. No money."


Image


Top
 Profile  
Reply with quote  
Display posts from previous:  Sort by  
Post new topic Reply to topic  [ 340 posts ]  Go to page Previous  1 ... 6, 7, 8, 9, 10, 11, 12 ... 14  Next


You cannot post new topics in this forum
You cannot reply to topics in this forum
You cannot edit your posts in this forum
You cannot delete your posts in this forum
You cannot post attachments in this forum

Search for:
Jump to:  
cron