Finally got round to pulling apart my Reflecta as part of a shoulder lamp build, so I thought I'd post up some disassembly pics (as I've not seen a guide on here).
Forgot to take a pre-disassembly photo, so here's one pulled from the interwebs
Attachment:
 01_Reflecta 3002 Video Lighting Lamp.jpg [ 50.81 KiB | Viewed 1186 times ]
Taking the lamp apart is fairly straightforward. You will need -
- a small blade screwdriver
- a pair of pliers,
- a small adjustable spanner/crescent wrench
- and possibly side cutters /knife (depending on if you care about saving the lamp electrics).
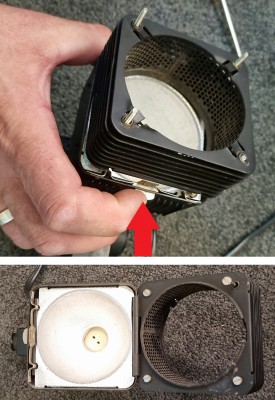
First, remove the four locking nuts [red arrows]. Once the nuts are off, the 'rod holders' [yellow arrows] will separate into two parts, and shade covers can be removed, as well as the top cover, the glass lens, and four spacers rings.
Attachment:
 02_20220121_105847.jpg [ 1.15 MiB | Viewed 1186 times ]
The top cover [blue arrow], the glass lens [green arrow], and four spacers [yellow arrow] are all shown removed here. The next set of nuts [read arrows], can now be undone (these were finger tight, and were easily removed without the need of tools.
Attachment:
 03_20220121_110045.jpg [ 1.36 MiB | Viewed 1186 times ]
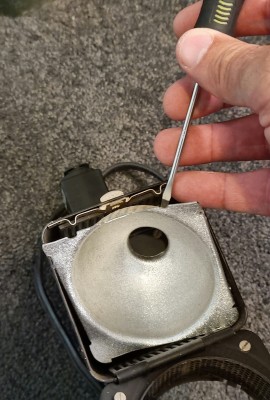
Push the silver button [red arrow] on the underside of the lamp head to open. The bolts can now be removed (or left in place ... I removed mine as they were loose).
Attachment:
 04_20220121_110323.jpg [ 1.36 MiB | Viewed 1186 times ]
My lamp didn't come with a bulb, but I'd imagine this would be a good time to remove the bulb, should yours have one installed.
The internal reflector is very soft aluminium, and I was easily able to pry this out of the housing with my screwdriver. Note, this did bend the reflector, but once out of lamp, it was simple enough to bend back into place (although, I don't actually have a use for it yet ... )
Attachment:
 05_20220121_110524.jpg [ 1.18 MiB | Viewed 1186 times ]
Loosening these four bolts [red arrows] partially releases the top housing from the back housing's bolt holes [yellow arrows]. The wiring, and a super annoying sliding metal bar trap these two parts together (for now).
Attachment:
 06_20220121_110541.jpg [ 1.36 MiB | Viewed 1186 times ]
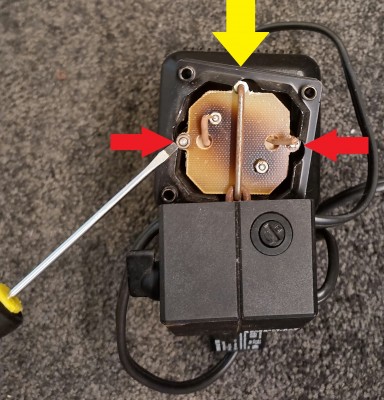
Here you can see the two wires [red arrows], which I choose to cut, and the metal bar [yellow arrow]. To remove
without damaging the electrics, you could possibly try and access the two little nuts, one of which is just visible about the yellow arrow (shown in more detail in pic #10).
Attachment:
 07_20220121_111220.jpg [ 1.17 MiB | Viewed 1186 times ]
Removing these two nuts [red arrows] allows the whole top housing to be removed [yellow arrow].
Attachment:
 08_20220121_111713.jpg [ 1.08 MiB | Viewed 1186 times ]
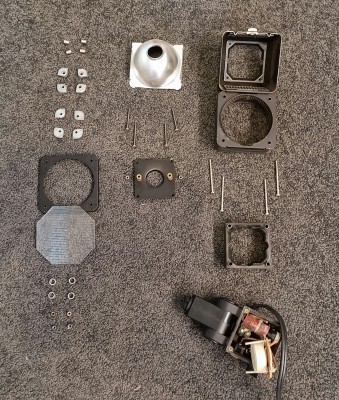
Semi-exploded view of the lamp parts (roughly in order of removal, from top left to bottom right) -
Attachment:
 09_20220121_111852.jpg [ 1.15 MiB | Viewed 1186 times ]
The nuts [red arrows] holding the evil metal bar in place ... nuts removed [Oo-er], and bar can be taken out.
Attachment:
 10_20220121_111902.jpg [ 1.39 MiB | Viewed 1186 times ]